YaQuiz is a free open-source quiz extension for Joomla 5 developed by Kevin Olson for this website, Kevin’s Guides.
You can use it to create review quizzes, tests, exams, etc. on your Joomla 4/5 powered website with relative ease.
Currently, this extension supports creating, editing, and displaying quizzes along with basic grading/user feedback. You can also save general stats, like the average user score on a quiz and the number of submissions.
Individual user scores may now be recorded. However, the user must be logged in.
You can view user results for any quiz from the admin panel.
While this project is not yet complete, it appears stable and should be safe to run on production sites.
Simply create your questions, add them to quizzes, and post them to your site.
If you find this extension useful, please consider leaving me a tip or purchasing a subscription to my site. Thanks.
Need Help or Customizations?
Please leave a comment at the bottom of this page for general support. For more specific support, please contact me via the site contact form.
If you would like to provide translations, simply reach out or make a pull request.
Question Types
Currently, YAQ supports 3 types of questions.
Multiple Choice
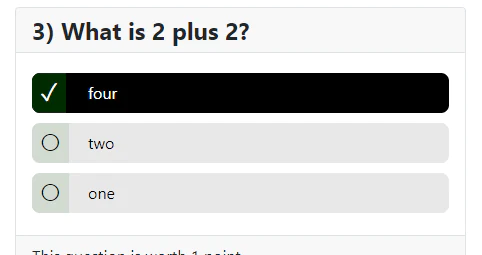
The standard type of question. A user selects from one of several predefined options and gets points for selecting the right one. There can only be 1 selected right answer at this time.
True/False
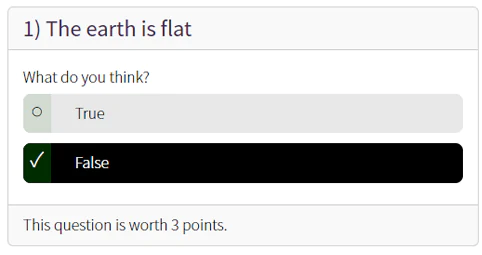
Nearly identical to multiple choice, but with only true/false options.
Short Answer
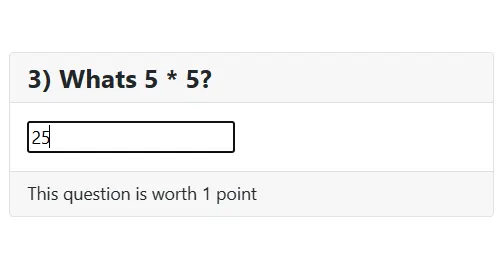
The user types an answer in a textbox. If it matches any of the predefined answers, it is counted as correct.
Records/Results
You can set quizzes to save user results. Users may view their results on the front end. A similar option exists on the admin side to view anyone’s results.
Global Component Options
You may access the global component options from the “Component Settings” option in the toolbar, or through the site global configuration.
First Tab… YAQuiz
The first tab contains a few general settings, like the overall quiz theme (styling – colors, basic layout, and such…)
You can record hits and submission counts. Note if caching is enabled your hitcount will probably be off.
Global Options
These are options that apply to all quizzes. The quiz access level is the default access level for a quiz, it can be overridden at the quiz level.
Randomize Multiple Choice… just shows the multiple choice question responses in random order.
Load MathJax loads MathJax, which is a JavaScript library that renders MathML/LaTeX equations. So if you’re doing a lot of math problems, you’ll probably want to learn how to use this.
Language
Here you can set a few basic language/text display options without having to manually edit or override the language files.
Permissions
The only permissions the component really respects at the moment are delete and edit permissions. If a group is allowed to edit, they can create, modify, save any quiz/question in the extension. If they have delete permission, they can delete any quiz or question.
How To Use – Categories and Questions
Create Categories
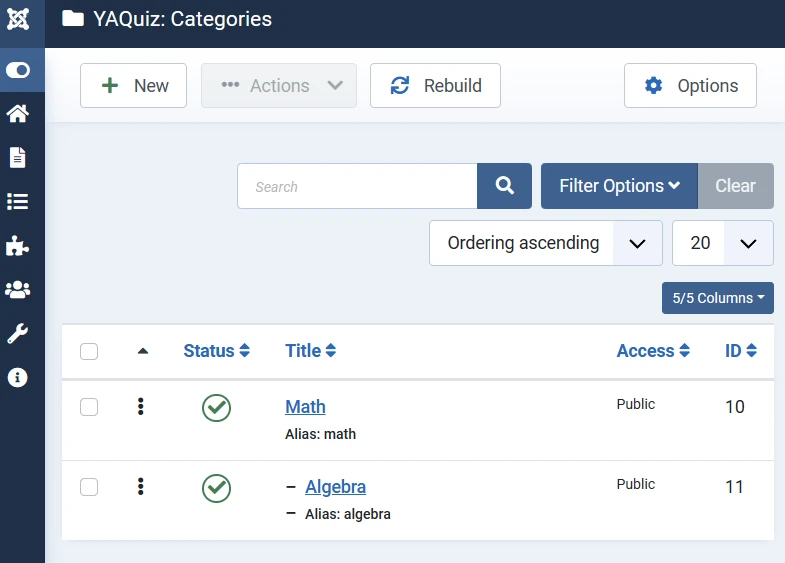
Quizzes and questions can be sorted into categories. This is optional. If you only have a few questions and quizzes, you might not need to use categories. If you plan on creating many quizzes, you’ll want to use categories to easier filter through your questions when you go to add them to the quizzes, or it may be difficult to find the questions you’re looking for.
Categories have no bearing on the quizzes or questions themselves. They’re just an organizational tool to help filter your questions and quizzes in the backend.
I created the category system using the default Joomla com_categories – so there are additional fields and options for things like a description, alias, layout, publishing, etc… all these fields have no bearing on YAQuiz. You can ignore them. The only relevant field is the category name itself.
Categories are shared between Quizzes and Questions. So if you create a “Math” category, you could put all your math quizzes and math questions in the same category.
You can create subcategories, but note that filtering only works by the current category. The filters are not currently set up to filter through a category and its subcategories. So if you have an “Algebra” category as a subcategory of the “Math” category – you have to go to the “Algebra” category to see the algebra questions, going to the “Math” category won’t show the questions or quizzes in the Algebra category, too. They’re separate things.
Create Questions
Next, create some questions you want to put on a quiz. You can also create the quiz first if you want and add questions later if you want.

Open the questions manager and use the “New Question” button to create a question.
The question field is the question itself. Basically, the title of the question. Try not to make this area too long. If you have a lot of details you want to add, add them to the editor below.
You can add any images, lists, HTML, etc. to the details field. This will be displayed below the question title and above the user response fields.
You need to set the question type. Once you save a question the first time, you cannot change the question type. For example, if you select “true/false” and actually wanted to use a short answer question, you need to delete the old question and make a new one.
Points
Optionally, you can have different point values for different questions. By default, the points system is turned off for quizzes and each question is worth the same amount of points (1). If you want to make harder questions worth more points, this is where you start. If you don’t plan on using points, you can ignore this.
Possible Answers
Once a question is saved, you’ll be shown fields that allow you to add/edit the correct answers for the question.
For multiple-choice questions, you type all the possible answers, and select the correct one by marking it as correct. The answer option will turn green when you do this. Be sure to save.

For true/false, just select if the correct answer is true or false using the radio buttons.

For short answer questions, you need to decide if the answers are case sensitive. Usually, you probably don’t want case sensitivity turned on. Enter all the possible answers you want to count as correct.
For example, if you want the answer to be “New York City” you might enter the possible answers as “new york city” “new york” “newyork city” and “nyc” – if the user types any of these they get full points for the question. If they type anything else, it’s counted as wrong. Try to think of what a user might end up typing here – check for knowledge, not for semantics!

General Tips: Be specific about your questions, avoid trick questions, and avoid any ambiguity.
Question Feedback
You can provide individualized feedback for each question. This will be displayed if the “show feedback” option is turned on for the quiz. If you leave these fields blank, it will just say correct or incorrect.
For example, if a user gets a question wrong, you can show feedback explaining why the correct answer was different.
Quiz Manager
Once you’ve created some questions, you need to create a quiz to hold them all. Click “New Quiz” under the “Quizzes” page to add a new quiz.
Name the quiz and provide a basic description. This description is shown to users before they start the quiz. You can explain what the quiz is about, how many questions it has, and how it’s graded here.

There are several other options available for each quiz…
- Display Mode
- Default – Single Page – All questions are shown together on one page.
- Multi Page / Individual Questions – All questions are shown individually, on their own separate pages. Note that this is probably the least performant option, since the user must wait for each page to load when answering each question.
- JavaScript Quiz
- This is like the multi page quiz, but all the processing is done on the client/user PC with JS rather than by submitting a form and checking it against answers in the database. This option can be fully cached and is probably the fastest, least server intensive option. However, you won’t be able to save user results or statistics with this option at this time.
- All the answers to each question are exposed in the page’s source code when you use JS mode. So tech savvy users could easily figure out all the answers before submitting the quiz. This is fine for review quizzes, but might make it inappropriate for any professional or institutional use.
- JavaScript Instant Review
- This works similarly to the standard JS Quiz. However, it provides instant feedback for each question. So a user answers a question, and immediately sees if they got it right or wrong. Instead of waiting until the end of the quiz.
- Results are not saved to the database and answers are exposed in page sourcecode, so not recommended for professional testing purposes. Review only!
- Store Quiz Results
- This allows you to save quiz attempts to the database. You can collect information such as number of attempts, number of passes, etc.
- You may also collect individual user scores and attempts, and allow users to view their results
- There are 3 levels of recording available, each additional level requires saving more info to the database
- 0 – Don’t save any results
- 1 – Save general results – This only saves things like # of attempts and the average of all the scores submitted
- 2 – Save individual results – Records all quiz attempts and saves the overal final grade from each attempt
- 3 – Save everything – Records everything, including which answers the user selected and what they got right or wrong
- Note that quiz results are stored AS THEY ARE when the user submits a quiz. If you modify the quiz later, add or change questions, the recorded results will still be the same as they were when the user originally took it.
- Display quiz feedback
- Allows the user to review all their answers and see what ones they got wrong, along with any custom feedback set at the question level
- Show Correct Answer
- This automatically adds the correct answer(s) if applicable to the feedback page. For example, if the user gets a question wrong, it will tell them what the right option was.
- Number Questions
- Numbers questions starting from 1 and displays this to the user
- Use Points System
- If yes, each question will be worth its point value when correct. If no, each question is worth the same amount – one point.
- Passing Score
- The percentage required to pass the quiz. For example, if set at 70, the user must get 70% of the questions (or points) to pass the quiz.
Adding Questions to Quiz
Once you save a quiz, you can add questions to it from the quiz details page. A tool on this page allows you to filter through the entire question pool and add the questions to your quiz.
Just select the question(s) you want to add from the list and click add questions.
You can reorder questions once they’re added to the quiz by dragging and dropping the questions or by using the order up/down buttons.
Note, you can add the same question to multiple quizzes if you want. If you change or delete that shared question later, it will be changed across all quizzes it’s a part of.
Removing a question from the Quiz on the Quiz Details page does not delete the question entirely, but it does remove it from appearing on the quiz.
Display Quiz
You can display the quiz on the front end for users to complete by either copy/pasting the link provided, or by creating a new menu item of type “YAQuiz” and setting the Select Quiz options under the menu item.
Viewing Results
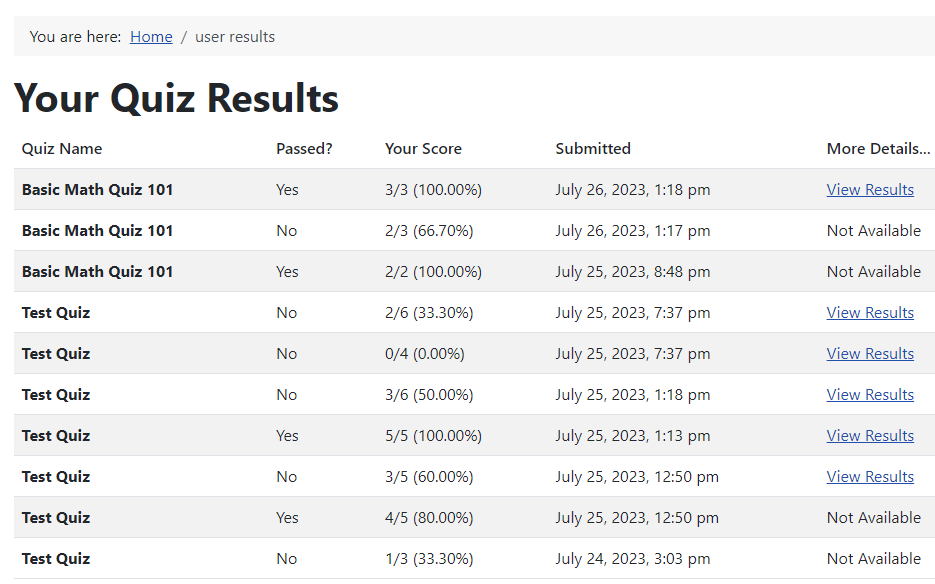
You may let your users see all the quizzes they have taken and the scores they got by adding the “User Results Page” menu item somewhere on the site.
From the front end, users can only see the quizzes they took themselves. Quiz recording must be set to level 2 or 3 for this to do anything.
All results may be viewed from the backend by navigating to any quiz and clicking the “Results” button in the toolbar. This button is only visible if you set recording to level 2 or 3. You may control who can view results from component permissions.
Timers
You may set quizzes to be timed, so users have to complete them within a fixed window. For timers to work, you must set “Use Quiz Timer” to yes and then set a duration in minutes in the quiz settings.
Timers only work for logged in users. If you enable timers, the quiz will automatically be restricted to logged in users. Guests will be denied access to the quiz if timers are enabled.
Timers work with any level of individual result saving. However, for best results, I suggest using “Store Quiz Results” level or 2 or 3. This will allow you to see both the start and end time of each quiz.
For one-page quizzes where all questions are on the same page, a new page will be shown before the questions with a start button. The quiz timer begins when the user hits the start button.
For multiple page quizzes, the timer starts once the user goes past the first page.
If a user leaves a quiz without completing it before the timer goes off, they may return and finish the quiz attempt, as long as the timer has not expired.
If the user is still on the quiz page and runs out of time, the app uses Javascript to submit the quiz automatically. Any unanswered questions are automatically entered as blank, so they should be marked incorrect.
If the user completely leaves the page without submitting the quiz, none of their questions will be saved or graded, including any they may have started. It counts as a 0/100.
The system waits 15 seconds past the time the quiz expires to accept any submissions from the user. So if they are on a very slow connection, the system can still get their results.
The timer dialog turns red and flashes smoothly during the last minute before it timer expires.
- Suggested Settings For Timed Quizzes
- Set access level to Registered
- Set Display Mode to “Default” or “Individual” – JS Quiz does not work.
- Set a maximum attempt count of your choosing
- Set Store Quiz Results to 2 or 3
- Set Use Quiz Timer to Yes
- Set a Quiz Timer Limit – I’d suggest anything from 5 minutes to 2 hours. Technically it accepts partial minutes, like 0.5 minutes would be 30 seconds. However, this is likely too short for most use cases. I would use 2 minutes as an absolute minimum unless you’re just testing.
Certificates
Certificates are an unstable feature and may not generate properly on many servers, yet.
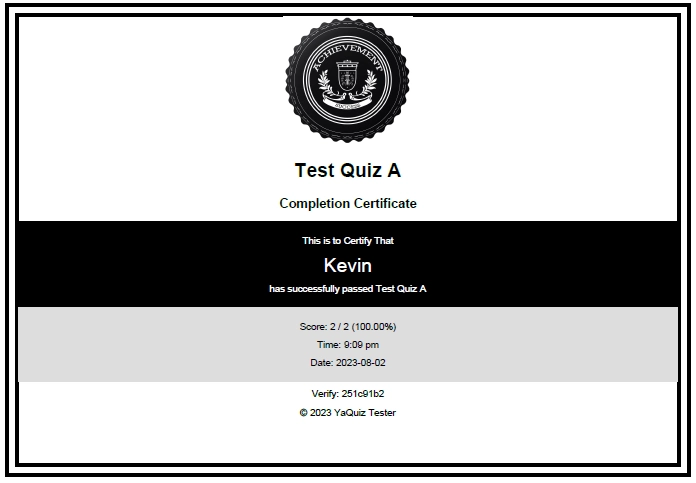
You can issue certificates to your users after they successfully pass a quiz. The setting “use certificates” must be enabled at the global or quiz level and a certificate template should be selected. You must also set the “Store Quiz Results” setting to level 2 or 3.
Certificates are generated as printable PDF documents. Specifically, the Dompdf engine is used to render the PDFs from HTML. The PDFs are generated on demand when requested, so they will not waste space on your server.
Certificates can only be issued to logged in users at this time. If enabled, the user will see a link to get their certificate after they pass a quiz. They can also download a copy of the certificate at any time from their User Results page.
All certificates are assigned an 8 character hash code upon completion. Instructors can use this code to verify the integrity of a certificate with the certificate verification tool, which is an available option when creating new menu items.
You can modify the certificate templates to your liking and use different certificates for different quizzes. The default includes a generic message along with some information about the user and the quiz they completed. Knowledge of HTML and CSS is needed to create new certificate templates. If you just want to change the text on a certificate, you can do so relatively easy, even without HTML knowledge, by copying the default template and editing the text in it (without touching the stuff between html element tags < some_tag > or at the end in the <style> section). Just stick to editing the text itself and you should be fine…
Permission Settings
YaQuiz supports setting permissions in global component options from the permissions tab. Here is a general summary of what each permission grants the user.
- Access Administration Interface – Needed to view quizzes and questions
- Create – Needed to add new questions and quizzes
- Edit – Needed to change existing quizzes, questions, and to access most other settings. Needed to reorder questions.
- EditOwn – With this permission, users can edit questions and quizzes they created themselves, but not necessairly items created by others.
- Delete – Needed to delete things and reset stats
- View Quiz Results – Needed to see individual user results and related account info