In this chapter, you will get an in-depth look at how to manage users and permissions in Joomla. You’ll learn how to enable user registration, understand the different user roles, and see what users can do with different access levels.
User Assignment
By default, Joomla sorts users into 9 different user groups across 5 different access levels.
The user group is the group the user belongs to. This could be something like a guest, a registered user, or an administrator. The user group a user is assigned to controls what the individual user has permission to do on the website.
Different user groups are assigned different access levels. Access levels control what a user can and cannot view on the website. For example, we can restrict our articles to only be viewable by registered users, if we want to. We can show certain modules to guests and certain modules to administrators. We can put our content behind a paywall and only allow registered subscribers to view certain content. There are many applications for these features.
User groups and access levels are completely customizable. It’s possible to add and delete user groups and access levels as needed, or rename them to better fit the titles in your organization. For most small to medium-sized websites, with limited users, the default user groups and access levels should be more than enough.
The nine default user groups are: Public, Guest, Manager, Administrator, Registered, Author, Editor, Publisher, and Super Users.
The five default access levels are: Public, Guest, Registered, Special, and Super Users. We will get into the specifics soon.
Super users and administrators can change the access levels and user groups of other users with the User Manager.
The functionality of user groups and access levels can be extended by third party extensions.
User Manager
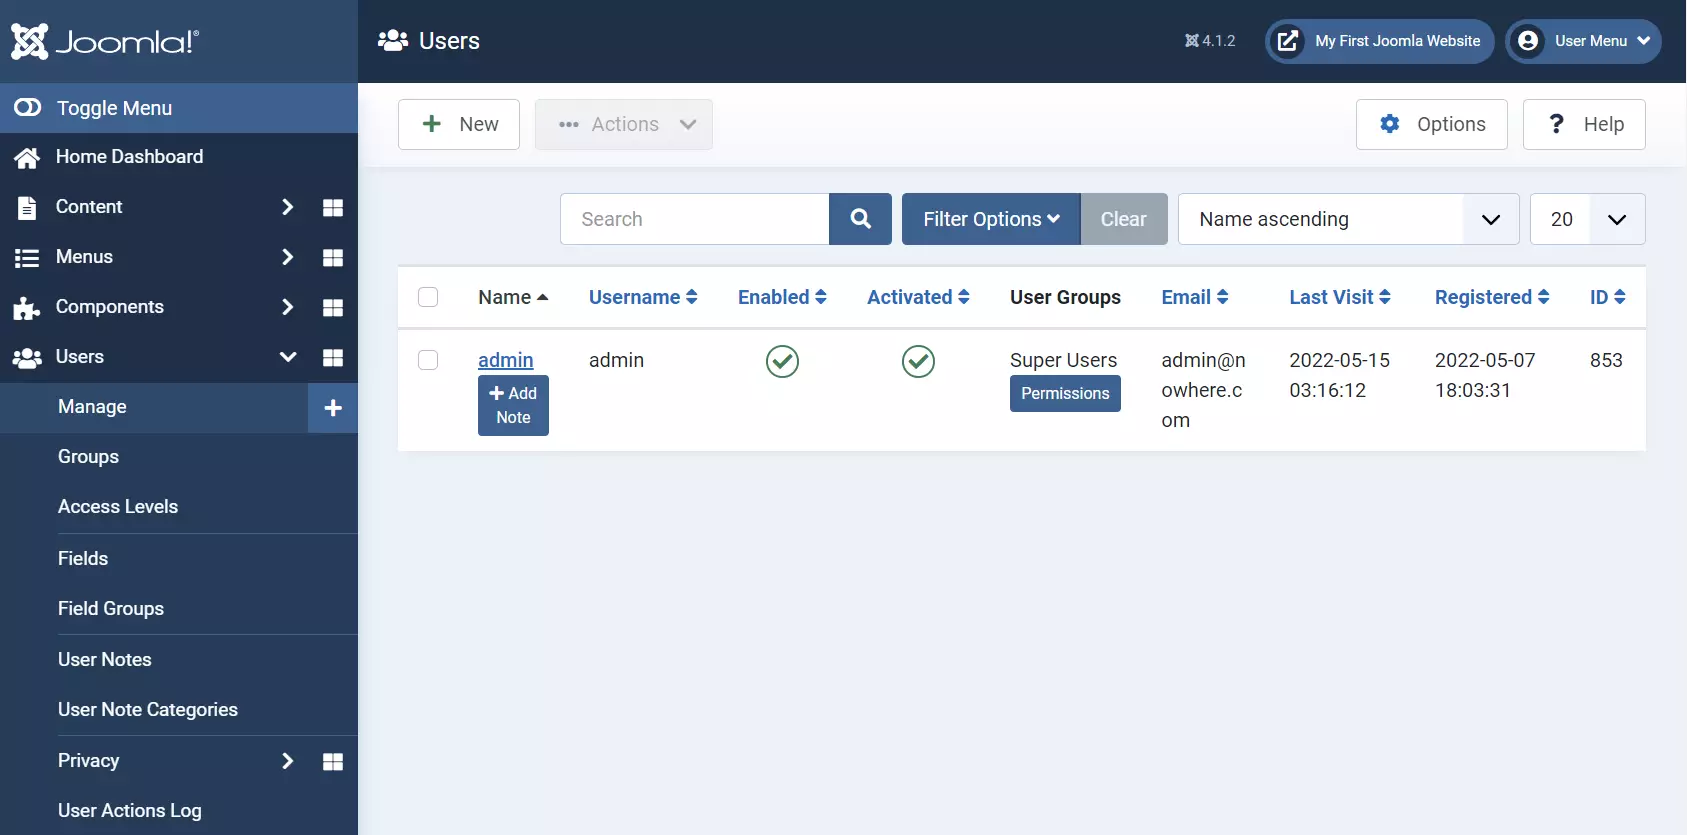
The User Manager allows you to create, edit, and remove users from your website.
The main page of the user manager shows a list of all the users on your website, along with some basic details. The layout looks similar to the Article Manager, Menu Manager, Category Manager, etc. They all follow a similar table layout. You can sort and filter users the same way you can with articles and other Manage screens in the Joomla administrator panel.
ndividual User Settings
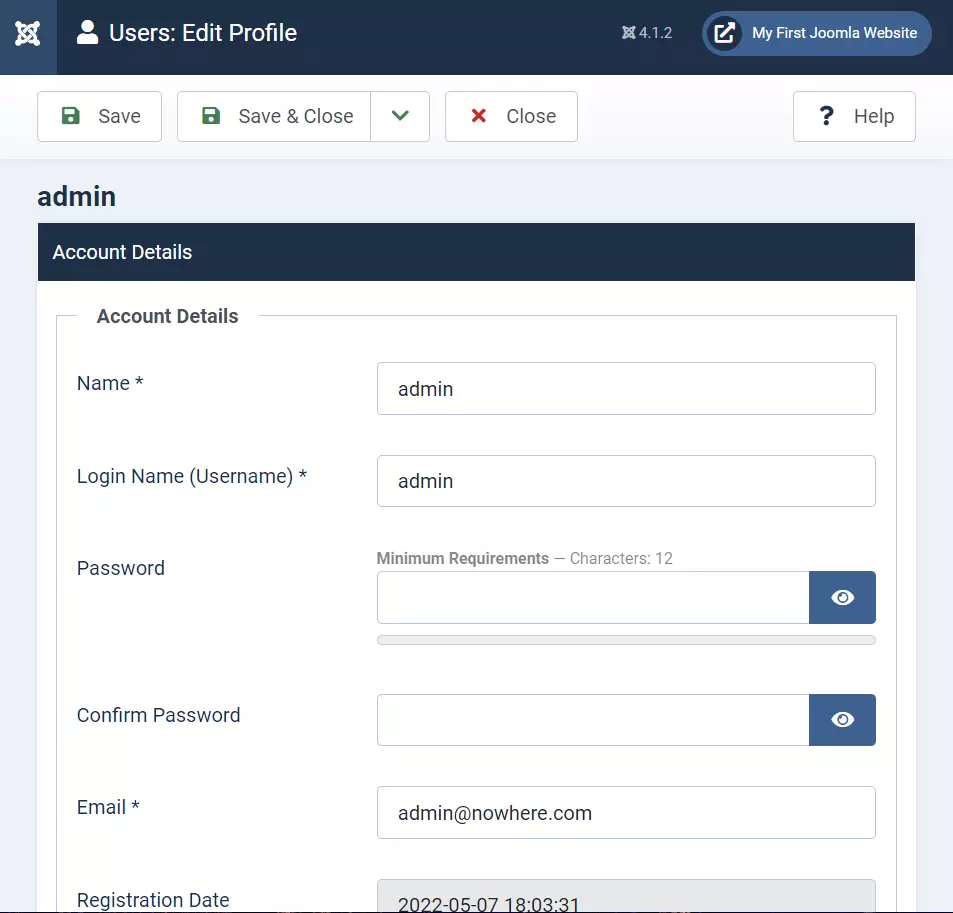
When you click any user in the User Manager, it opens a screen displaying several options across several tabs. Most of these are self explanatory, but you may read below for specific details on each field. In general, you won’t need to change any user options, aside from assigning them a different user group if they need elevated permissions. There are self-service ways for users to change their settings (email, password, etc.) from the front end. Administrators should only need to change individual user settings here if there are unusual circumstances, or if you’re in a small organization that manually controls all the users.
The account details tab contains important settings, such as the user’s actual name, username, email, and password.
- Name: The actual name of the user. If open to public registration, this may be fake, of course. Not usually displayed on the front end, though some extensions may do so. The usual practice is to display the username, not the actual name.
- Username: The name the user uses to log in to the website. This is usually set to appear instead of their actual name when people post comments and engage in public areas of the website.
- Password: You may reset the password for any user by typing it under Password and Confirm Password. You cannot see the user’s old password for security reasons.
- Email: The user’s email
- Registration Date: The date and time they registered their account
- Last Visit Date: The last time this user was on the website
- Last Reset Date: The last time the password was reset
- Password Reset Count: The amount of times the password was reset
- Receive System Emails: Whether this user receives system emails, like global messages and such.
- User Status: Whether this user is enabled. If disabled, they can’t log in or do anything. May be useful if you need to ban someone or quickly revoke access for any reason.
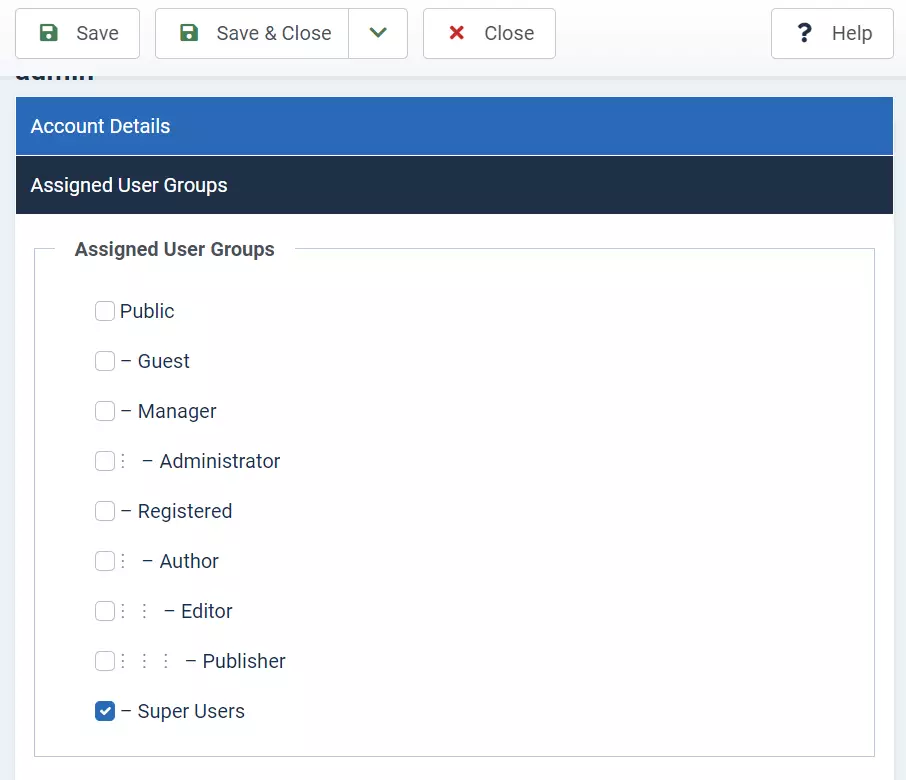
This tab controls what group the user is assigned to. It’s presented in a hierarchical list of options, with the more important privileged groups indented. Administrator has more privileges than Manager, Author more than Registered, Publisher more than Editor, and so on.
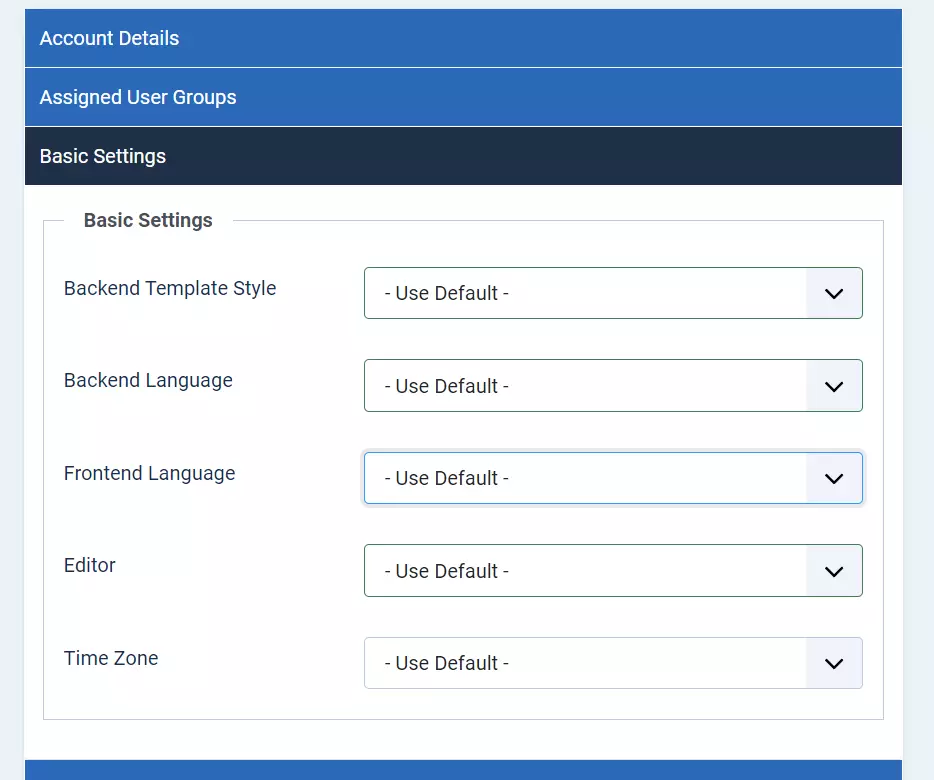
The Basic Settings are user-specific options usually chosen by the user themselves. The defaults are usually sufficient options.
- Backend Template Style: The template style for the site’s admin panel, if you’re using multiple backend templates for some reason.
- Backend Language: The language the user sees in the admin panel.
- Frontend Language: The language the user sees in the front end for forms and extension content. Note that this will not automatically translate article content itself. It only pertains to text like login/registration fields and such.
- Editor: The editor the user is set to use. TinyMCE is the default WYSIWYG editor in Joomla. If you’re using a different editor, and want specific users to be able to use it, you may change the default here.
- Time Zone: The time zone the user is in. Adjusts the time shown on items to match the user’s local time zone.
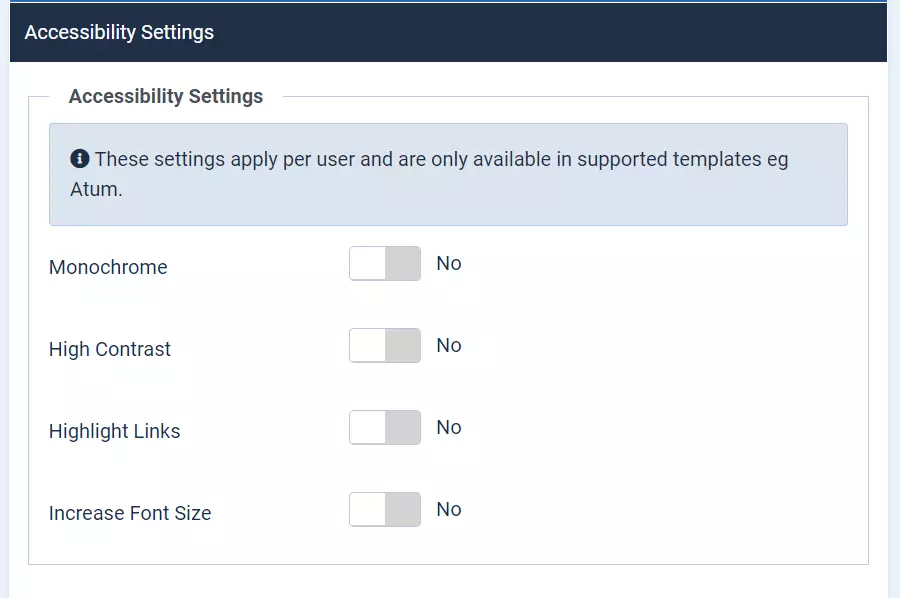
The accessibility settings change the way the site is displayed for the user to aid with accessibility. These settings only work if the template you’re using supports accessibility options. Most do not. Atum, the admin template, does support these settings.
- Monochrome: Monochrome means single-color, it turns the template into black and white or greyscale.
- High Contrast: On some templates, this will modify the colors to make text appear more readable on different backgrounds.
- Highlight Links: Surrounds all buttons with borders so the user knows they’re clickable.
- Increase Font Size: Makes the font size larger.
The remaining two tabs “User Actions Log Options” and “Joomla API Token” do not need to be touched.
User Groups and Permissions
Each user group has a distinct set of permissions that applies to it. Permissions dictate what a user can or cannot do. The most important permission settings can be found in the Global Configuration under the “Permissions” tab. Different components and extensions may have specific permissions in their respective settings elsewhere.
There are about a dozen different permission settings in the Global Configuration, which can be set for each user group individually. Looking at these settings is a good place to learn what groups can do what. The default settings will suffice for many use cases, but you may customize these settings to suit the needs of your business and website.
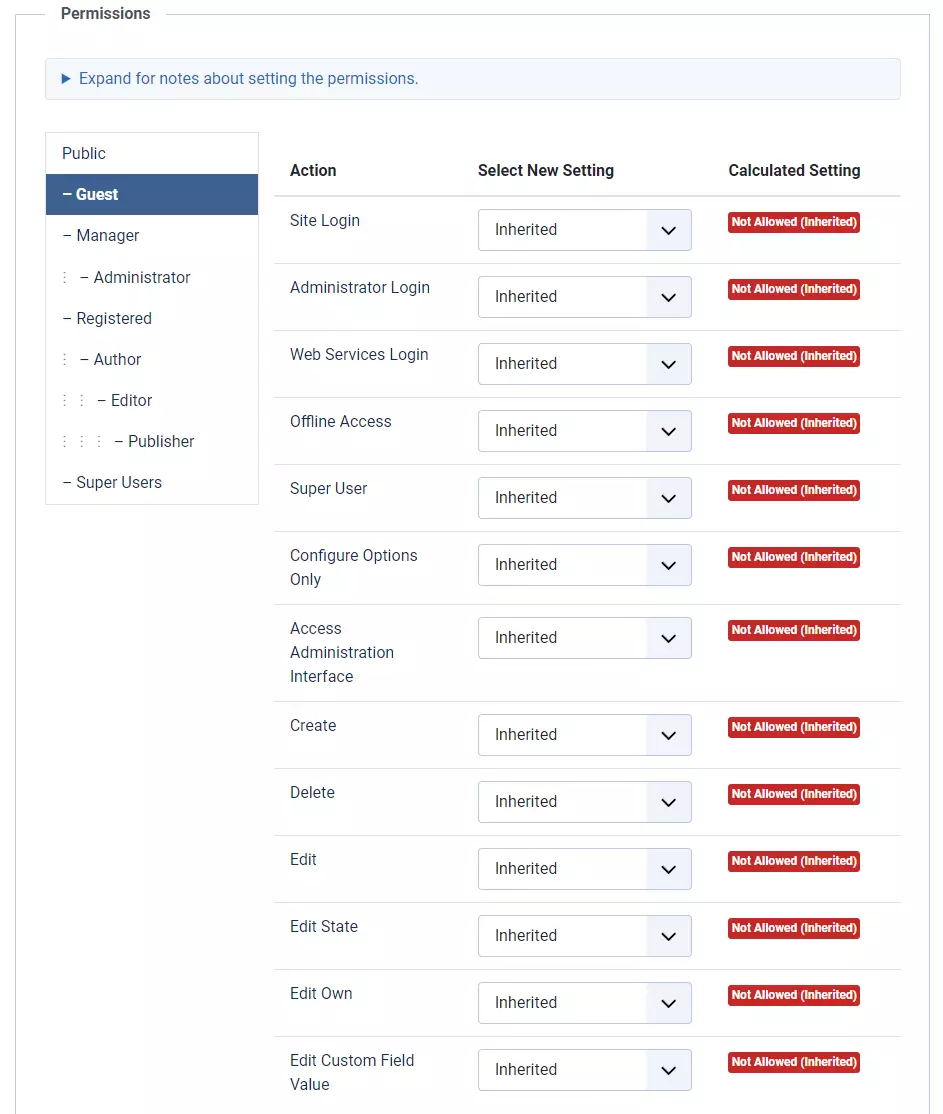
On the left side of the permissions settings, you can see each user group. The indentations show hierarchy or level of specificity. Here is a brief summary of what each user group is for:
- Public: The public is anyone who visits your website. They could be a registered user, a guest, an administrator, whoever. These settings apply to anyone who visits the site.
- Guest: Guests are public users that are NOT logged in. The difference between Public and Guest is that guests are specifically users who are not logged in. Public could be logged in or not logged in. For example, if something on our site was set to display a message to guests saying “Register Now!” we wouldn’t want to show that message to people who are already logged in, but we still want to show some articles to both registered and unregistered users, like the home page.
- Manager: Managers are a step below Administrator. Managers can create, delete, and publish articles/categories from the administration panel, and access the website when it’s in offline mode. They cannot change important site options, users, or menus. They can only change content and media by default.
- Administrator: Site admins are a small step below super administrator. They can change all areas of the website except the global configuration. They can make changes to users and user groups (except super users), templates, etc.
- Registered: Registered users can login to the front end of the website and change their user profile. They cannot create/modify content, or anything else administration related. They are simply members of the public with registered accounts. Users of the website.
- Author: Authors may create and edit their own created articles from the website’s front end. They cannot login to the backend or make any major changes.
- Editor: Editors are a slight step above authors. They can edit other user’s content, but they cannot login to the admin panel or delete content.
- Publisher: Publishers may create, modify, publish, and delete content from the site’s front end. They’re like Managers, but can only change article content from the front end. They cannot access the admin panel.
- Super Users: Super users, sometimes called super admins, have permission to change all areas of the website. The first account you created when you setup your Joomla install was a super admin account. You should be careful with this assignment, and only give it to trusted individuals with extensive Joomla experience. Unless someone other than you absolutely needs to access the global configuration regularly, give them the administrator role instead of the super user role.
Actions
The actions in the permissions tab show what actions each user group can do. The actions set here are the default, and apply to every component. For example, turning the “create” permission on in the global configuration will allow the user group to create articles, users, modules, etc. The permissions are shared across all components, but can be individually overwritten for each component later. Below, I summarize each action:
- Site Login: They can log in to the front end
- Administrator Login: They can log in to the back end admin panel
- Web Services Login: They can log in using web services. More on login methods later.
- Offline Access: They can view the site when it’s in offline mode.
- Super User: They can change everything.
- Configure Options Only: Allows the user to configure options, but not permissions of other components. You must change permissions for individual components for this to do anything. When disabled, the options button under each component in the admin panel will not be displayed.
- Access Administration Interface: In addition to the Administrator Login, this gives the user access to other parts of the admin panel (components, modules, etc.) Everything except global config.
- Create: The user is allowed to create new items
- Delete: The user is allowed to delete items, including items they didn’t create themself
- Edit: The user is allowed to edit items, including articles they didn’t make themself
- Edit State: The user can change the state of the items from published to unpublished or deleted
- Edit Own: The user is allowed to edit their own items, but not necessarily items made by other people.
- Edit Custom Field Value: The user can change the values of custom fields attached to content.
The actions can be enabled or disabled for each user group. If it’s set to “inherited” that means it inherits the same setting from the parent group.
Access Levels
Access Levels configure what content users can and cannot see. Access levels are more general than user groups, and user groups are a part of each access level.
You can view all the access levels by opening the “Access Levels” option under the “Users” section of the administration panel.
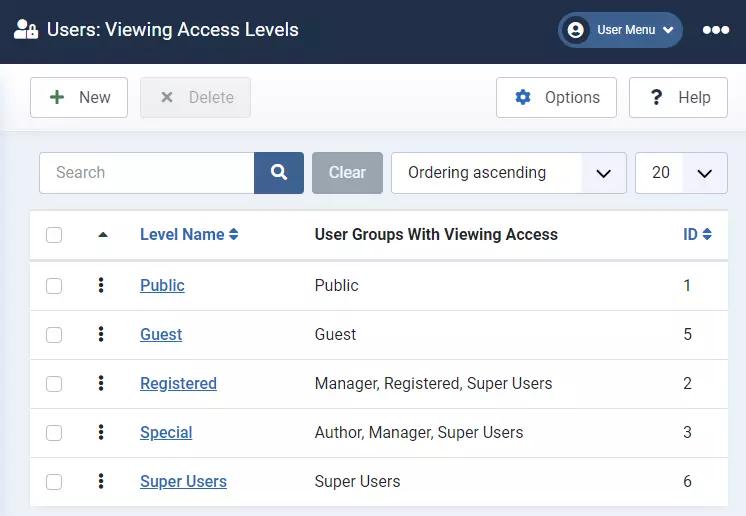
Access levels may be changed by clicking the level. You may change the name on the first tab. The second tab allows you to select which user groups belong to this access level.
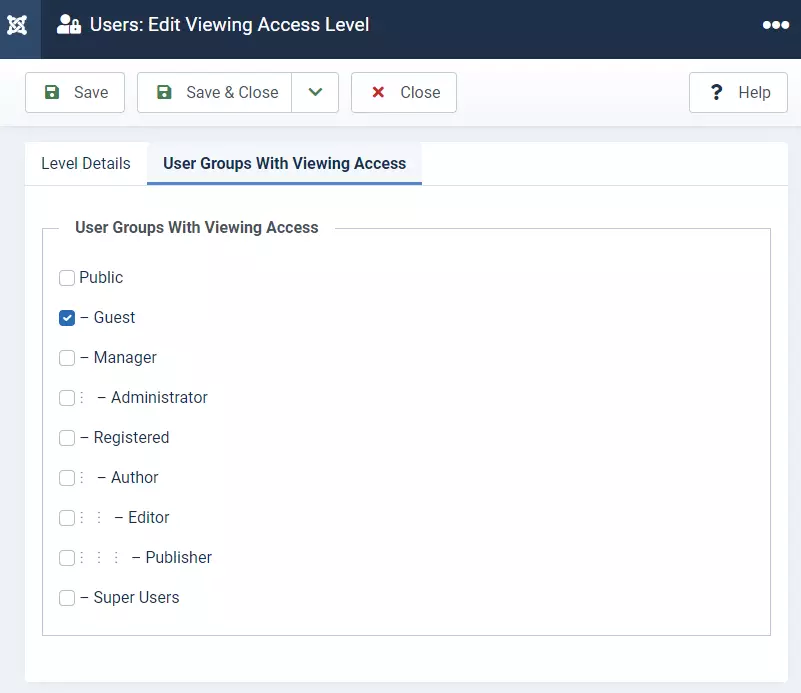
Here is a summary of all the different access levels with the associated user groups.
Setting Access Levels
Access levels may be set in several places. They can be set for an individual article, a module, a category, a menu item, and more. We’re going to focus on access levels set for articles and menu items.
The default access level for articles is public, so anyone can view the content. If you open an article in the article editor, there’s an option on the right side of the screen to change the access level. Here, you can select the access level for the individual article.
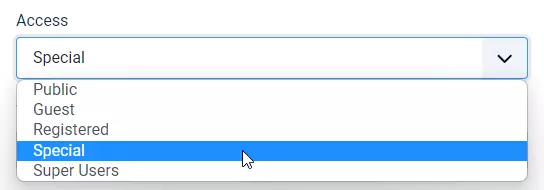
As an example, I’ve created a new article called “Content Writing Guidelines” and I want it only to be visible to my site’s special users. This article is for internal use only, so I don’t want regular users or guests to be able to see it. I open the article and set the access level to “Special,” then I publish the article.
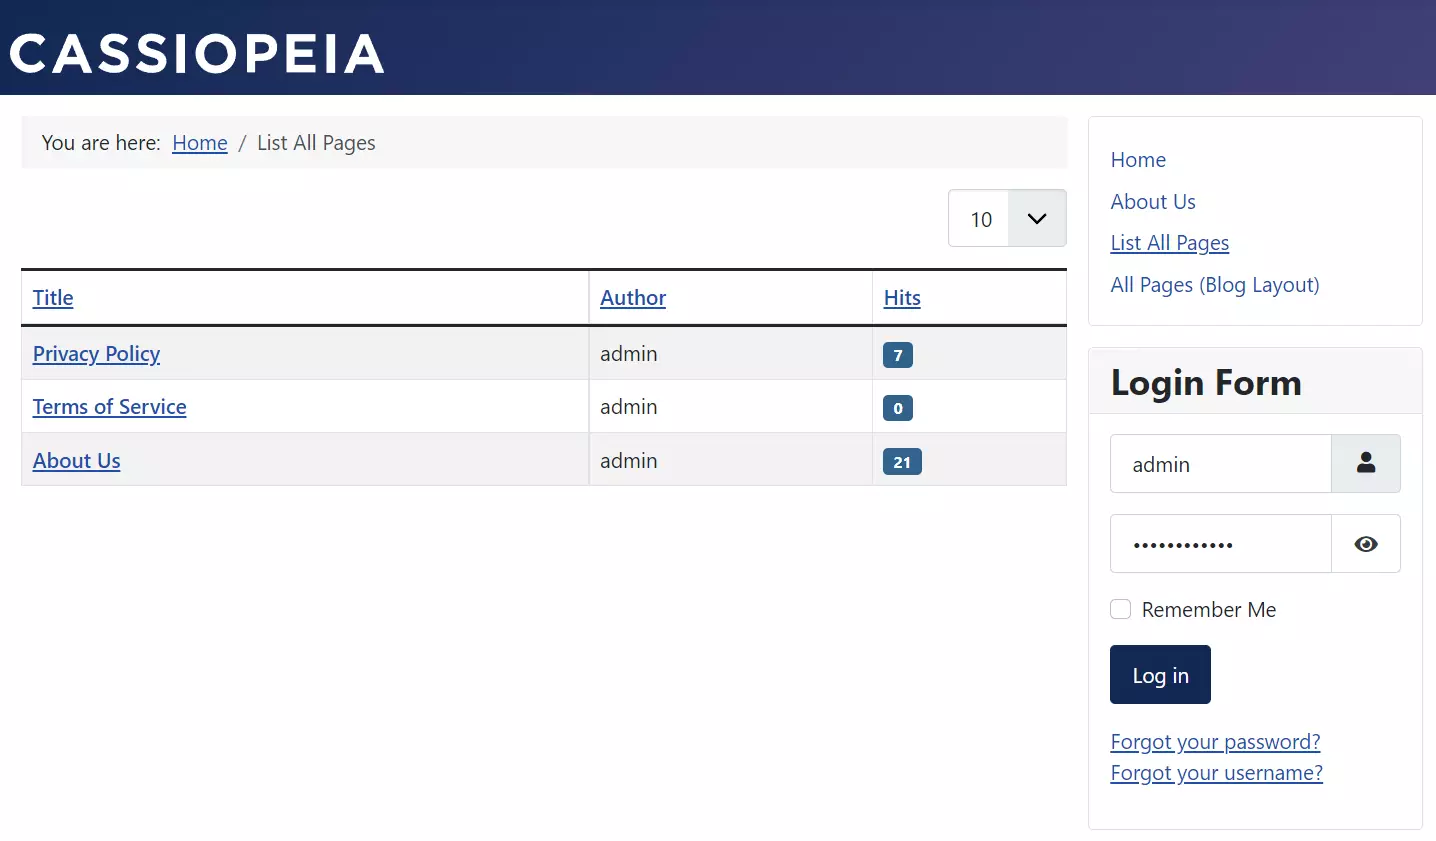
When I’m logged out, the “Content Writing Guidelines” page is not visible to me in my category list.
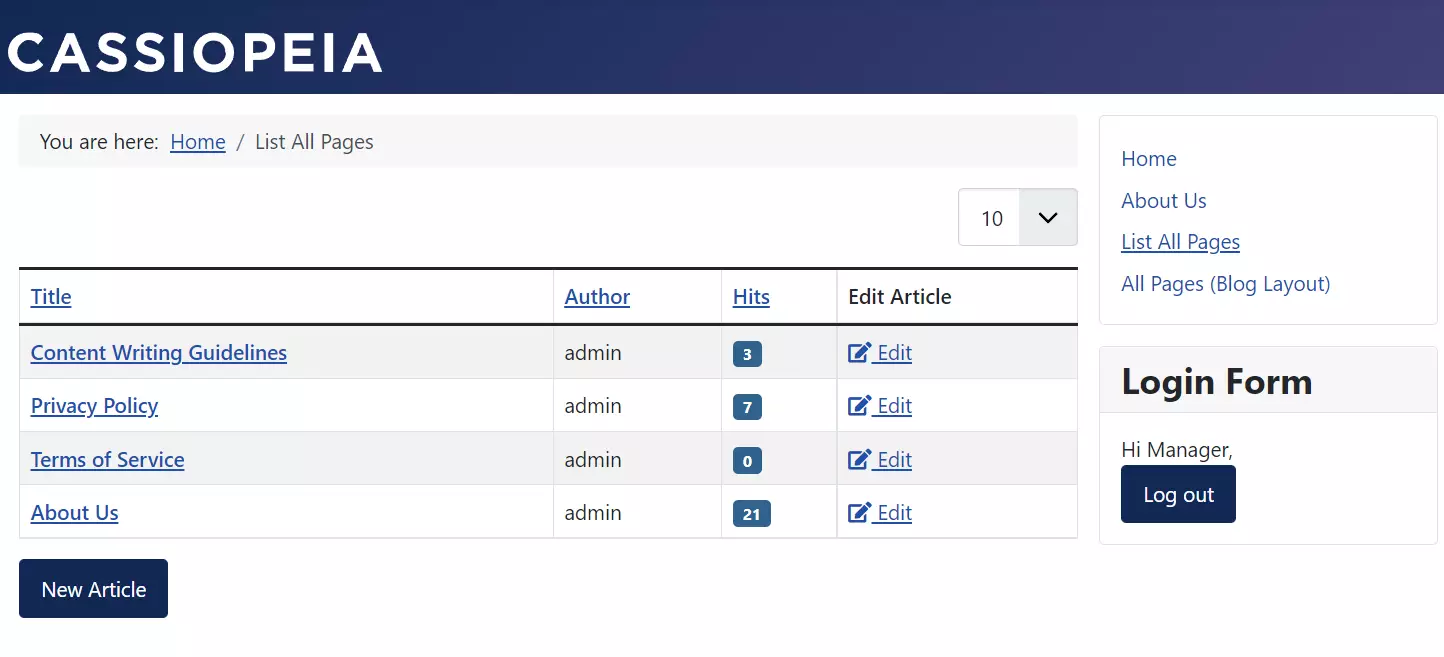
When I login as a manager (or any other user with special permissions), the article becomes visible.
Special Access Category
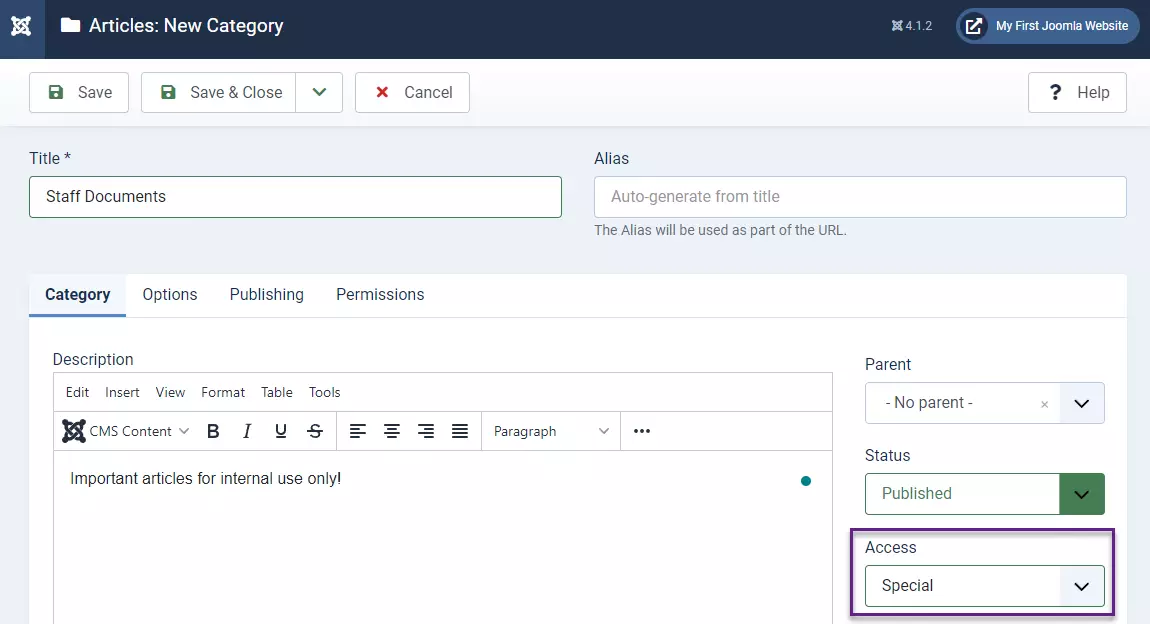
Now let’s say I want to have multiple articles that are for site staff only. Rather than putting them in the same category as my public articles, I create a new category called “Staff Documents” and set the access level for this category to special.
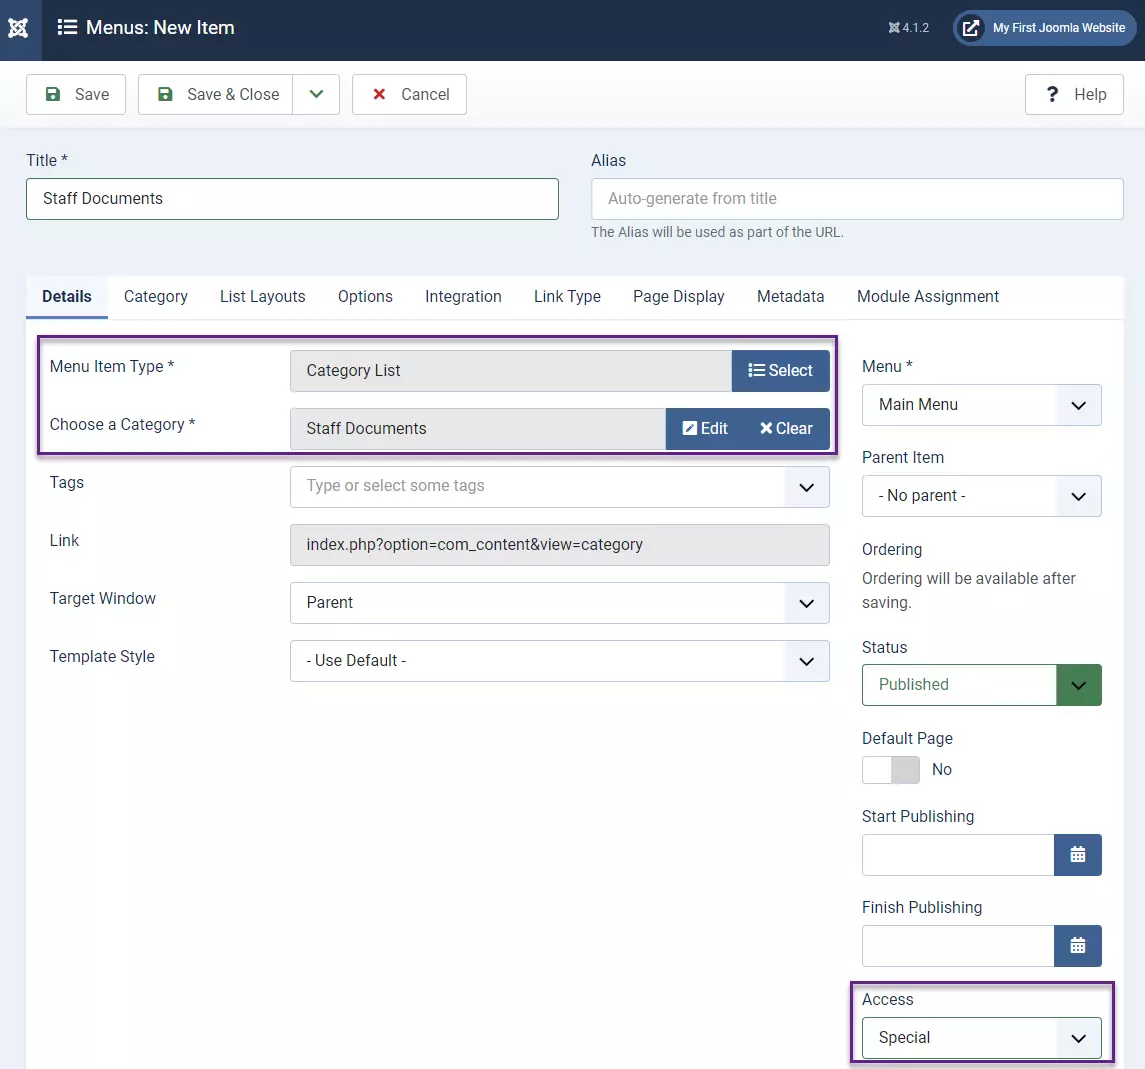
I also create a new menu item linking to this category as a category list. I set the access level for this menu item to special as well.
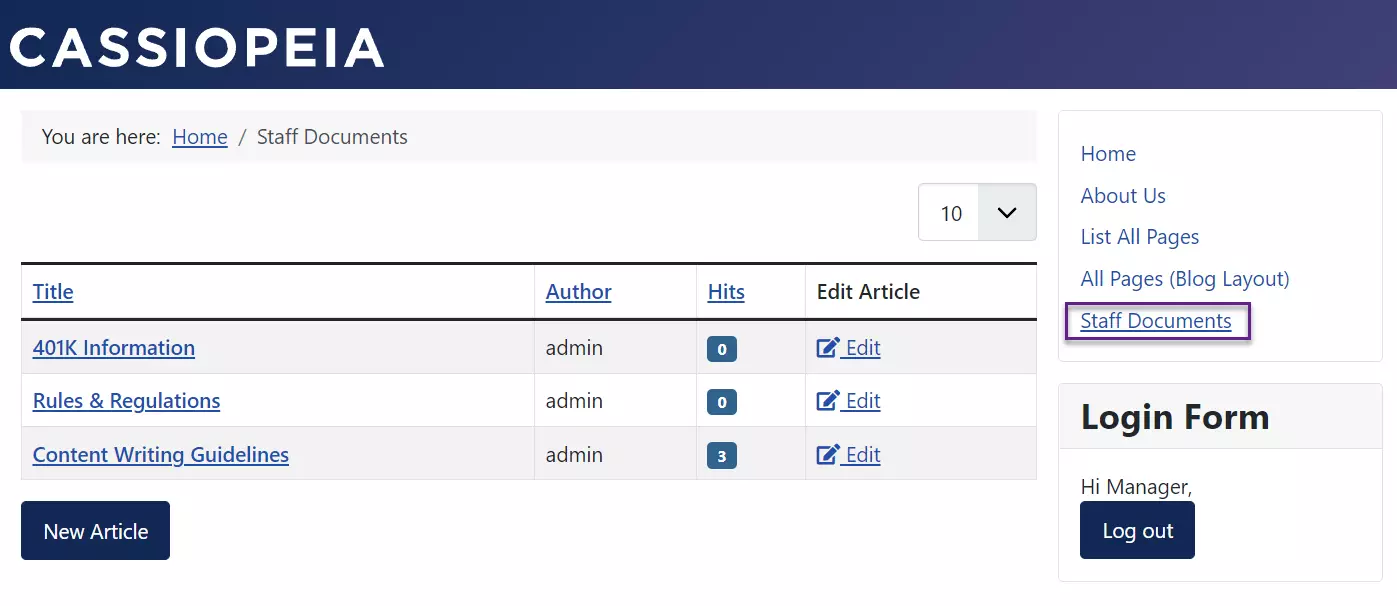
Now when we visit the front end as any special user, we can see the staff documents page.
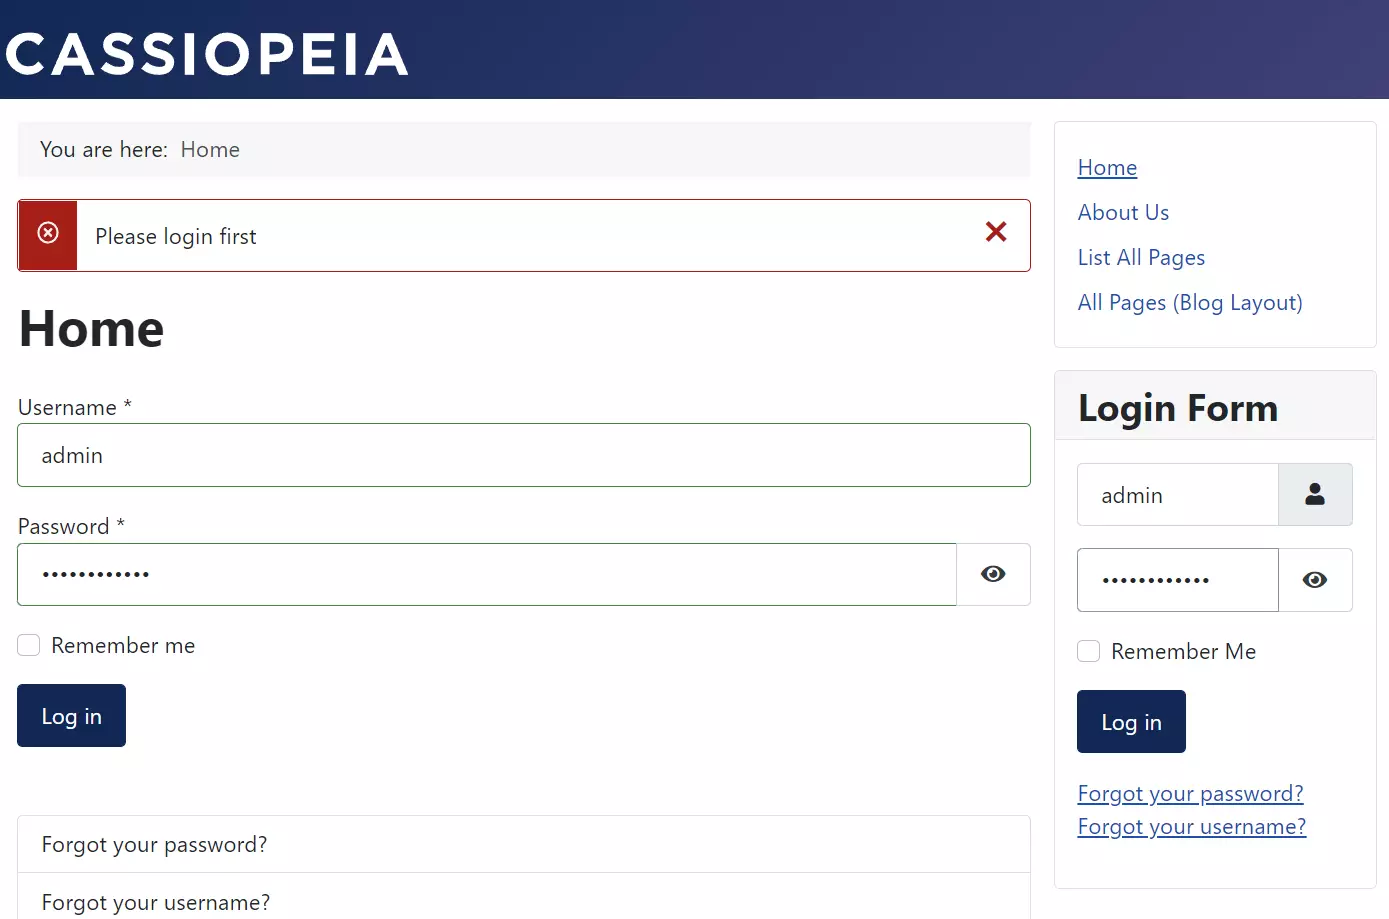
Note that if we try to visit the page when we are not signed in, we get an error saying we’re not allowed. The item itself also disappears from the menu.
User Registration
Here is the user registration process in Joomla, from the time they visit as a guest to the time they decide to leave.
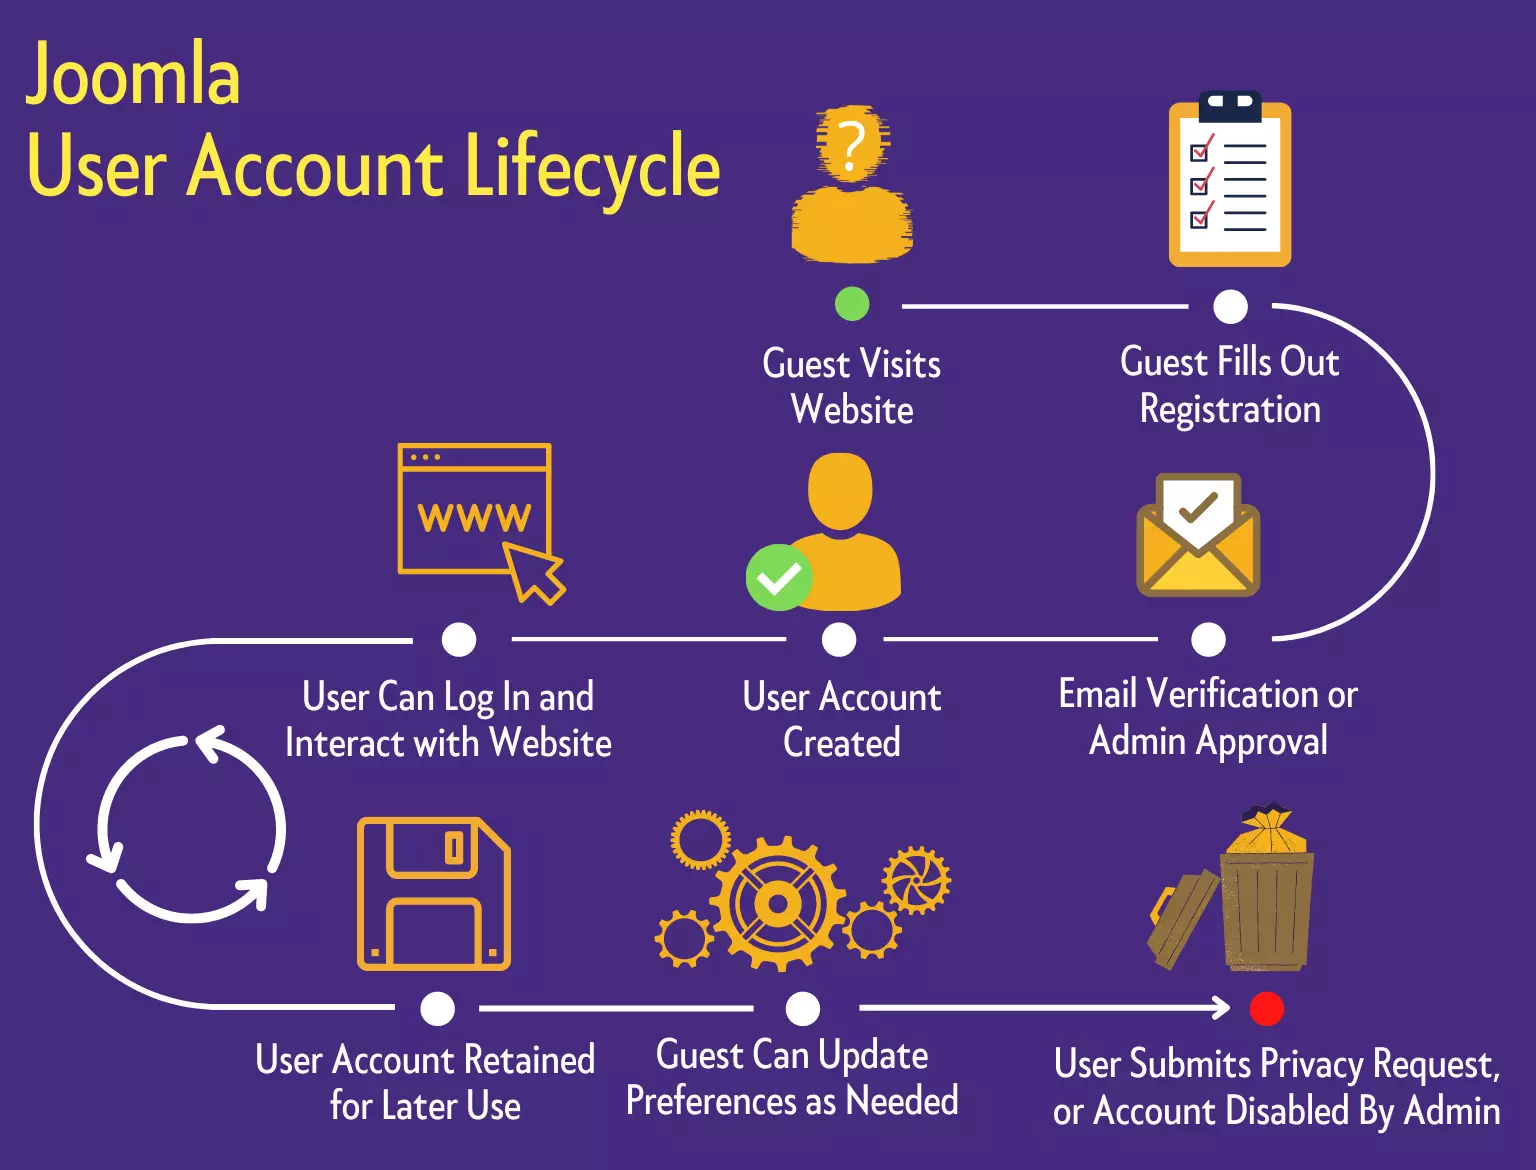
By itself, Joomla provides a way to allow users to register, confirm their account, and manage their password/email from the front end. Other than that, there’s not much your users can do with their accounts by default. User accounts become much more powerful when you add third-party extensions to your Joomla installation. If you plan on adding article comments, a newsletter, an online store, or any other extension that makes use of user accounts, you should learn how to enable and manage user registration and profiles.
By default, new user registration is turned off. To turn it on, you need to enable user registration in the settings for the Users component. Navigate to the user manager and click “Options,” or go to the Global Config and select the “Users” component.
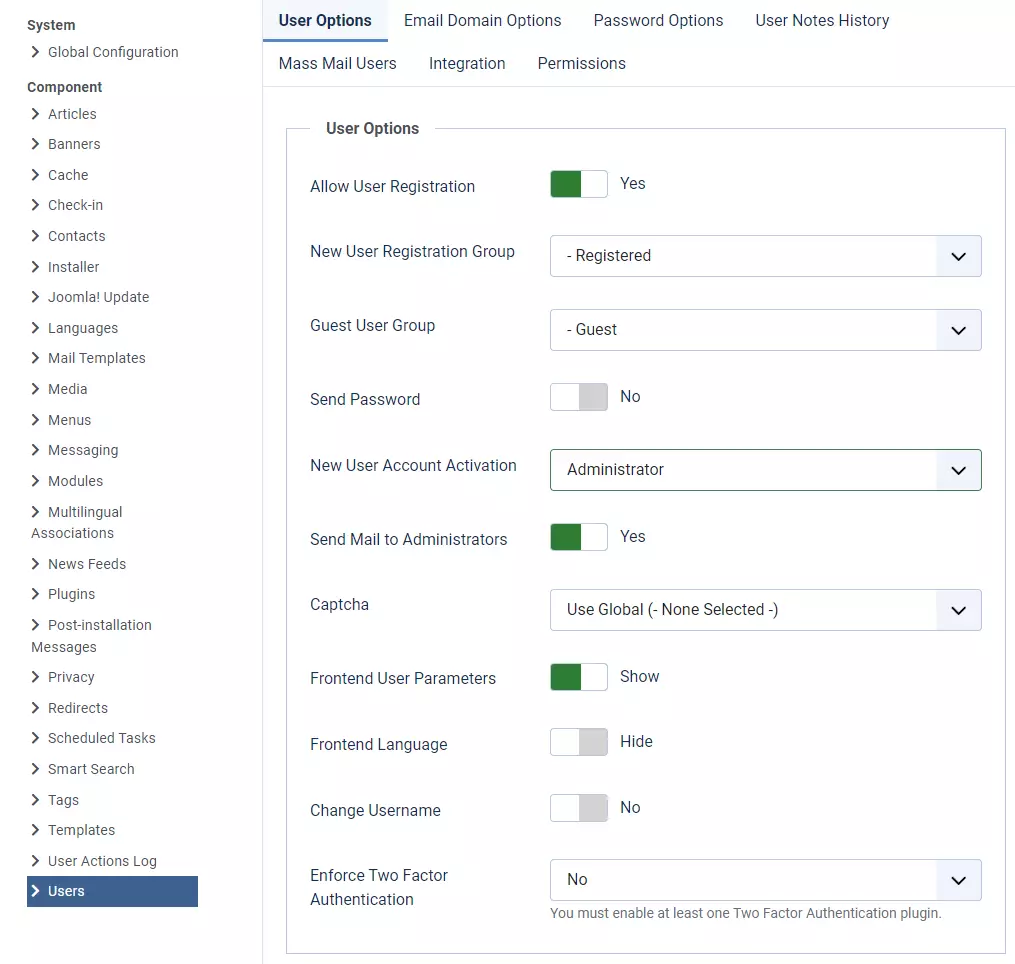
Allow Registration
Allow users to register for the website from the front end themselves.
New Group
The group new users are put in after registering.
Guest group
The user group unregistered guests are considered a part of.
Send Password
Send the user their password when they register in plain text. NOT RECOMMENDED.
New Account Act.
Who activates new users after registering? The users themselves through email verification, an administrator, or are they automatically activated?
Email Admins
Send an email to administrators when a new user registers
Captcha
You may enable captcha to add a bot challenge to the site. This should prevent bots from registering accounts. A captcha plugin must be set up.
Frontend User Params
Allows the users to set their editor preference and language settings from their user profile.
Frontend Language
Allows the user to select a language when they are registering.
Change Username
Allow users to change their user names themselves. Not always advisable.
Suppoer 2FA
Support two factor authentication methods. A plugin must be configured for this to work.
Users
Open users component settings in GConfig here
There are some pretty important settings on this page.
- Allow User Registration
- This setting allows users to register for your website. If enabled, the login page or the login module will display a link for users to create new accounts.
- Users can then register accounts with their username, password, and email.
- New User Registration Group
- This option tells Joomla what user group to put new users into. The registered group is a good default.
- Guest User Group
- The group guests, anyone not logged in, are considered to be a part of.
- Send Password
- Send a copy of the user’s password to their email address in plain text when they register.
- For security reasons, it’s best to leave this disabled. It’s not a good practice to send users their passwords directly. They should remember their passwords or reset them if they forget.
- New User Account Activation
- By default, new user accounts must go through a process before they become activated and users can log in.
- Administrator – if set to Administrator, an administrator must manually go in and activate new user accounts. May be useful for closed internal websites.
- Self – The most common option. The user gets an email with an activation link that they must click to activate their account. This ensures the email collected is accurate, which is important. Recommended setting.
- None – User accounts are automatically activated with no email verification or admin approval required.
- Send Mail to Administrators
- Send an email to administrators when a new user account is created. Useful if the activation setting it set to Admin, so admins know there’s a user that they need to review.
- Captcha
- Captcha challenges are those annoying tests you see on some websites to prevent bot abuse.
- Your site must have a separate captcha system set up through a plugin for this to work. We will discuss this more later.
- Frontend User Parameters
- Allows the user to change their time zone, language, and editor preference from their user profile.
- Frontend Language
- Shows an option to select the front end language on the user registration page. If set to no, they can still change it later in their user profile.
- Change Username
- Allows users to change their username from their user profile.
- Enforce Two Factor Authentication
- Two factor authentication is usually the notification you get on your phone or via text message that says something like “Is this really you?” or “Approve login request” when you try to log in to a website. A separate plugin must be configured for this to work.
- Joomla supports Google Authenticator and YubiKey out of the box, with some configuration.
Additional Settings Tabs
This is an explanation of the settings for the different tabs, for your reference.
The user notes history settings allow you to set the number of versions of user notes kept. User notes are like articles written to keep track of users. This may be useful for internal company reporting purposes. Disable versions if you don’t plan on using user notes.
There is an option elsewhere in Joomla to mass mail your users. This will send an email to every single user on your system. Here, you can set a prefix for the subject (some words that always come before the subject, like perhaps your company name). You can also set a Mailbody Suffix, this is like a footer or note that comes at the end of the mass email. You can put things like disclaimers, terms, contact info, etc. here.
The custom fields option allows us to create custom fields for users. These custom fields can be used to track miscellaneous user information.
The permissions tab looks very similar to the one we looked at in the global configuration. In fact, these permissions automatically inherit the permissions from the global configuration. Note that the permissions here are NOT the same as the ones in the global configuration. Here, you can override the permissions for each user group specific to the User’s component. The permissions set here only apply to user management. Not articles or anything else.
This means if by default the global configuration settings allow administrators to create users (it does), you could change the setting here to disallow this for administrators. Administrators would still be allowed to create articles, and create things wherever else the permissions permit, but it would not allow them to create users any more.
You may notice under the “Authors” tab they have create permission, inherited from the global configuration. We want our authors to be able to write articles, but maybe not create users. This does not mean they can actually create users. Remember, authors are blocked from logging in to the administration panel. There’s no way for them to even get to the screen to create users. So it’s okay to leave the create setting on “allowed” even though we don’t want authors making users themselves.
Enabling User Registration
To enable user registration, start by going to the settings for Users and enabling the “Allow User Registration” option.
You will leave most of the other fields at their default values, unless there’s a particular reason you need to change something. I’d recommend leaving the new user group as “Registered,” the guest user group as “Guest,” and the set password option set to No.
You may want to change the New User Account Activation option to either self or none. If you are testing your website out on your local computer, Joomla will not have a way to send emails unless you have manually configured the SMTP settings. In this case, set this option to “None” or “Administrator” since there’s no way to send verification emails. If you’re using Joomla hosted on a paid web server, you can select the “self” option and Joomla will send verification emails using your web server. Most shared, semi-dedicated, and dedicated web servers are automatically configured to support the PHP Mail function, so you don’t have to change any email settings for emails to work.
You may also want to change the Send Mail to Administrators option to No if your test server doesn’t support emails.
Leave all the other options as the default and save the settings.
Test User Registration
You should always test your website to make sure it’s working as expected. Based on the settings I set above, I would expect to be able to register an account and have it activated immediately. Let’s see if this works.
If you reload the front end of your website, the login module should now display a link to create an account. Click this and try creating a new test user.
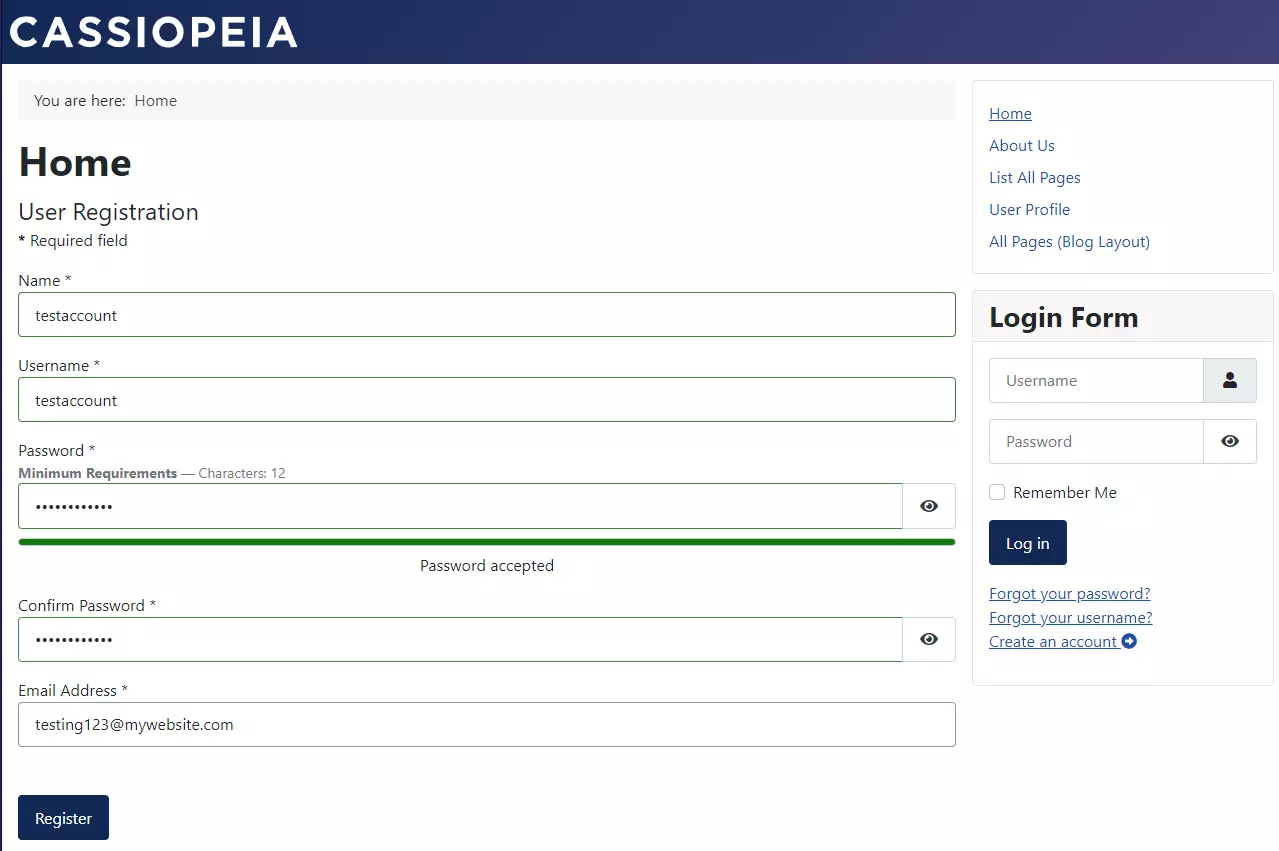
After registering, you will either get a success message or an error. If you get an error that looks like the one below, this behavior is to be expected. It just means your test server isn’t set up for email. The account was still created if you see this message. This shouldn’t happen once your website is published on a live server.

If you get a different error, you may need to change your settings or try again. If you got the above error, you should be able to login anyways. Log in using the username and credentials you just created. The login form should now display your username and a button to log out.
User Profiles and Fields
Users can view their user profile and change their information/settings.
You must first create a link to the user profile option in one of your menus. Add a new menu item to your main menu called “My Profile” or similar and set the access level to “Registered” so only logged in users will see it.
When you select the menu item type, the “User Profile” option is under the “Users” component option.
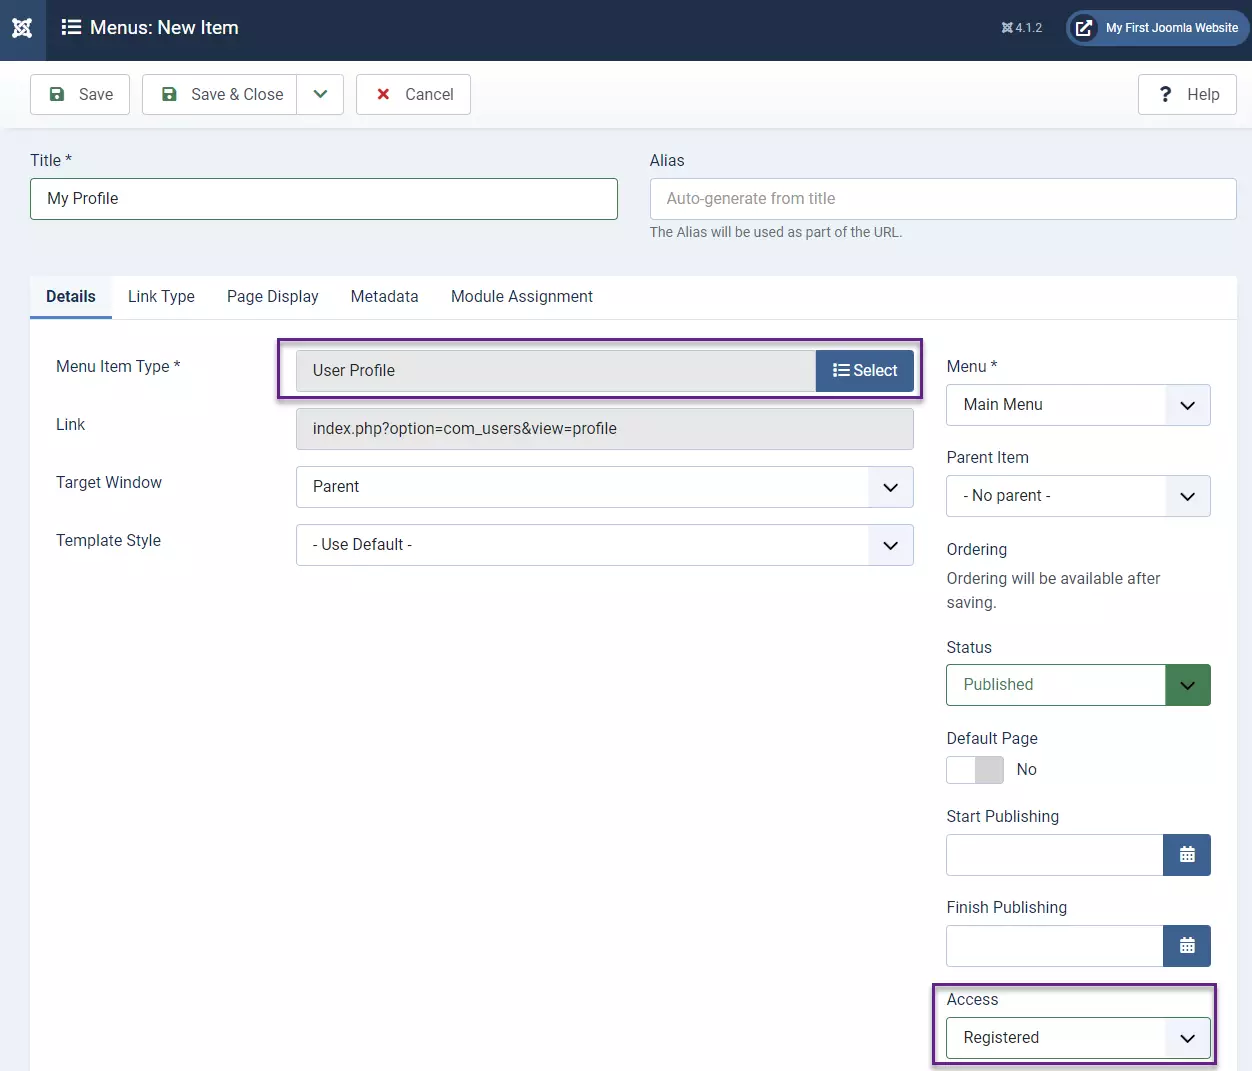
Refresh your front end page, make sure you’re logged in, and you should now see a “My Profile” link in the menu.
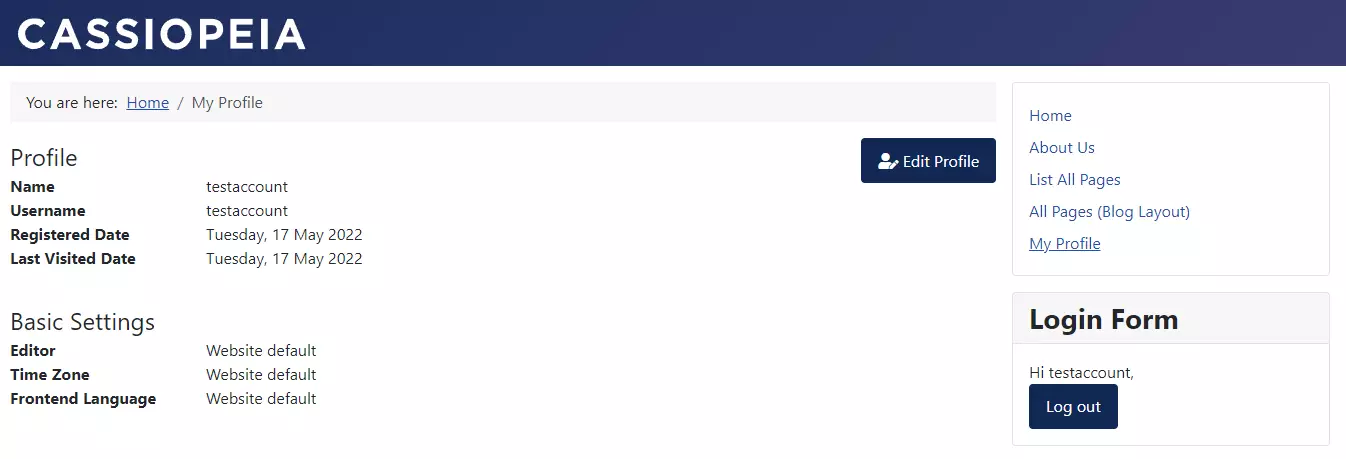
Clicking this takes you to the user profile. Here you can see some of your basic account details. There’s also a button to edit the profile.
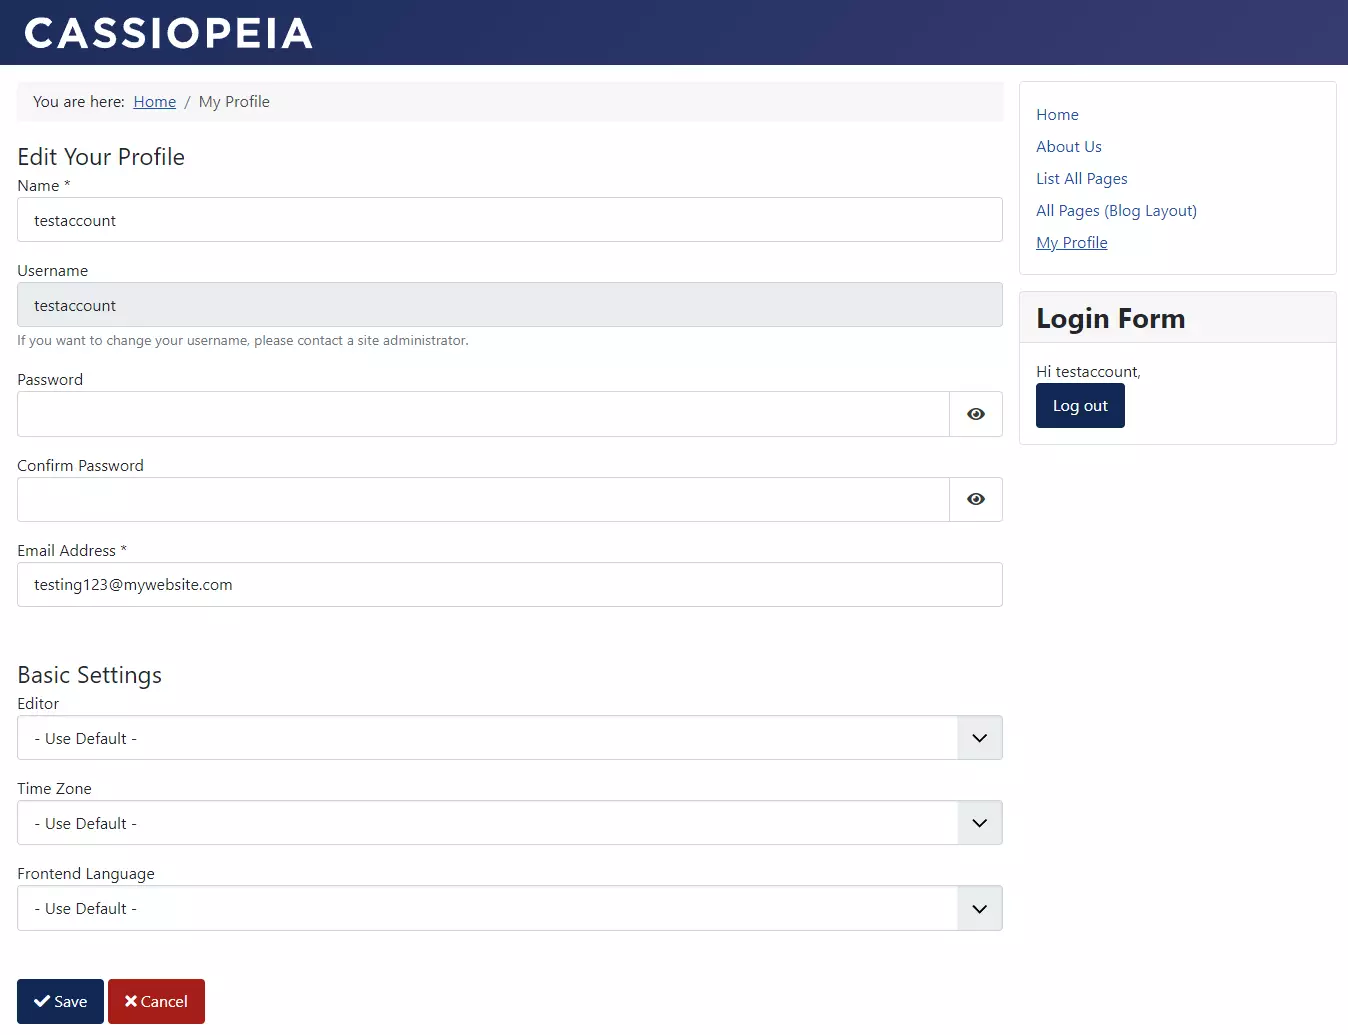
Finally, if you click the edit profile button, you can change the account password, email, and more.
Additional User Fields
It is possible to collect and save additional information about users in their user profiles. You can record user phone numbers, addresses, birthdays, and more.
If you’d like to enable these additional features, you must enable and change the “User Profile” plugin.
From the Administration panel, open the “System” page and select “Plugins” under the “Manage” section.
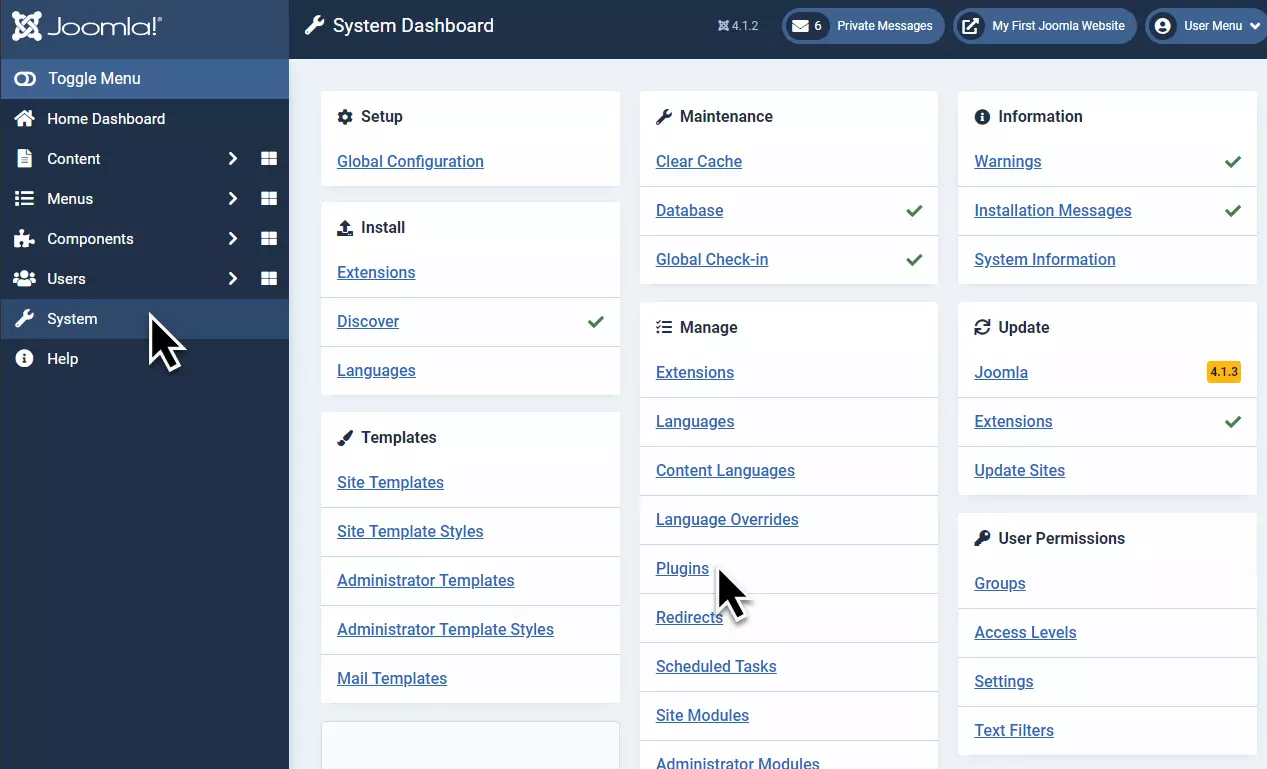
This is the first time we’ve used the plugin manager in this series. There are over a hundred different plugins in Joomla by default. We don’t need to worry about all of them right now. Many of them you will never need to use. We’re going to find the User Profile plugin.
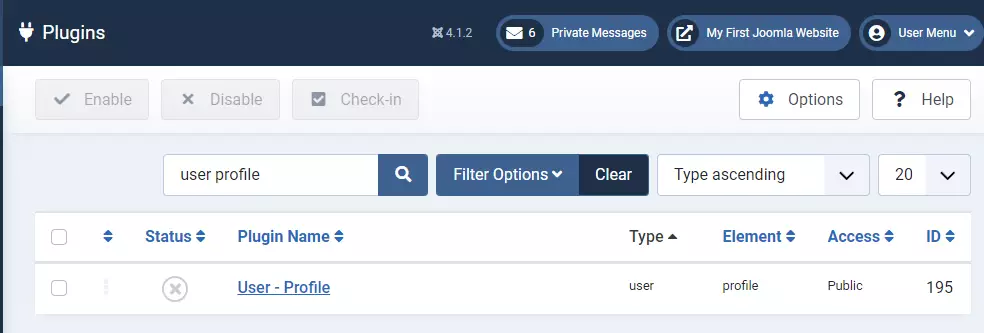
You can find the user profile plugin by just typing “user profile” into the search filter box.
Note that by default, this plugin is disabled. The grey x towards the left indicates this.
Click the plugin name to open its settings.
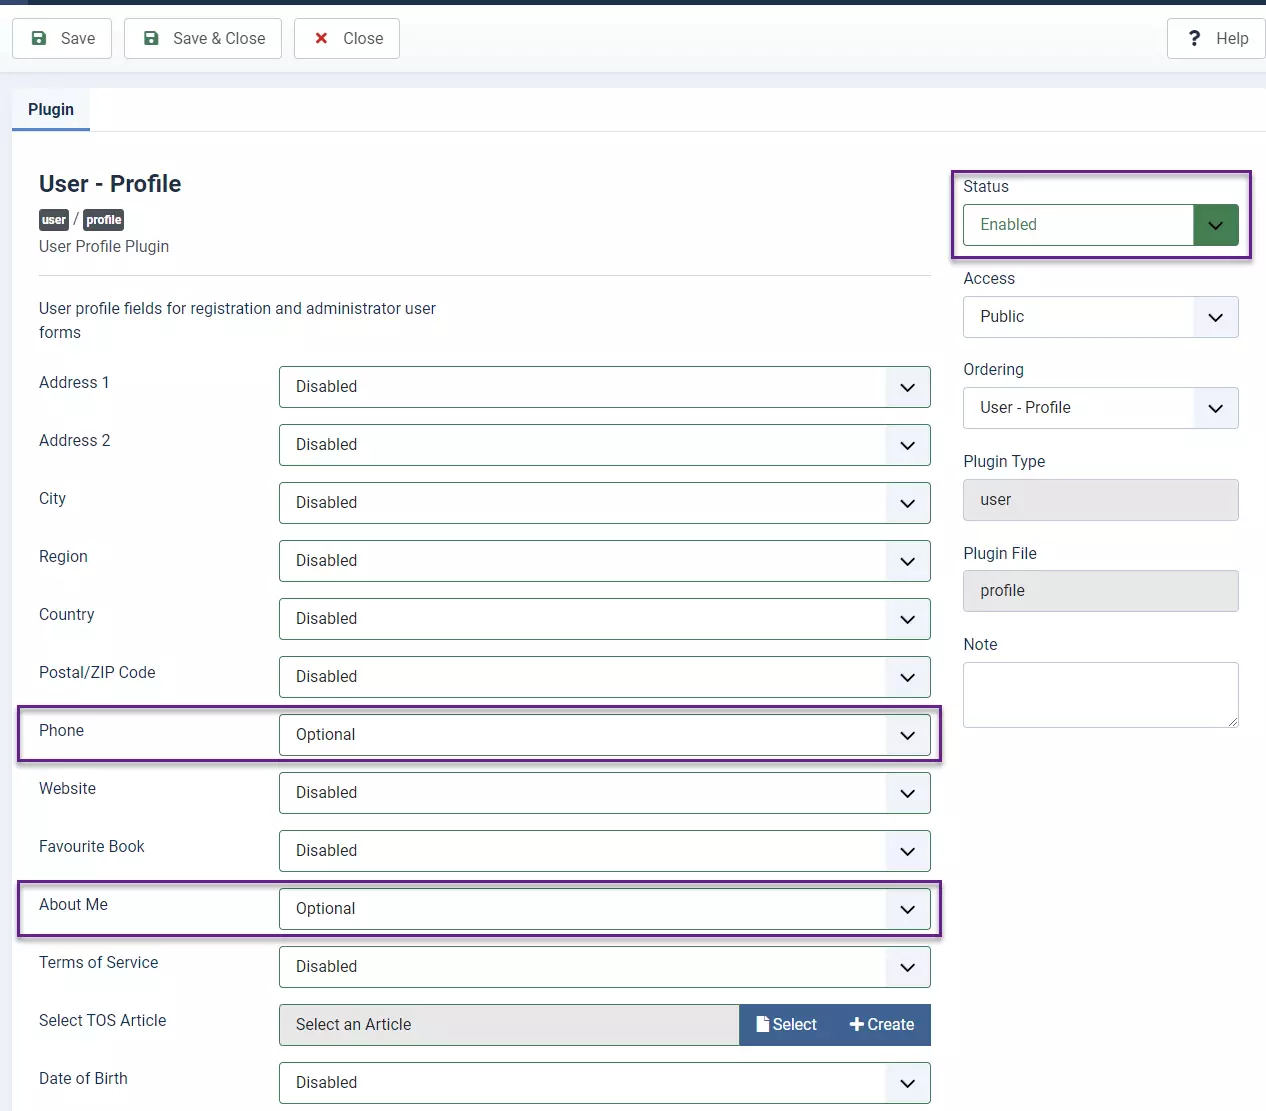
On the settings page for this plugin, we can select from many pre-made fields. There are two sections, each containing the same field options.
The fields in the first section are the fields that get displayed on the user registration page.
The fields towards the bottom are the fields that the user can edit after they register, from their user profile settings.
Each field can be disabled (hidden entirely), made optional, or made required.
I’m going to enable the plugin, disable all the fields except the phone and about me fields, and make these two fields optional. The screenshot doesn’t show the bottom part, but I’ve made these fields optional there as well.
Make any changes you’d like and save the plugin.
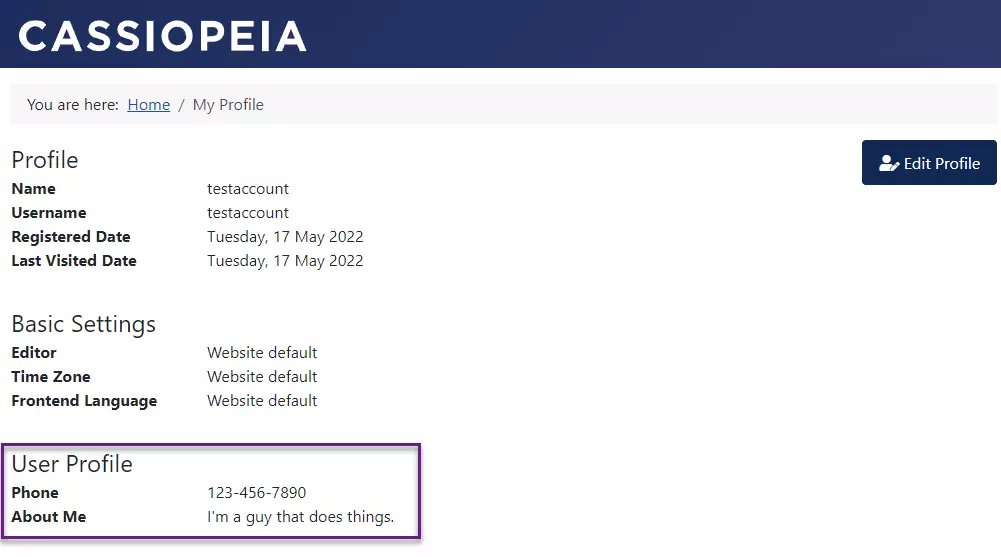
Now if I go to the front end and edit my user profile, I can change the settings for phone number and about me. These get saved for future reference and are displayed on the user profile. Note that managers, administrators, and super users are the only people who can view the details of other user’s profiles.
If you want to make user profiles visible to the public, or other regular users of the website, you will have to use a third-party extension. Joomla does not have this capability built in.
You must be careful when collecting sensitive user data. If you’re collecting user data, you should have a privacy policy and terms of service agreement in place. These documents should explain what you use the collected data for, who it gets shared with, and how it’s protected. While Joomla is secure and receives regular security updates, it’s not infallible.
Avoid collecting sensitive data if possible. Do not collect user tax IDs, credit card numbers, etc. unless you have a full-time information security professional on staff.
If you create a terms of service agreement, there is an option in the user profile plugin to link to this article. Users will then be required to accept the terms before creating accounts. This is highly recommended.
You can view this website’s terms of service for reference. There are also many terms of service generators and templates you can find online for help.
Multiple Users and Check-ins
If you’re running a website with multiple users with permissions greater than registered, it’s probable you’ll have a time when multiple users are trying to modify the same item at the same time. We don’t want an author editing their article at the same time an editor is trying to revise it – this would result in one of the two user’s version of the file overwriting the other. A loss of work would occur. This is why Joomla has a system in place to check items in and out.
Whenever someone with permission to edit an item, be it a menu item, an article, a module, or anything else, the item is automatically given the status of “Checked Out.” This means it cannot be edited by anyone else, other than the person who opened the item first.
When another user is editing an item, a lock icon will appear next to the item. If you hover over the item, details about who is currently editing the item will be provided.
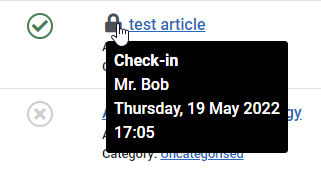
It tells you who is editing the article, and what time they started editing the item.
If a second user attempts to edit the article while another user is working on it, they won’t be able to access the item at all. An error message will be displayed, even if the user has higher permissions than the person who checked it out.

When the user who checked out the item saves and closes the item, it will be checked in again. The lock will disappear and other users can edit it again.
It is possible a user might leave an item open for an extended period, preventing others from editing it unintentionally. To avoid this, you should properly inform your users of how the check in/out system works.
If you notice someone has checked an item out for an extended period of time when you need to edit it, administrators can force the item to be checked in. This can be done by simply clicking the lock icon as an administrator. The item will be checked back in so someone else can start editing it again.
If you check in an article while another is editing it, save your changes, the article will be checked back in. It’s possible that the original user will overwrite your changes when they save their version.
If this happens, you will have to look at the version history for the item to see what changes the writer and admin made, then make a third edit to incorporate both changes, or discard one version. Avoid checking in items while others are editing them, unless absolutely necessary.
Preventing Save Conflicts
- Explain how the check-in system works to your content writers, authors, publishers, and administrators.
- Implement rules on how long users may leave items open.
- Require writers to save and close their work after making edits.
- Create separate scheduled times when authors, editors, and administrators are supposed to make their changes.
- Make users add version notes to their edits so you can easily see who made what changes.
- Make sure users close, or save and close all items after editing.
Global Check-in
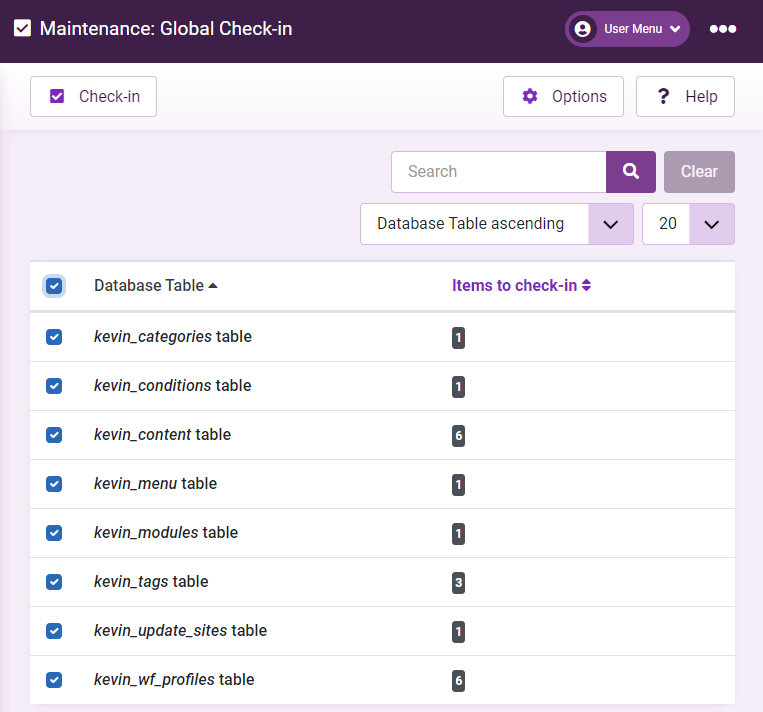
The Global Check-in option can be found under the “System” page of the administration menu under the Maintenance section. The number next to it shows the amount of item types across the whole website that are currently checked out. If you open the Global Check-in page, it will list all these items.
The Global Check-in page allows you to check in all the items at once based on which table in the database they’re a part of. For example, as I’m writing this article, I’ve noticed that a lot of items are not checked in. This is not because I have many users editing items (I’m currently the only writer/admin for this website), but because I must have exited my browser window on these pages without clicking the “Close” button first.
To check items back in, just select the tables you want to check in, and click the “Check-in” button.
Remember, this will check in everything in each of the tables selected. If you have multiple users currently editing content, you may not want to check in everything at this time to prevent possible save conflicts. It may be best to do global check-ins after hours or when you’re the only user online.
Internal User Monitoring
If you’re working on your website with multiple authors, managers, admins, etc. it’s important that you have ways to communicate with them internally and see what they’re up to.
In addition to seeing what users are currently editing items based on their check in status, you can also view a log of everything everyone has done.
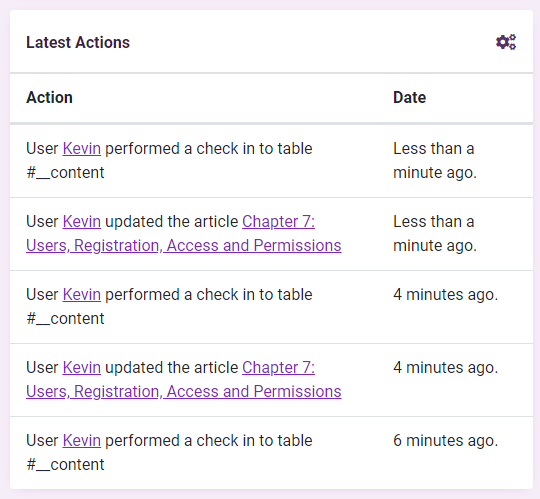
In the home dashboard, by default, a module is displayed titled “Latest Actions.” This gives you a quick overview of what users have recently made changes to parts of the website. It has information on what items got edited and when, along with what settings were changed by administrators. If you save an article, upload a new template, or change some settings, each action will appear in the actions log.
You can see in the screenshot of my action log, I recently saved this very article and checked in a few items.
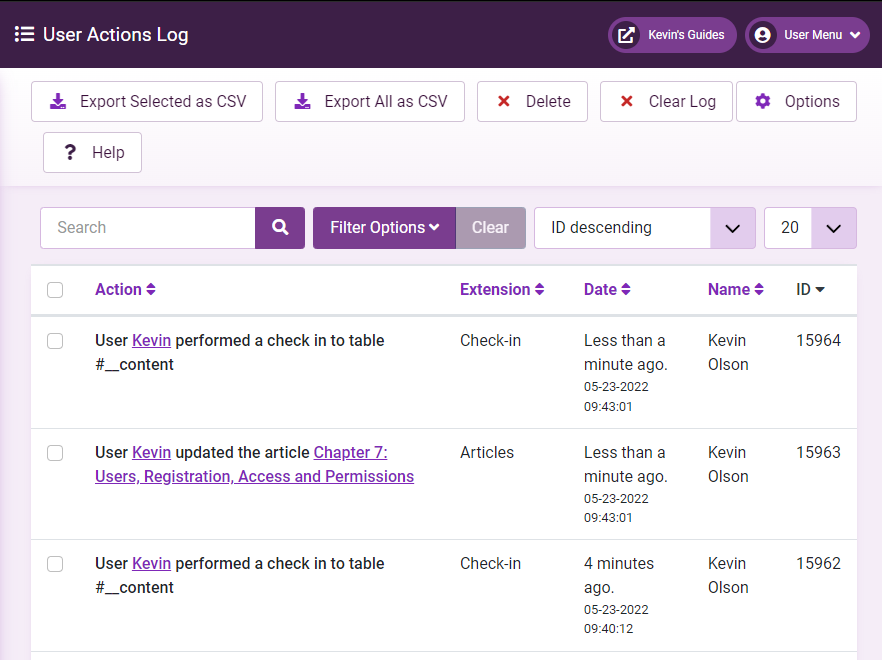
You can view a full list of every action ever taken by any user of your website by visitng the User Actions Log under the User part of the administrator menu.
Each time anyone does something, it is logged as an action. My action log is a massive 740 pages long! I should probably clear these out.
You can also export all the actions as a CSV for later reference and save it to your PC, if you want to clear up the log stored on your website.
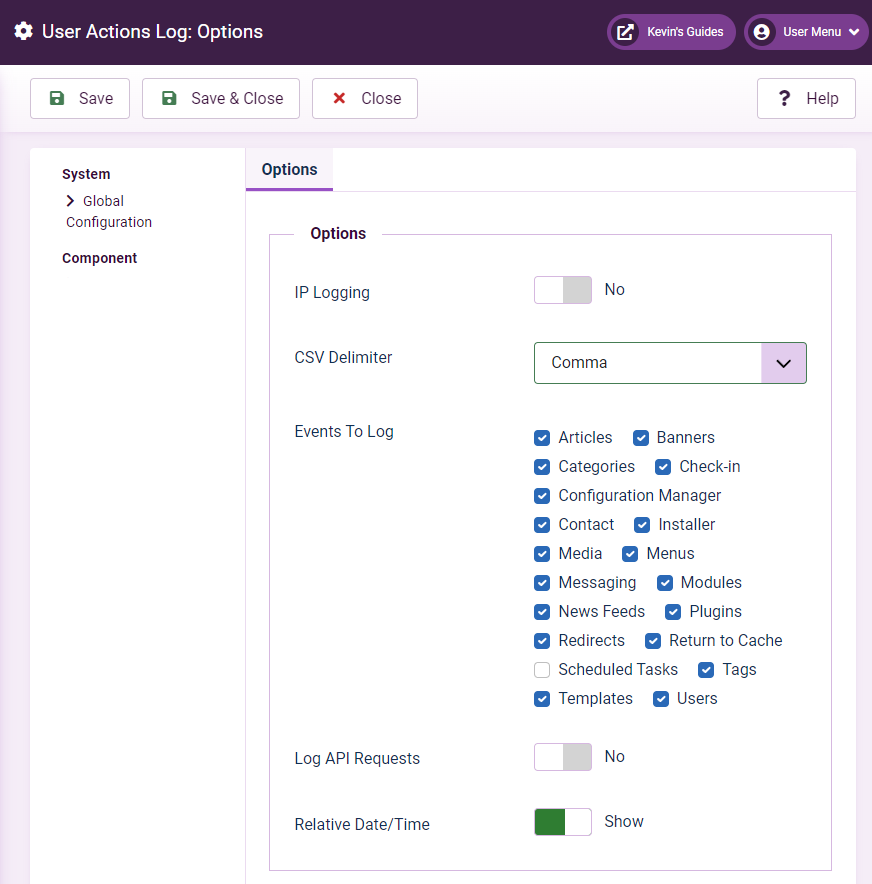
Finally, if you open the options for the User Actions Log, you can make changes to what actions get saved in the log. If you only want to record certain actions, you can disable logging of certain items.
Conclusion
This concludes Chapter 7 on managing users and permissions in Joomla 4. You should now know all the essentials. For further reading on user management, check out the other guides related to users.
Assignment
Instructions: Enable user registration on your website. Add links that only users can see so they can manage their portfolio and log out of their account. Consider adding a separate user menu, that is only shown to logged-in users. Be sure to test the user registration system to make sure it works. Register a test account, log in, and ensure everything is working properly.
Consider creating test accounts in different user groups, so you can see how the different roles behave.
Review the User Actions Log, and see what information Joomla has logged about you since you started working on your website.

