In the previous chapters, we’ve discussed how to add items to the main menu. In this chapter, we’ll be going into a bit more detail about how to manage and customize menus and site navigation. A menu in Joomla allows users to navigate to different areas of the website by clicking links. They do much more than that, too. Menus can control how a page looks, what gets displayed, and how the URL is structured in the browser address bar.
Lots of examples will be provided to demonstrate these concepts.
Menu Manager
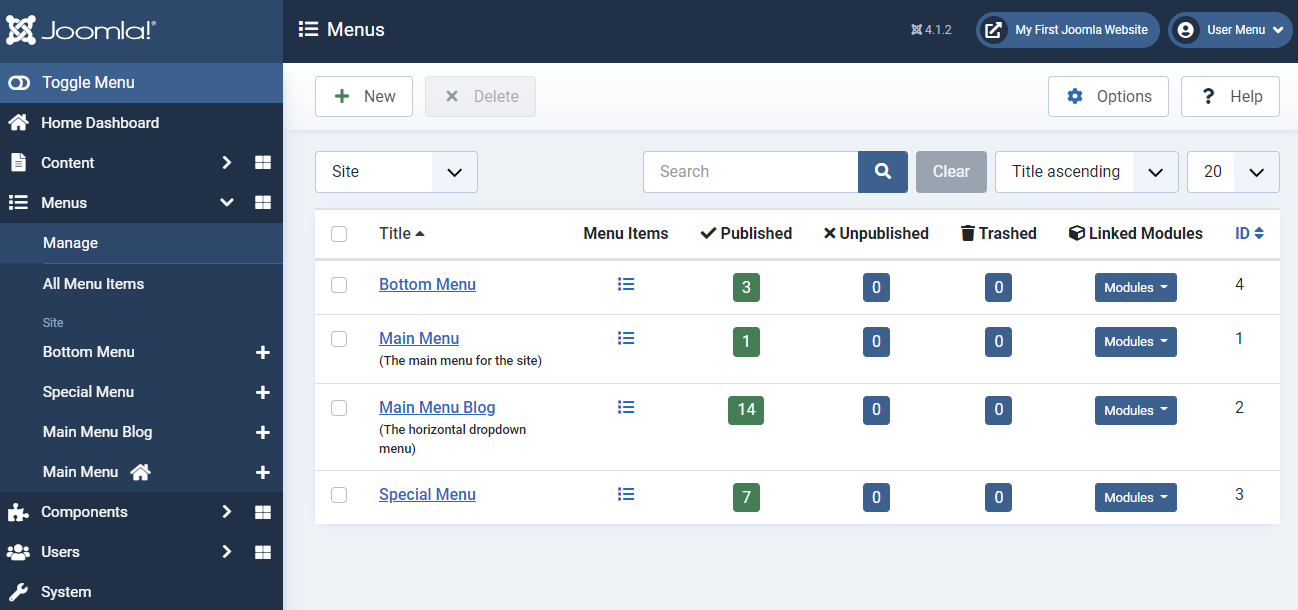
Let’s get started by looking at the menu manager. It can be found under “Menus” – “Manage.”
This page displays a list of all the menus on the site, how many items are in each menu, and provides links to edit each menu.
Main Menu
The most important menu is the main menu. This is likely where you’ll put most of your links. Open up the main menu.
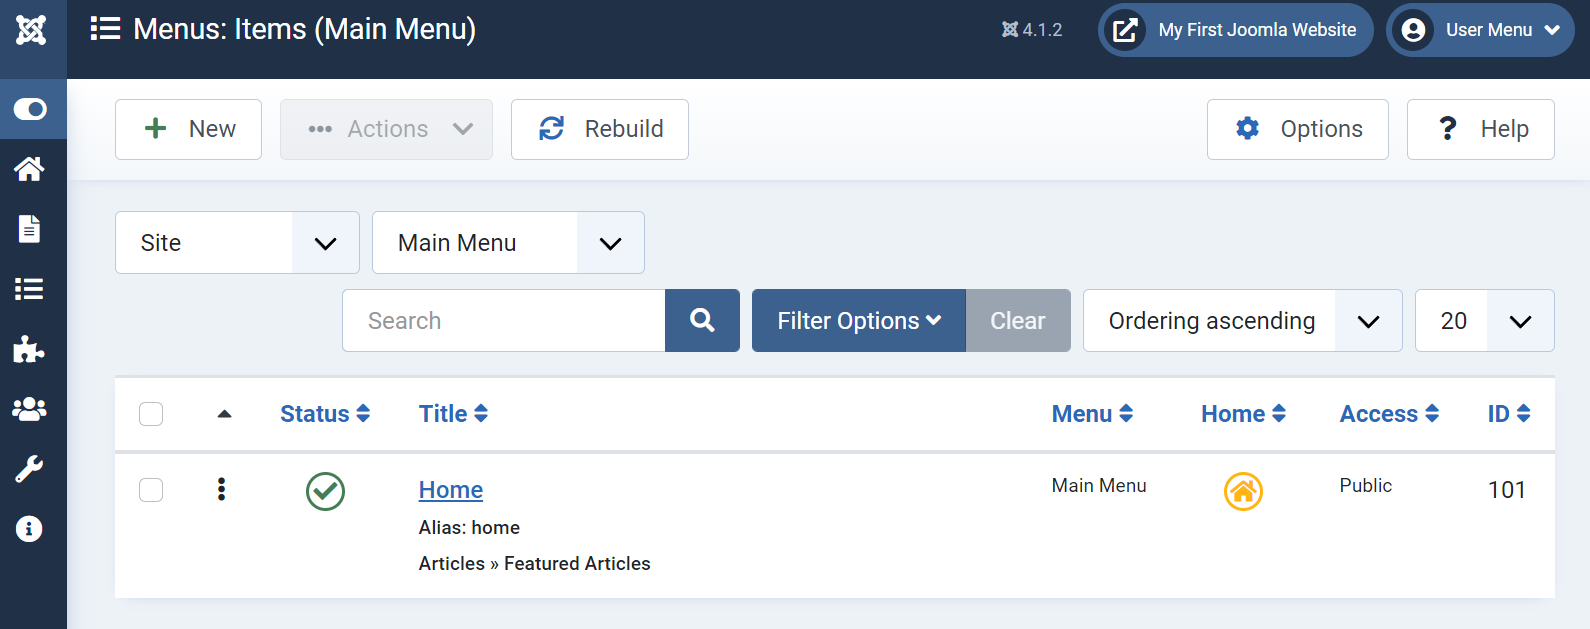
There’s only one item in the menu at the moment – the home link. You can see it’s also marked with a golden Home icon. This shows that this item will be the home page for the entire site. So when people visit https://yoursite.com it will take them here. Your site is required to have one menu item marked as Home at all times, as all sites need a home page. You can change it later.
Note that under the “Home” item it says “Articles >> Featured Articles.” This is the menu item type. It means the Home item will display the featured article view from the Articles component.
By default, the main menu is displayed in the main menu module on the right side of the site. You can see it by viewing your front end.
If you were following along with previous chapters, you may already have additional menu items here.
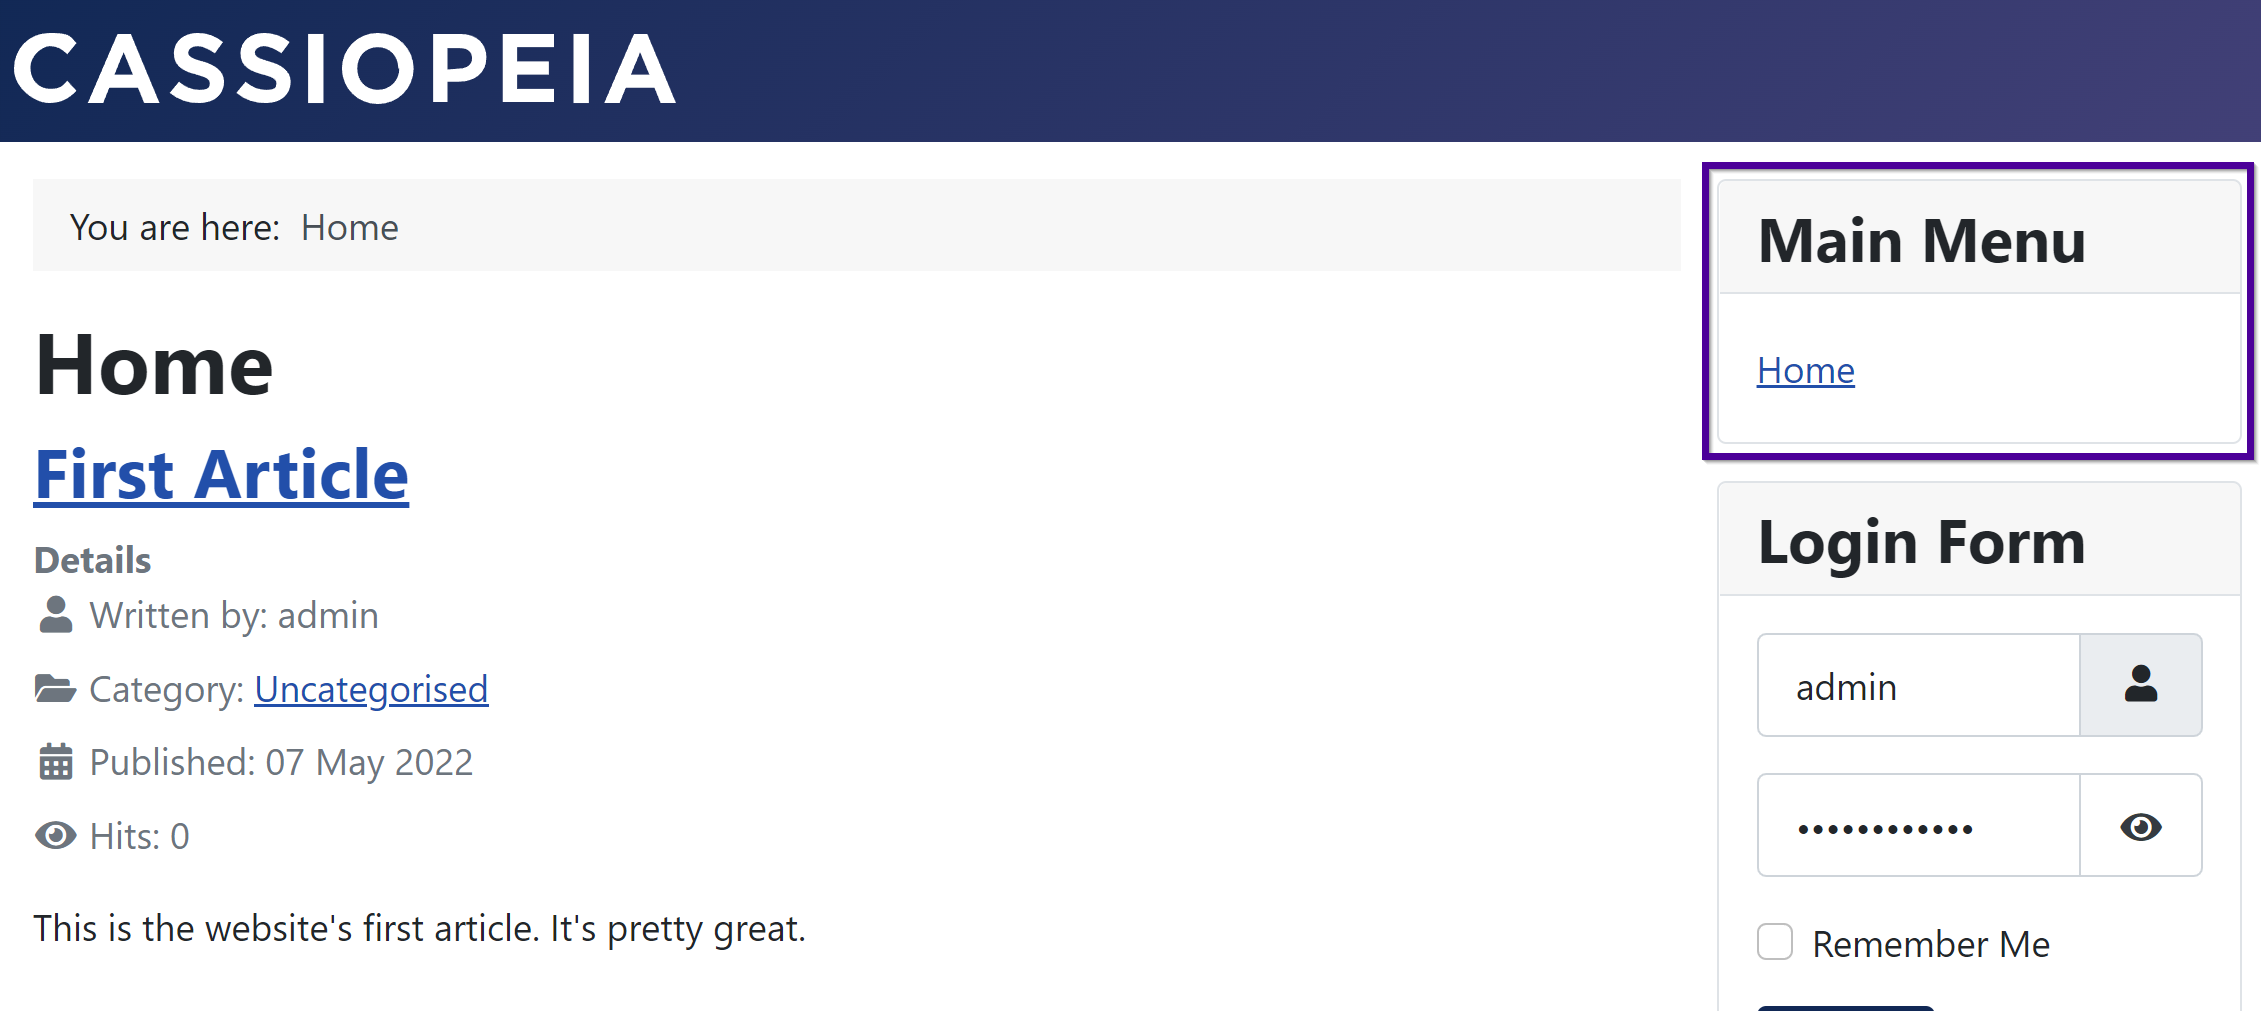
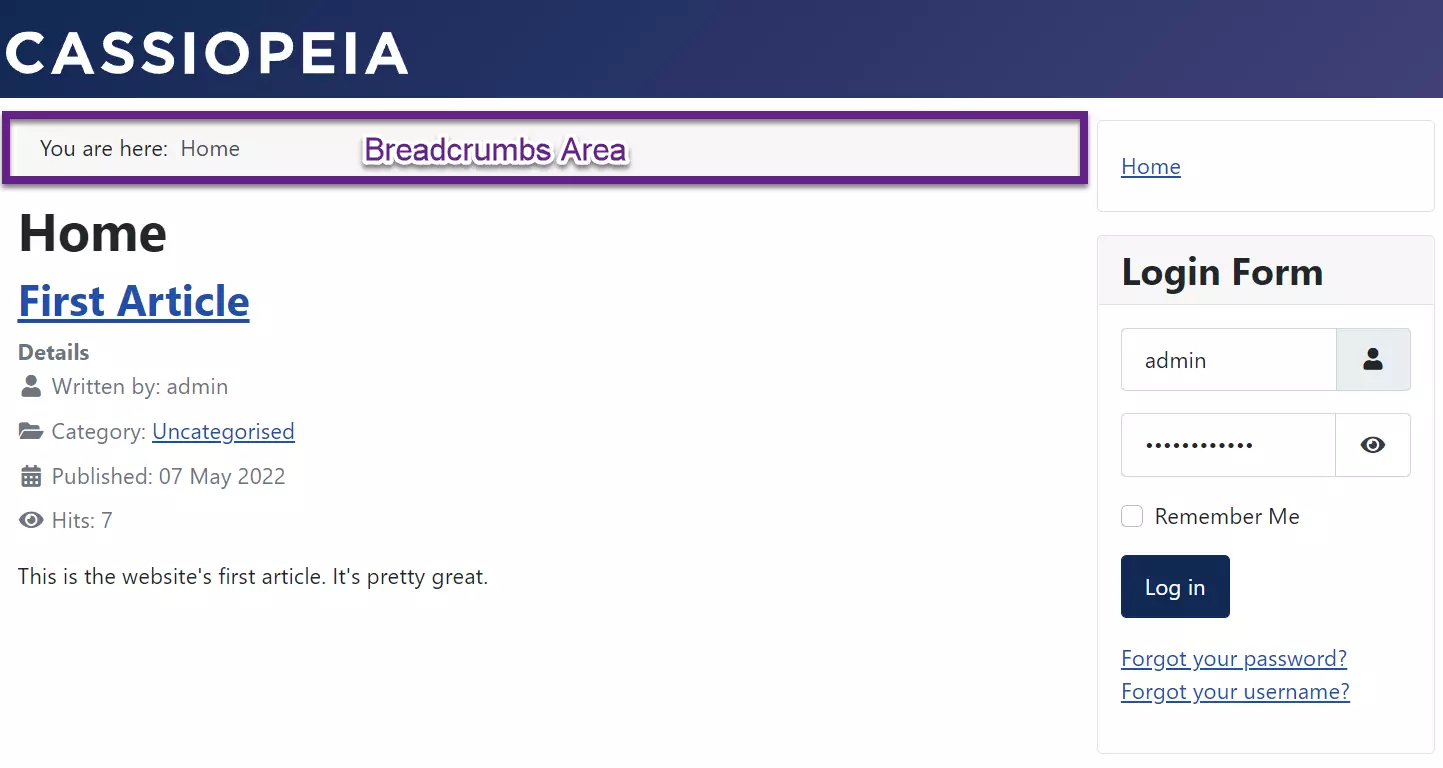
The area at the top of the page that says “You Are Here” is known as the breadcrumbs. It will display the title of the menu item you’re currently on in the website, and any parent pages of that item.
This provides an easy way for users to see where they are on the website.
Search Engine Optimization (SEO) and URL Rewriting
In the Site settings (first tab) under Global Configuration, there’s a section for Search Engine Optimization (SEO). This contains settings pertaining to how URLs appear in the address bar for your website.
These settings are important, as they tie in directly to menu navigation. The way you structure your menus and menu items affects the URLs of the pages in the address bar.
The way links look in Joomla is a bit confusing, unless you enable Search Engine Friendly URLs:
For example, here’s what a link to an article might look like with SEF URLs turned off:
http://mywebsite.com/index.php?option=com_content&view=article&id=1:first-article&catid=2&Itemid=101
That’s way too long for anybody to remember off-hand or reasonably type.
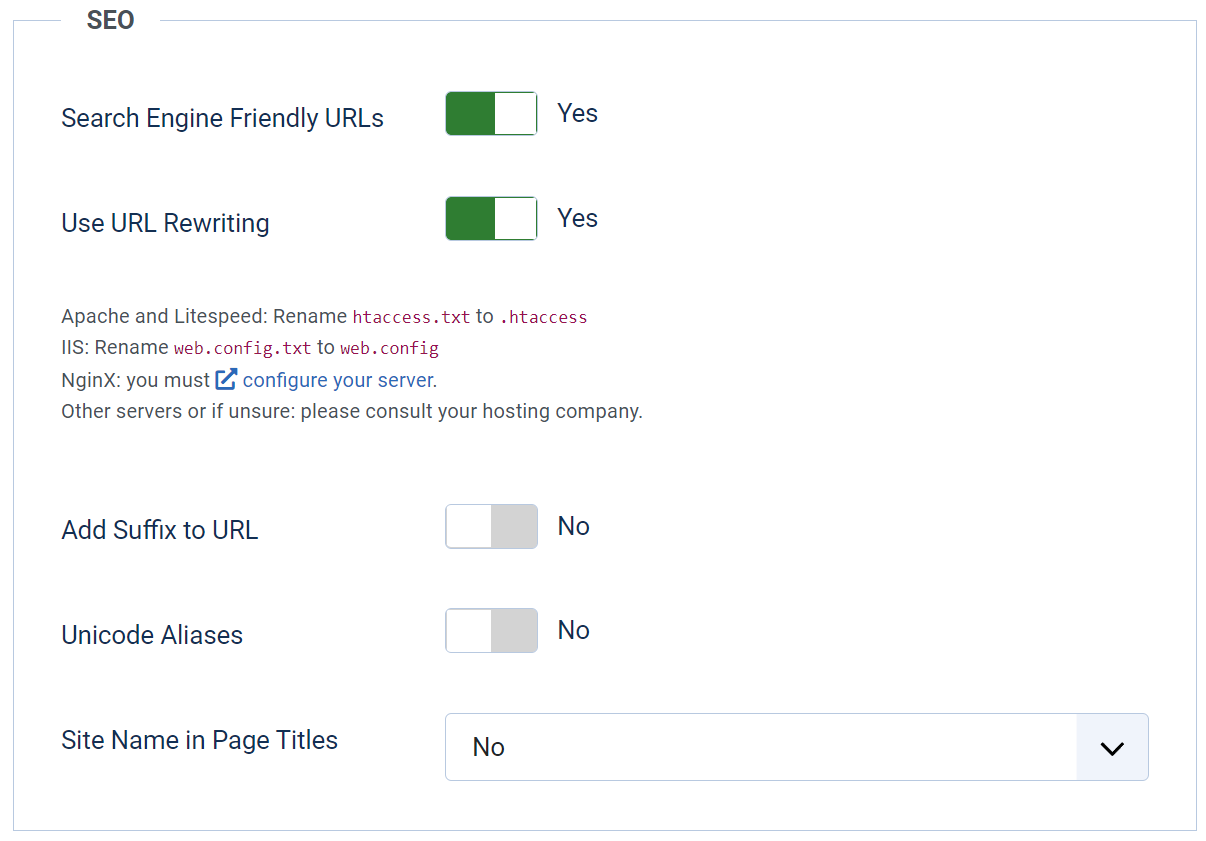
With SEF URLS turned on, we get URLs that look more like this:
http://mywebsite.com/index.php?view=article&id=1:first-article&catid=2
It’s a little shorter and easier to type, but by the end of this guide, we’ll use menus to make them look more like this:
http://mywebsite.com/pages/my-first-post
You should always enable Search Engine Friendly URLs, unless you’re using a third-party extension that needs it off.
The URL rewriting part option is the option we’re going to focus on, as it requires a special step to enable.
URL Rewriting In Joomla
A URL is a page addressed which can be typed into an address bar. For example, google.com is a URL.
By default, URL rewriting is off. This means “index.php” will automatically be a part of all sub-page addresses. This looks kind of ugly. We want to remove it from the link.
Consider this. I have created a new menu item called “About Us” in the main menu which links to a single article using the settings below:

When I navigate to the page using the menu item, this happens. Notice the address bar. The address is mywebsite.com/index.php/about
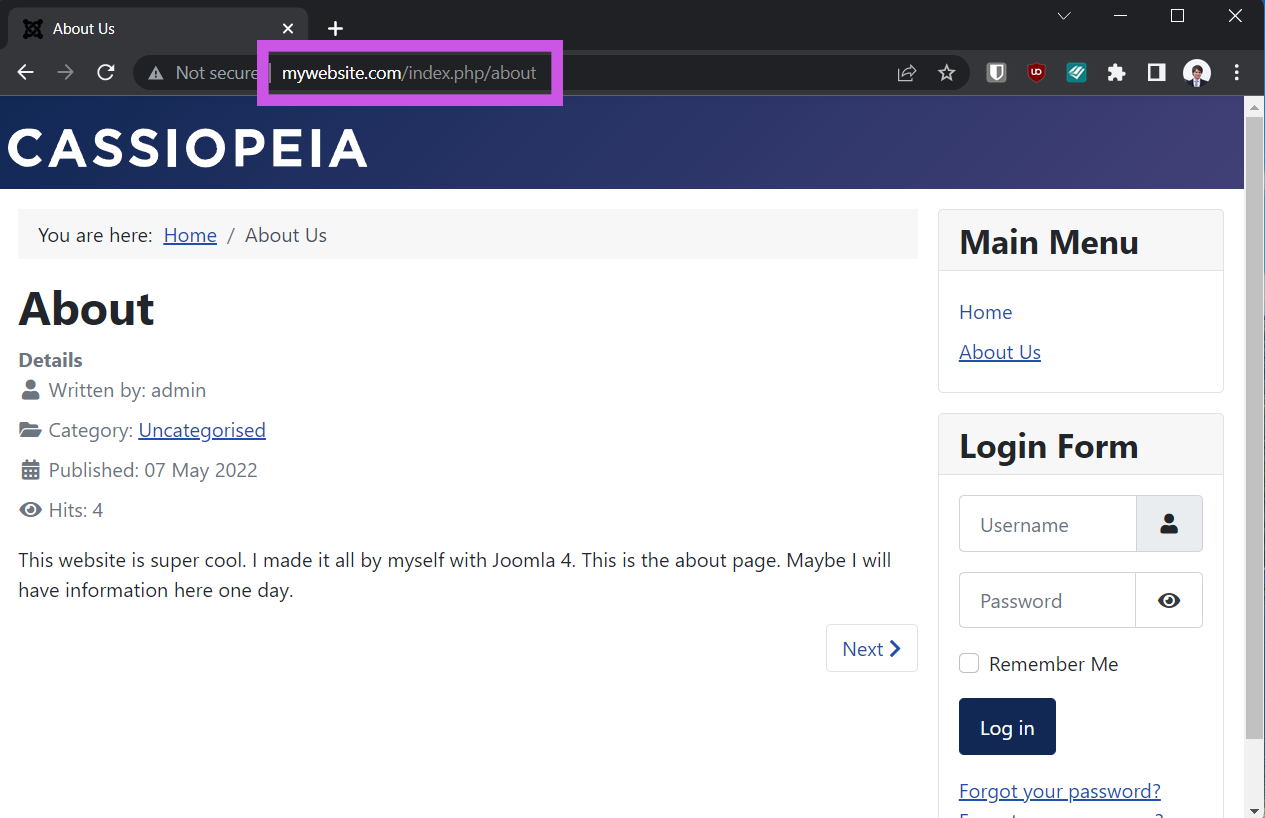
The “about” part of the URL at the end came from the menu item alias. This is the part that gets used in the URL.
You should consider if people need to get to a page by typing it in the future. For example, say you want to tell a colleague to visit your about page. It’s much easier to tell them to visit yoursite.com/about versus yoursite.com/index.php/about – no one will remember to type the “index.php” part unless they write it down, so we want to omit it from the URL entirely.
We can do this using URL rewriting. Enable this setting in the Global Config under the SEO section of the Site tab if you haven’t done so already.
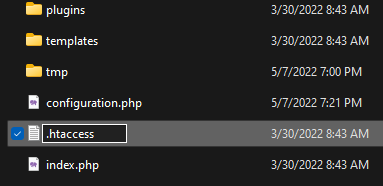
For this to work, a file needs to be changed in the web server. We’re running Apache (and so are 99% of web hosts out there), so we need to follow the instructions Joomla gives us after we enable this setting. It says we need to “Rename htaccess.txt to .htaccess“
You may not be familiar with naming files like this. Usually files are named filename.type – in this case, the file name and file type is just “.htaccess” there’s nothing before the period.
If you’re running XAMPP on a local test server like I am, you can open File Explorer and navigate to your website’s root Joomla directory (the place you installed Joomla at in Chapter 2).
Rename htaccess.txt to .htaccess
If You Can’t See The File Extension…
Make sure you’re renaming the entire file name, including the .txt at the end. If you don’t see the .txt at the end, you may have file extensions hidden. To display file type extensions in Windows 11 click “View – Show – File Extensions” in the Explorer window. Then return and rename htaccess.txt to .htaccess

If your website is hosted on a paid server, or somewhere else, you will need to use your web host’s file manager or FTP client to rename the file from htaccess.txt to .htaccess
.htaccess is a configuration file read by the Apache web server which enables Joomla to use URL rewriting. Save the global configuration with URL Rewriting turned on, if you haven’t done so already.
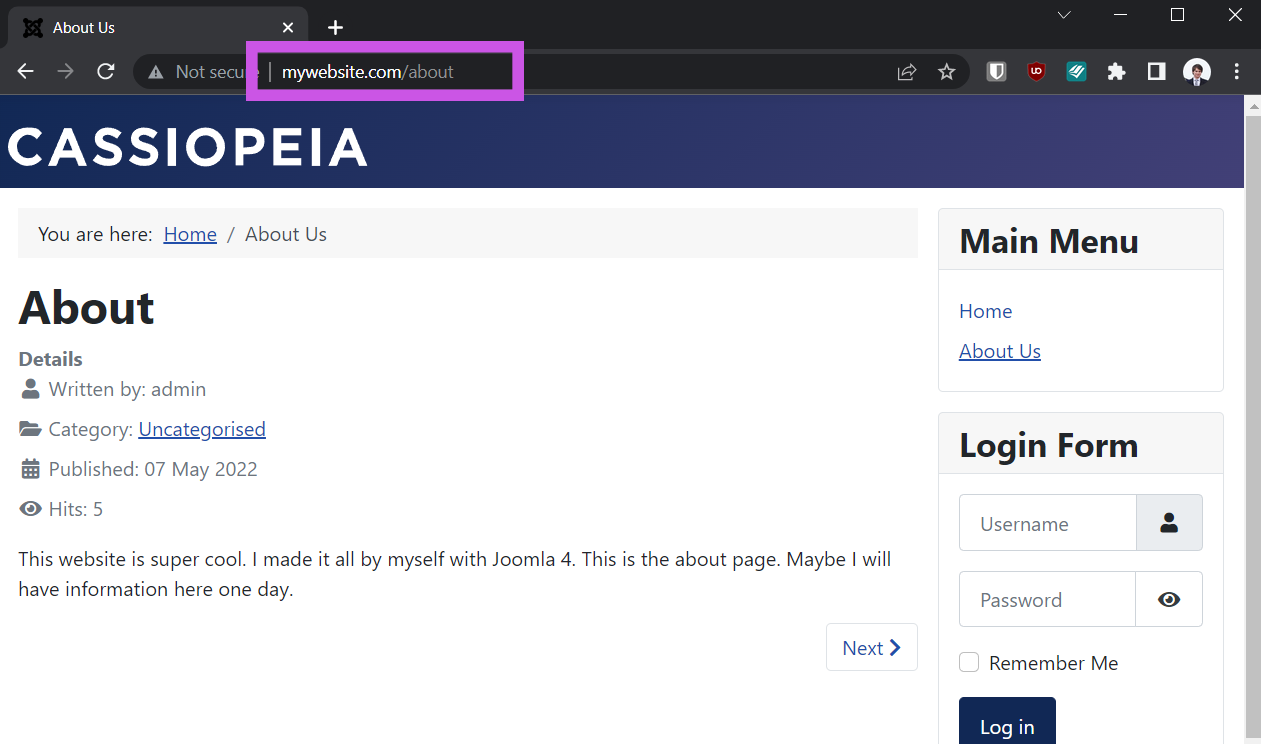
Now, when you reload your website and navigate to the about page created, the URL should work without the .index.php part. The index.php file will no longer be a part of the URL for any page on your website.
We have briefly touched on the alias field in articles, categories, and menu items before. The alias property is a shortened name for a piece of content or menu item. It’s important to use good naming conventions in your aliases, because the alias of an item ultimately becomes part of the URL in the address bar. For content, an alias may be set at the article level, the category level, and the menu-item level. Which alias gets used depends on how your menu is set up.
In the previous example with the “About Us” page I created, the alias for the menu item was set to “about” – that’s why the link became “mywebsite.com/about” and not “mywebsite.com/about-us”
When you give an article an alias in the article editor, next to the title, you’re assigning an article alias. Whenever your site links to that page, if there’s no direct menu item link to that article, the alias from the article will be used in the URL. If you create a page that links directly to an article, then the alias from the menu item will be used instead of the alias from the article itself. If a direct link to an article is created as a menu item, any references to that item elsewhere on the page will automatically be redirected to the menu item.
Example
Consider this, I have created a new category called “Site Pages” that stores articles I want to display as single pages on my website. I’m going to put three articles in this category. One for my about us page, one for my terms of service page, and one for my website’s privacy policy.
- Article Title: Privacy Policy
- Alias: privacy-policy
- Article Title: Terms of Service
- Alias: terms-of-service
- Article Title: About Us
- Alias: about-us
My “Site Pages” category looks like this:

Pay attention to the alias for each item. The alias for Privacy Policy is privacy-policy, Terms of Service is terms-of-service, and About Us is about-us. For demonstration, it’s important that you remember these are the article aliases (different from a menu alias, category alias, or a title).
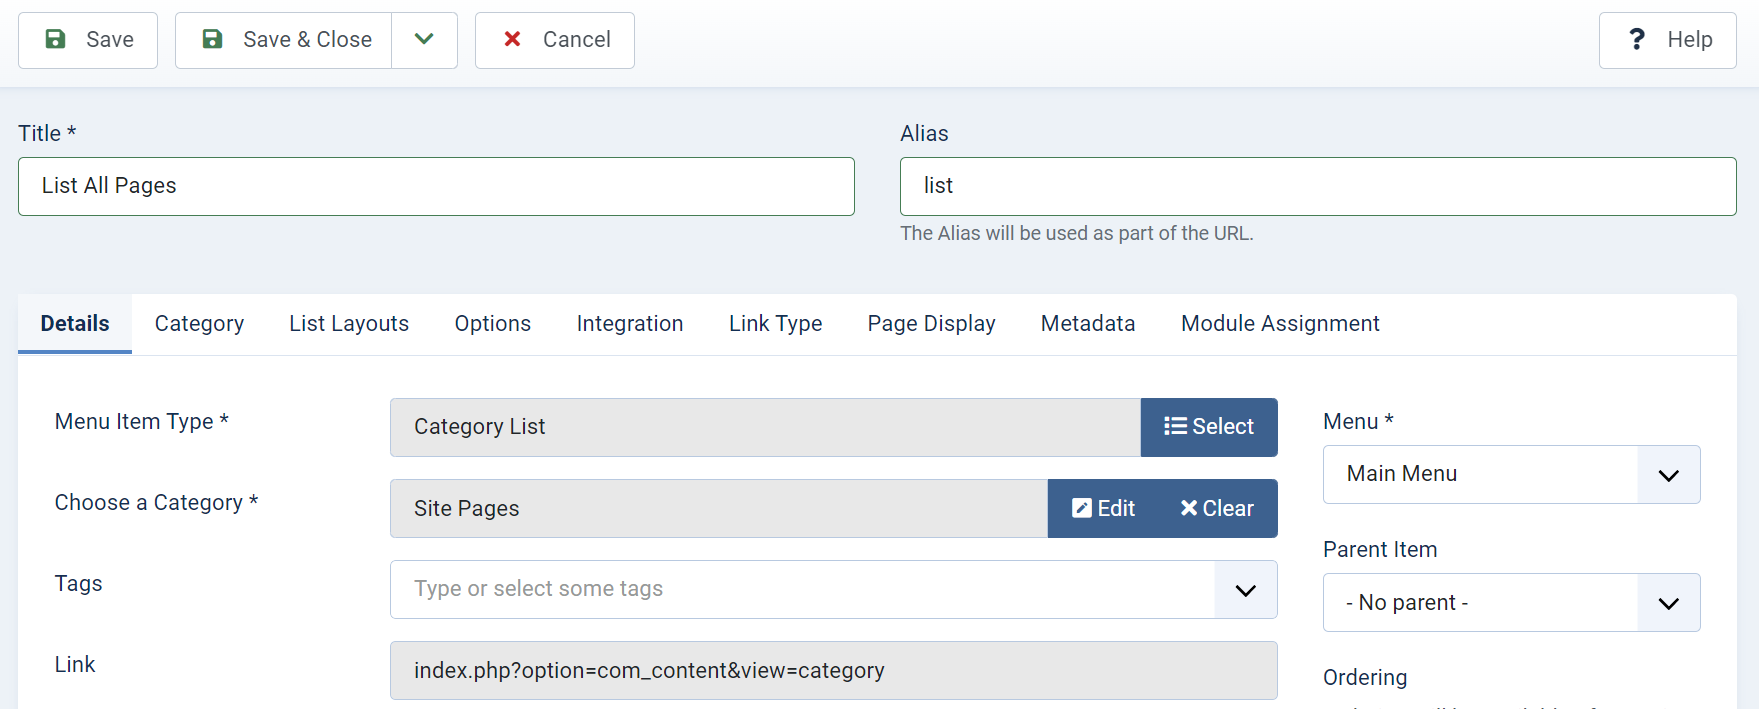
Next, I add a “Category List” menu item to my main menu. Recall that this menu item type lists all the articles in a single category. I’m going to list all three articles in the category I created above.
The alias for the “List All Pages” menu item is set to “list”
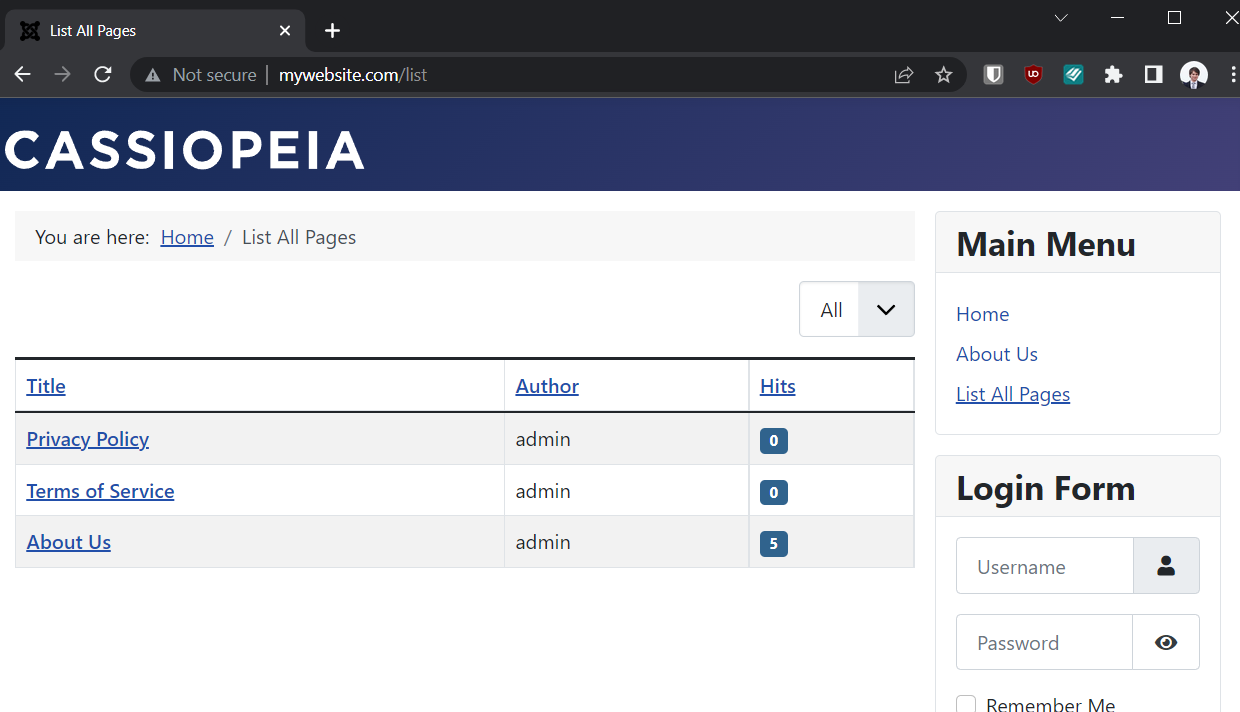
On the site’s front end, when I click the link, it now takes me to the list of articles in the category.
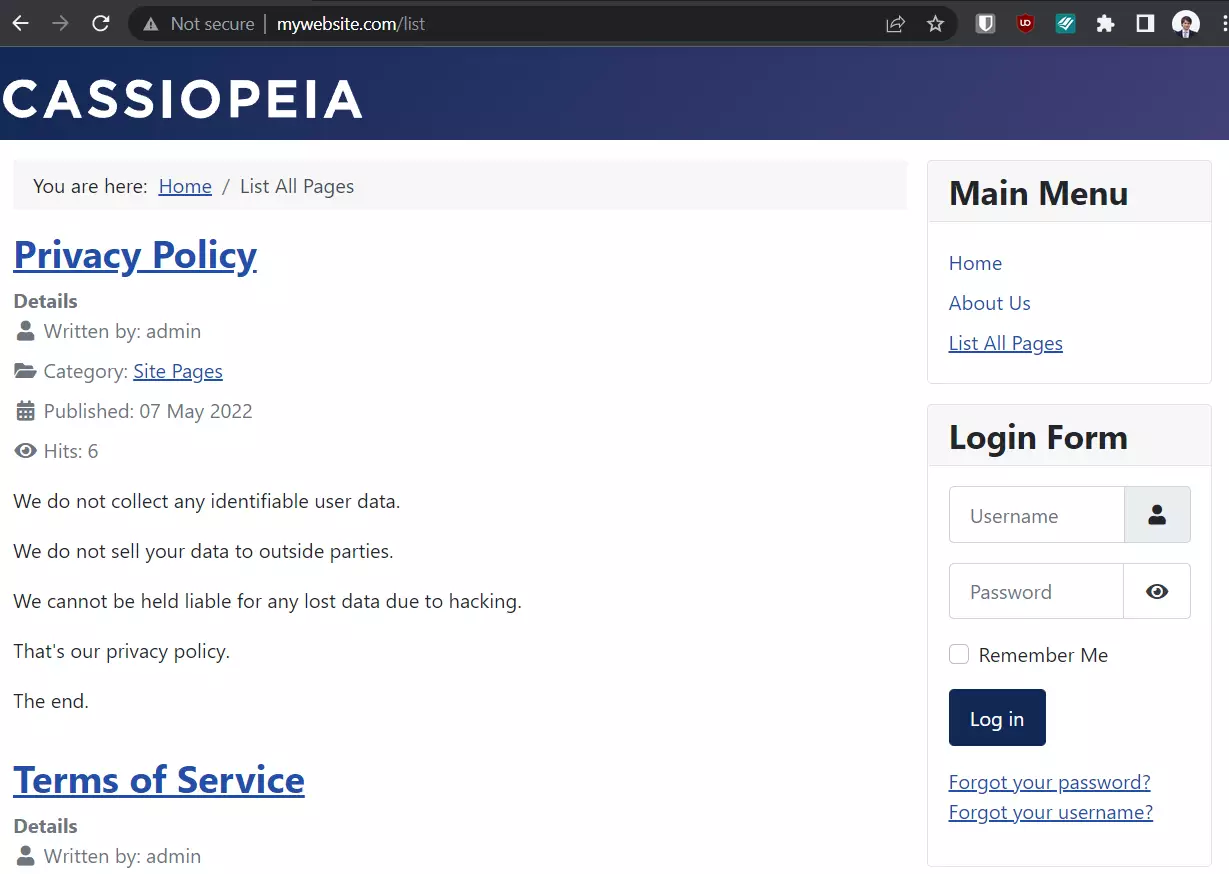
Note that since I set the alias for the menu item to “list” the URL becomes “mywebsite.com/list”
Note that in the breadcrumbs it says “You are here: Home / List All Pages” the “List All Pages” part of this comes from the Menu Item title.

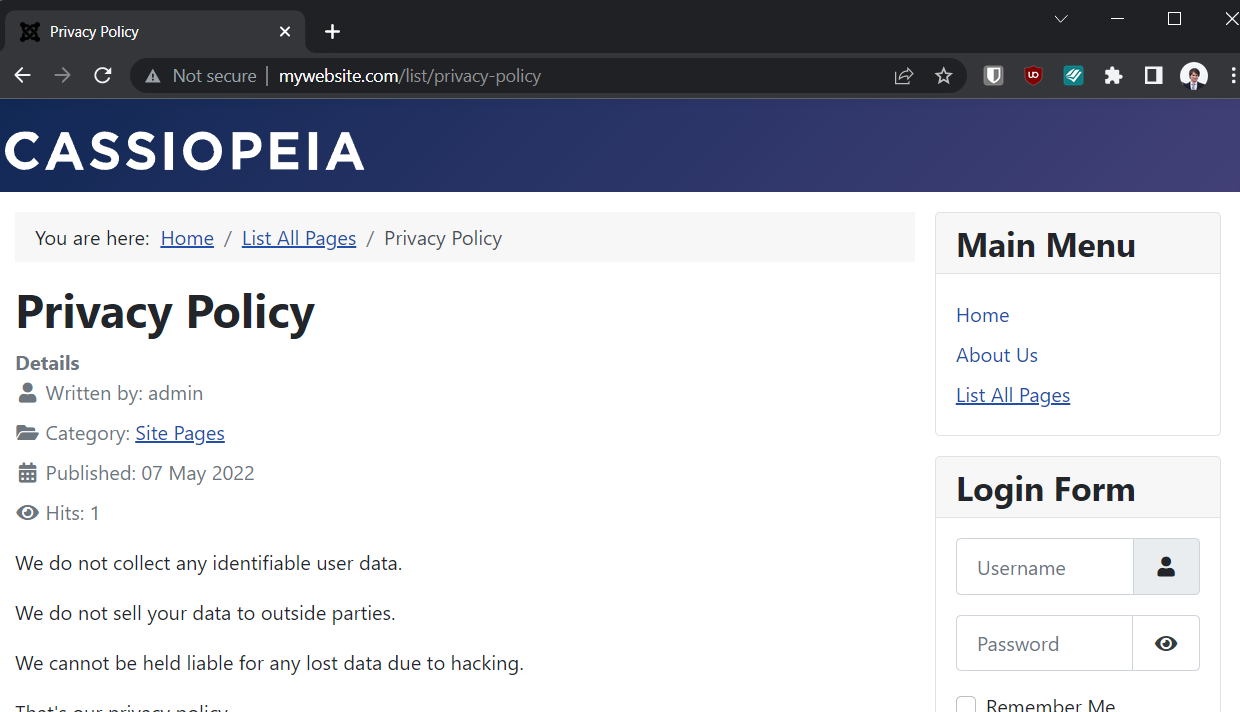
Next, look at what happens when I click “Privacy Policy”
Notice in the URL it has used the alias “privacy-policy.” This comes from the alias set at the article level in the article editor. This is because I have not created a direct link to the “Privacy Policy” page as a menu item.
Also, notice on the main menu to the right, “List All Pages” is underlined, showing that I’m on a sub-page of “List All Pages.”
Since it’s a sub item, the article alias comes in the URL after the menu item alias. It’s list/privacy-policy. List is the parent item and the privacy policy is the child item.
Compare this to the about us page. When I click the “About Us” item from the article list page, it brings us to the “About Us” item in the menu.
Do you see the difference? When I opened the privacy policy, it took me to mywebsite/list/privacy-policy. When I clicked the “About Us” page from the list page, it took me to “mywebsite.com/about” and NOT “mywebsite.com/list/about-us” . Even though I accessed it from mywebsite.com/list.
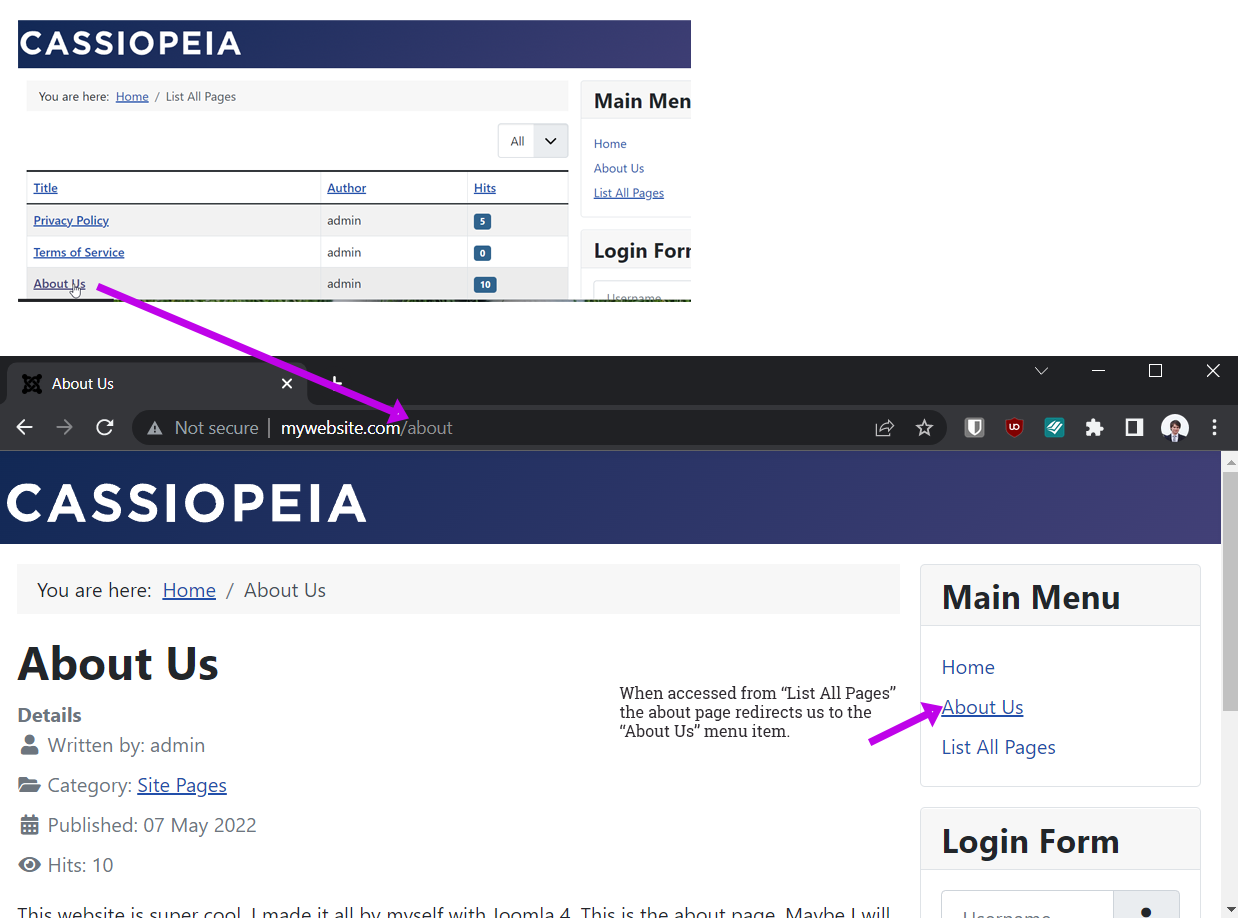
It did this because I already created a direct link to the about us page as a separate menu item. This supersedes the link from the /list page.
This is a useful feature once you realize how it works. It’s important too. We wouldn’t want to have two different links to the same web page. We only ever want one link to a page. If both mywebsite.com/list/about-us and mywebsite.com/about directed to the same article, with different URLs, this would confuse search engines and possibly your website’s users.
Sub Menu Items
It’s possible to create sublevels under menus. Let’s say I want to create a direct link to the privacy policy at “list/privacy” using another menu item. We can create subitem, or child item, of the parent “list” menu item.
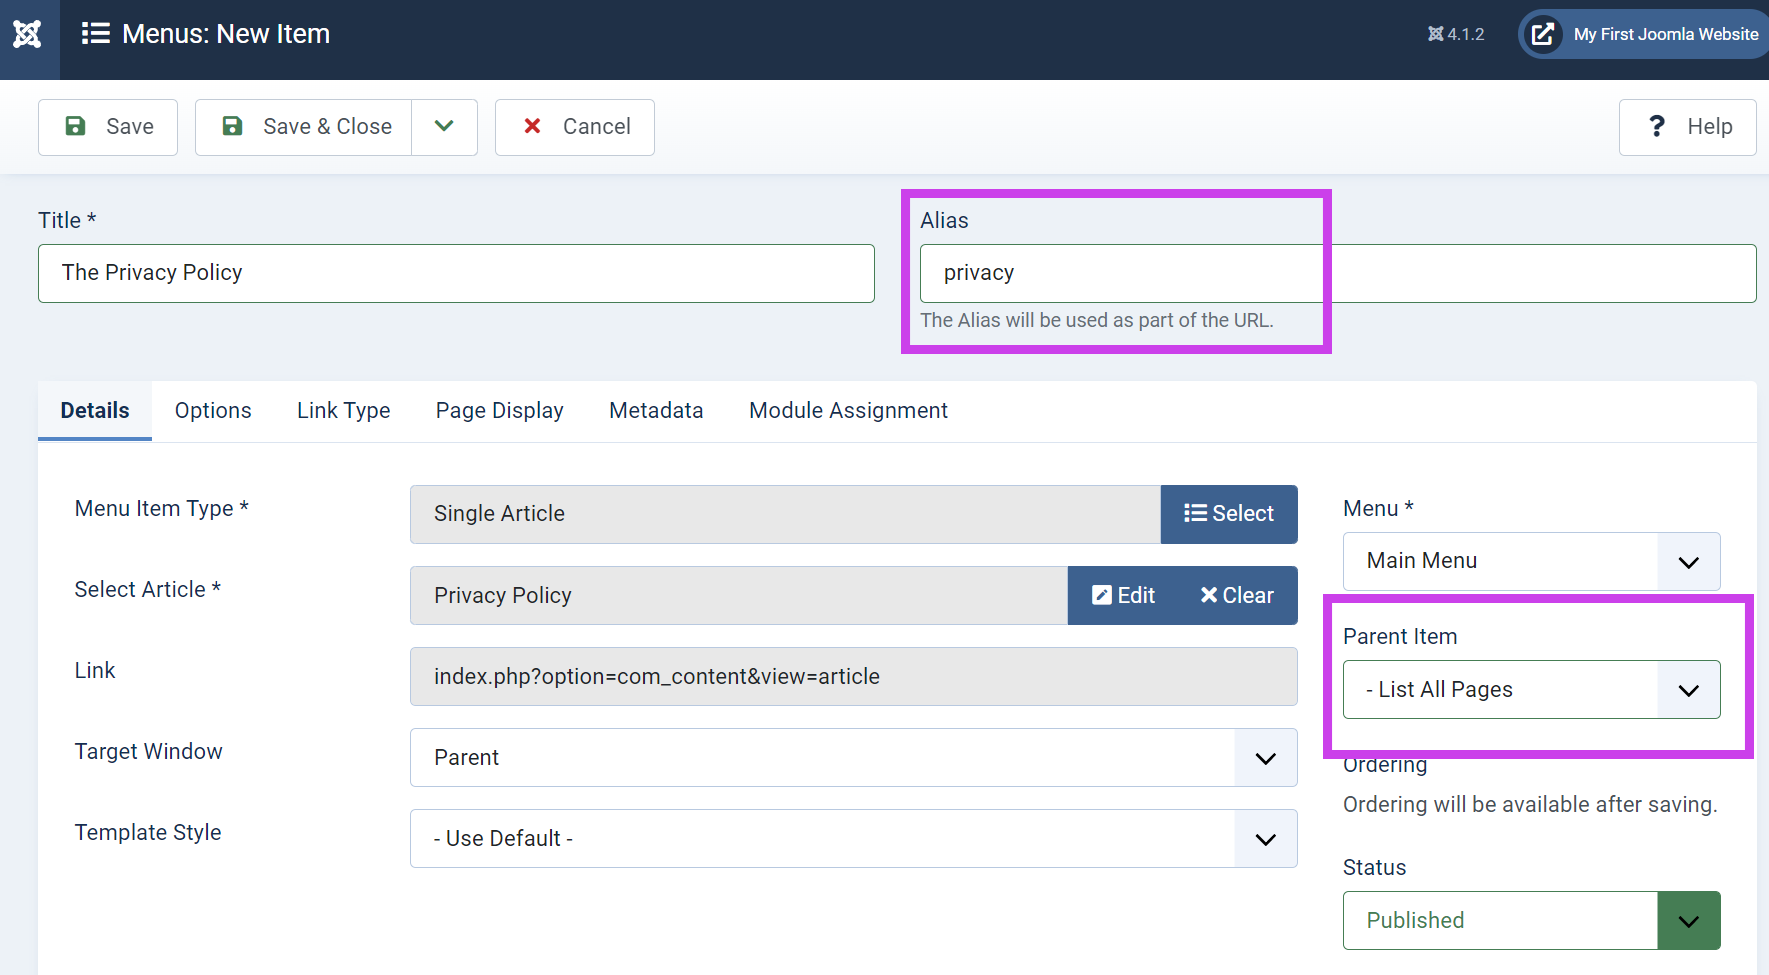
In the following screenshot, I have created another direct “Single Article” item on my main menu. Notice that its parent is “List All Pages” and its alias is “privacy” (not “privacy-policy”).
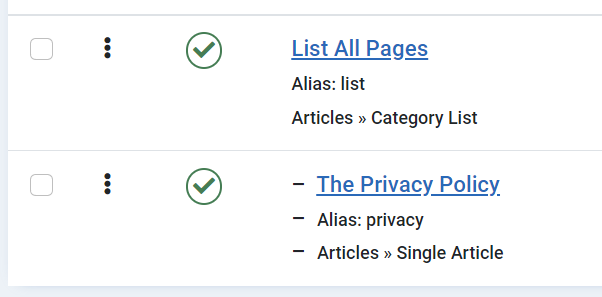
After saving this item, the list of menu items in the menu manager shows a dash in front of my “The Privacy Policy” item to show that it’s a subitem or child item of “List All Pages.”
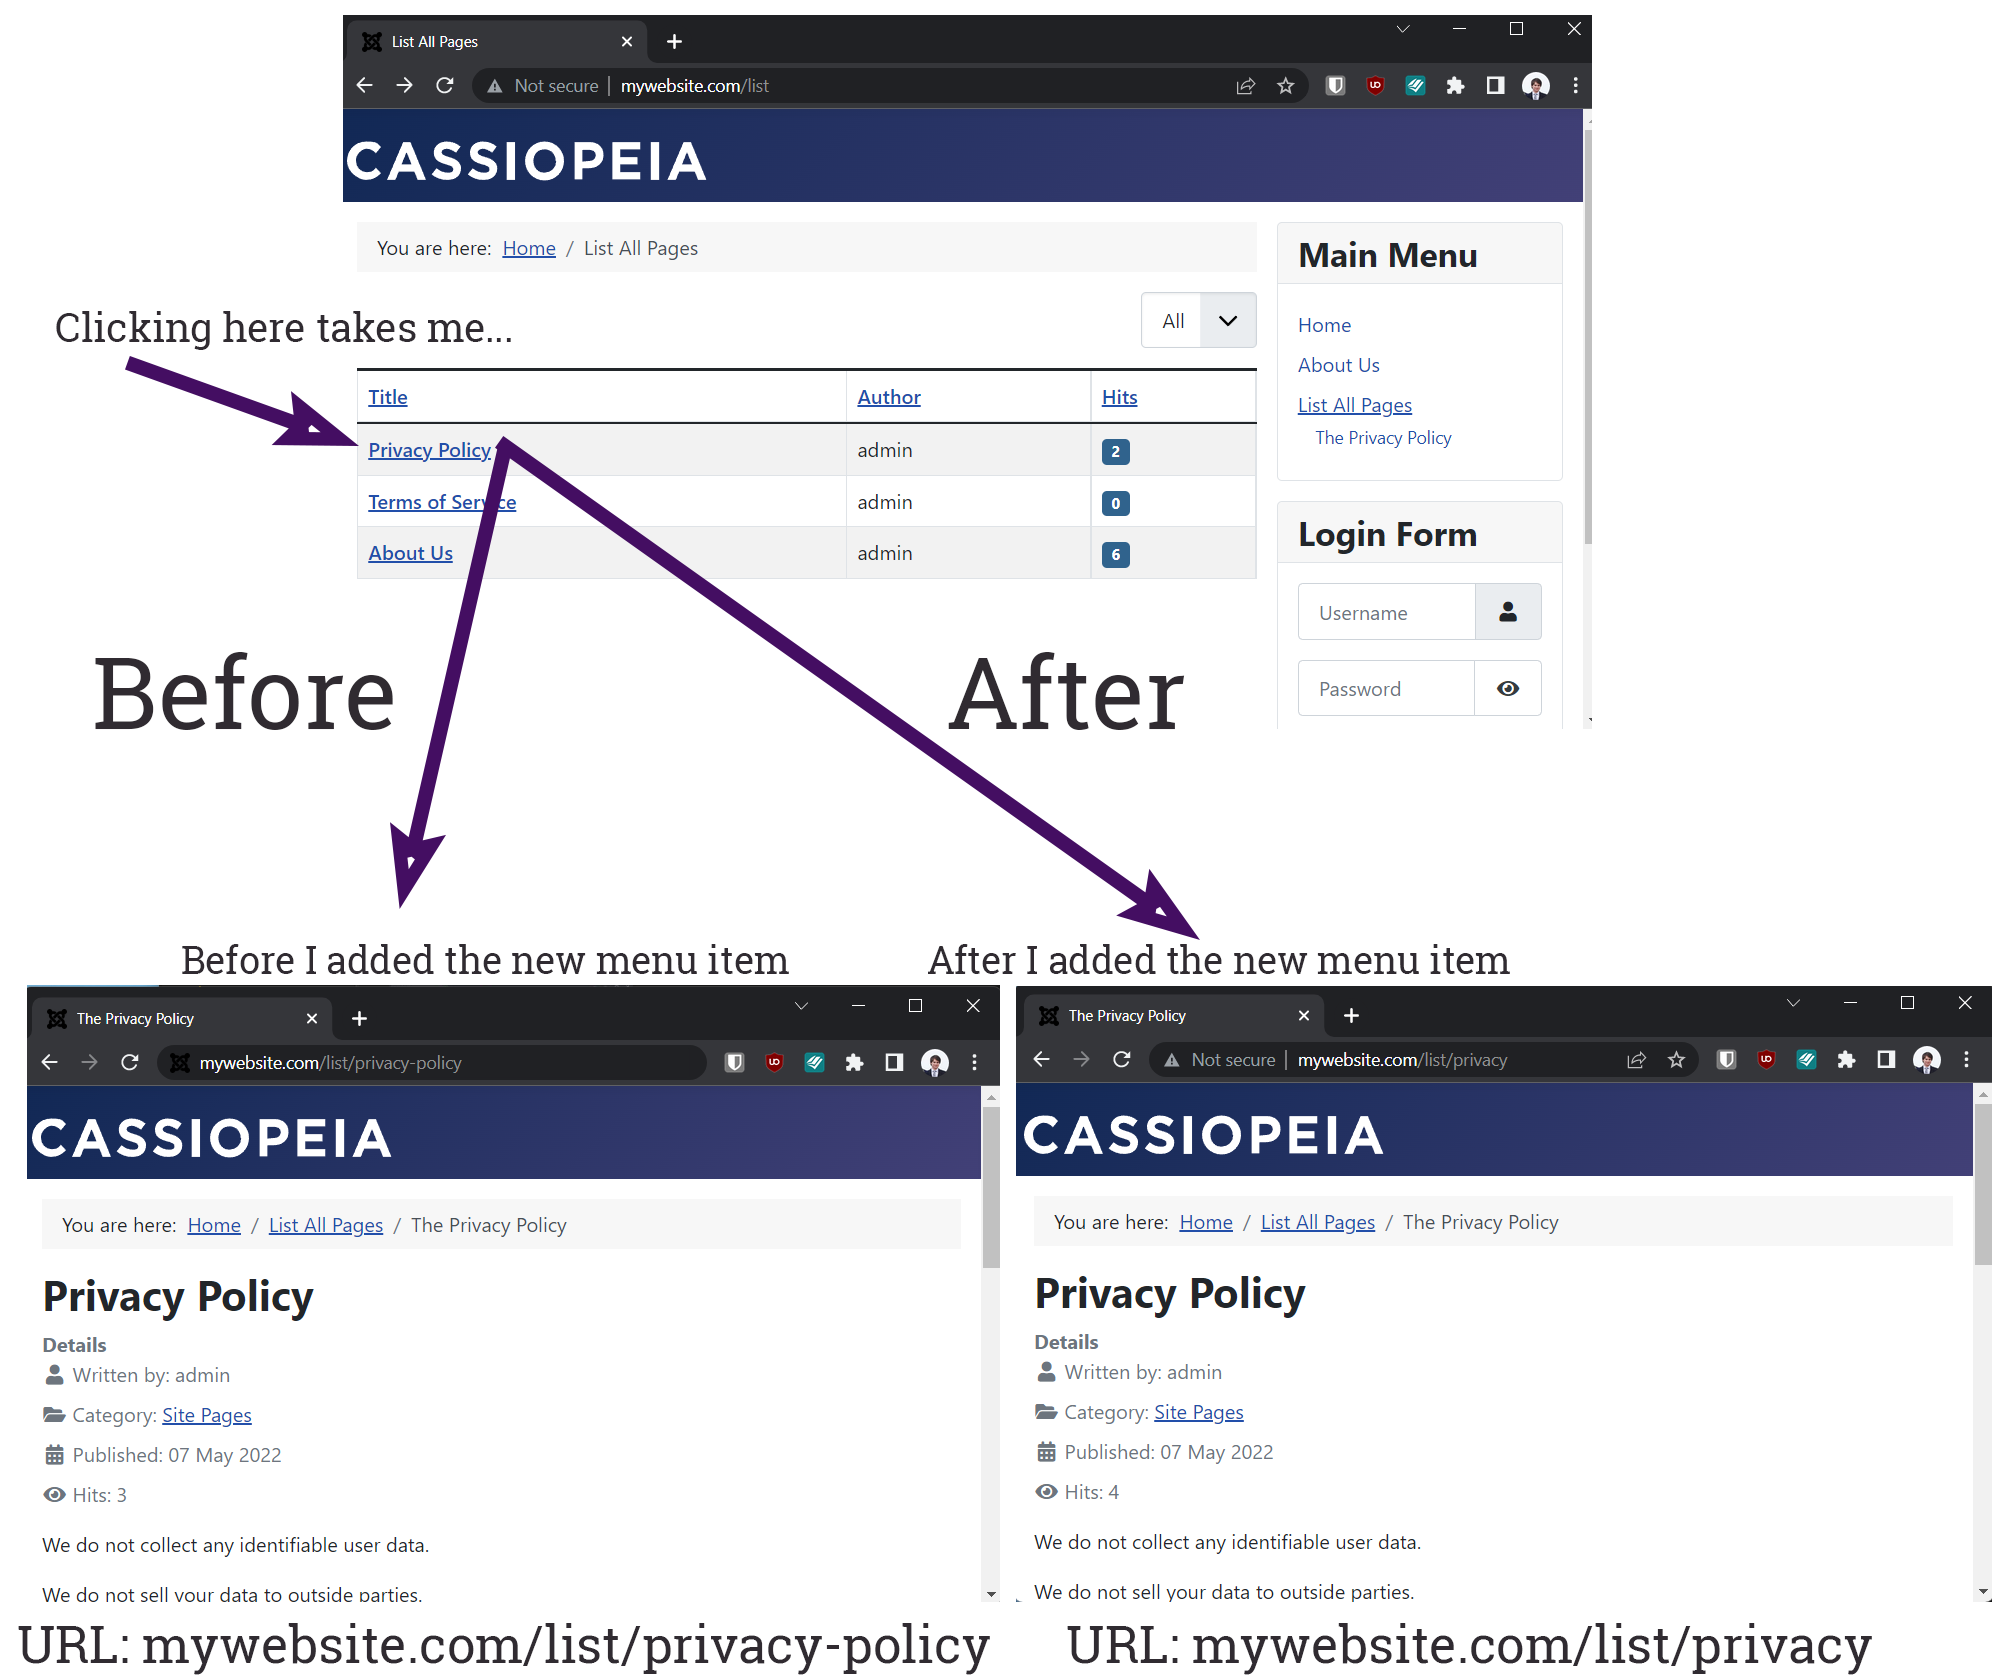
Now, when I click “Privacy Policy” from the “mywebsite.com/list” page – it brings me here:
All Links Reflect Menu Item
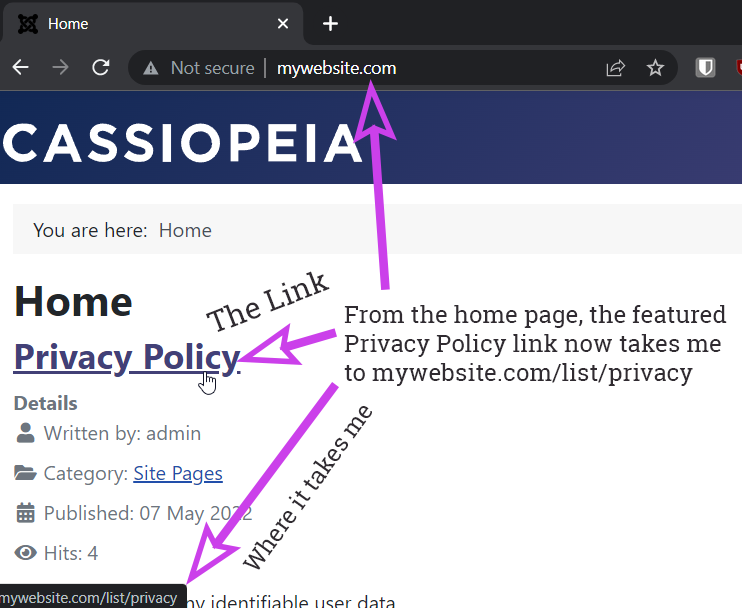
Notice again that every link, anywhere, to the privacy page, will direct to “mywebsite.com/list/privacy”
For example, if I feature the “Privacy Policy” on my home page. Clicking its title will return me to “mywebsite.com/list/privacy”
The Importance of Menu Items
Question: What happens to the privacy policy URL if I delete the direct link to the privacy policy from the main menu?
Answer: The link to the Privacy Policy changes from “mywebsite.com/list/privacy” to “mywebsite.com/list/privacy-policy” as the original article alias comes back. Since the page is still on the “list” page, the “list” part of the URL remains.
Question: What happens if I delete both the list page link and the privacy policy link entirely from the menu?
Answer: In this case, the link to the privacy policy from the home page has no “list” page to go back to. The link becomes: http://mywebsite.com/?view=article&id=4:privacy-policy&catid=8
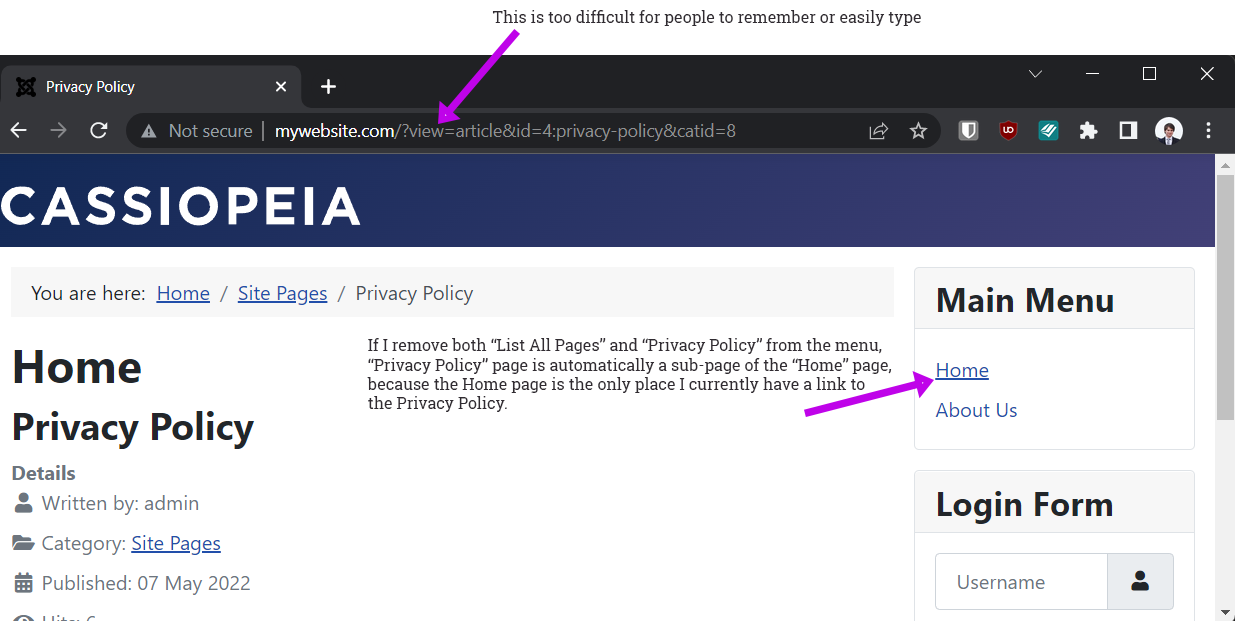
If you’re following along on your Joomla install, the catid and article id may be different in the URL, depending on what order you created your articles and categories.
As you can see, that link would be difficult for someone to easily type in (even if they wrote it down). It’s too long. Therefore, you should always create menu items for each of your categories. That way, you won’t have to see ugly links like the one above. Creating menu item links to individual articles is optional, and should only be done if you require more specificity.
Category Page Link and Layout
I have re-enabled the “List All Items” page that was removed in the last step above.
Note on the home page, under the featured article “Privacy Policy,” there is a link to the category that the page belongs to (Site Pages).
When I click this link, it will direct me to the “List All Pages” page, since this is the page corresponding to this category.
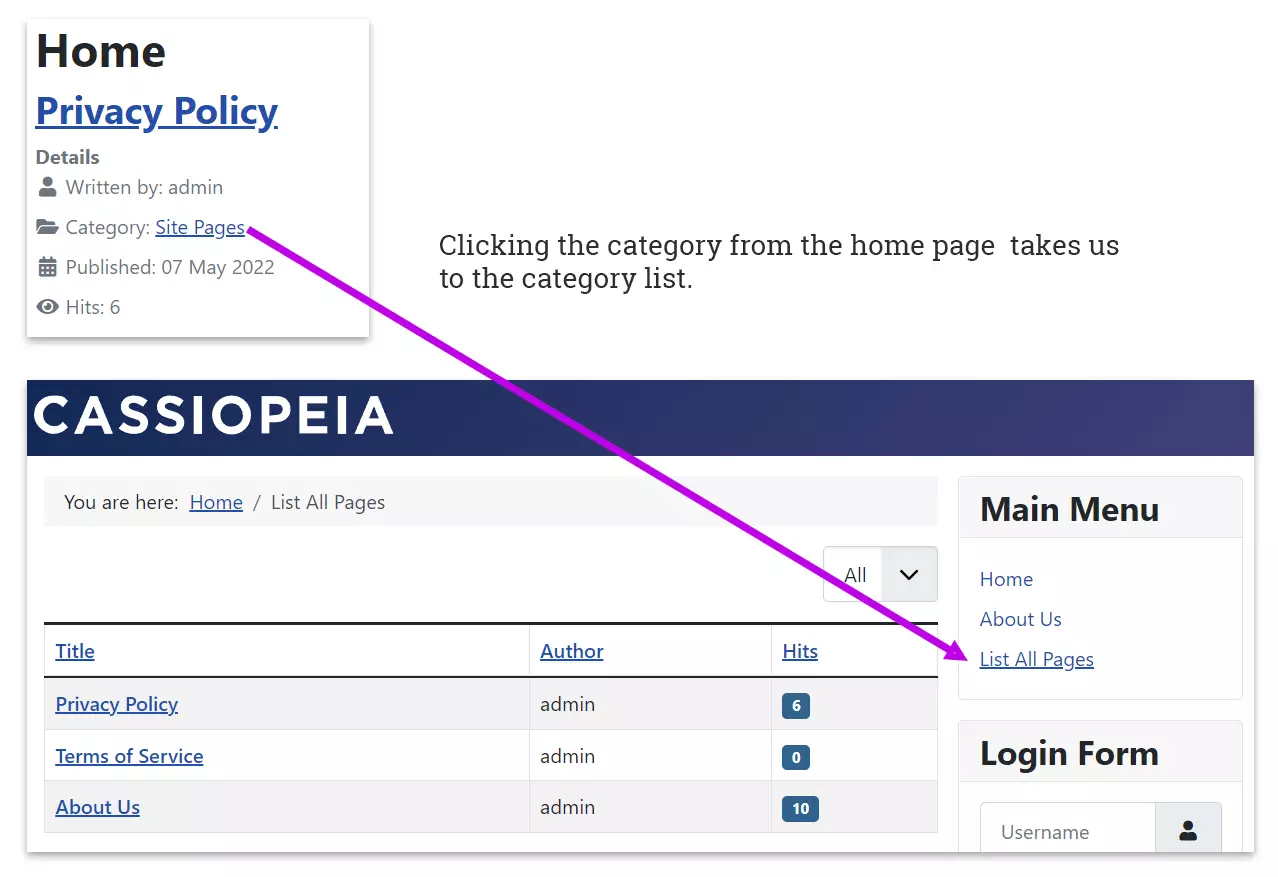
This is interesting, because it overrides the default behavior. Without the “List All Pages” menu item selected to be a category list, this happens when I click the category link from the article.
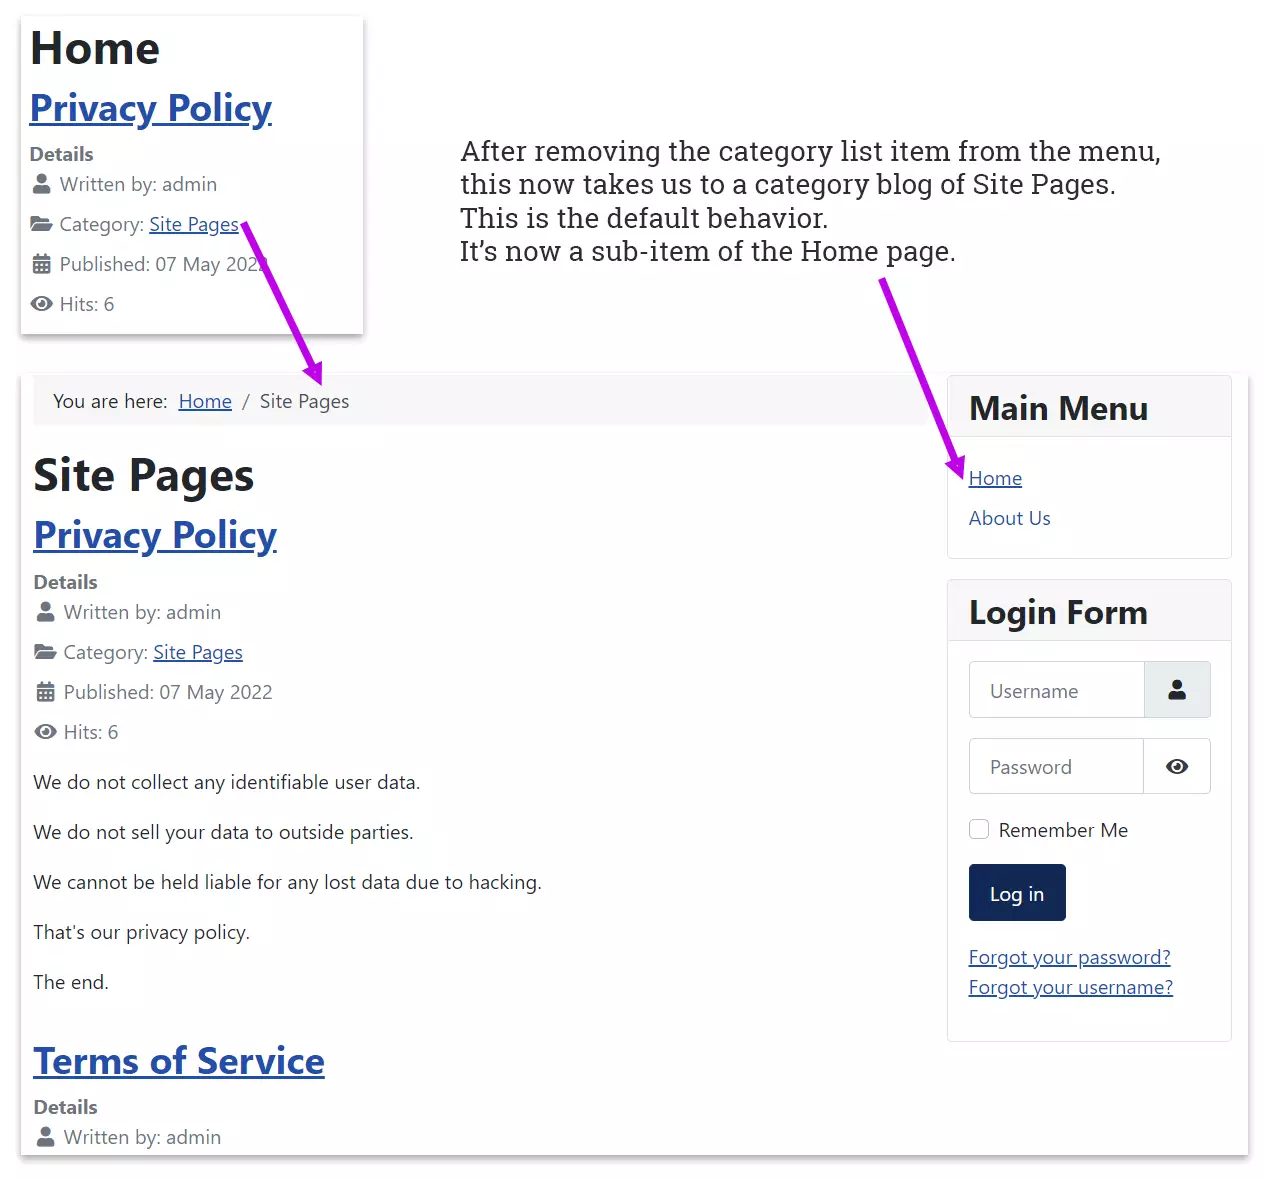
The takeaway here is that the menu item “Category List” takes precedence over the default category blog layout.
Now let’s see what happens if we turn the “List All Categories” link back on, but change it from a Category List item to a Category Blog item.
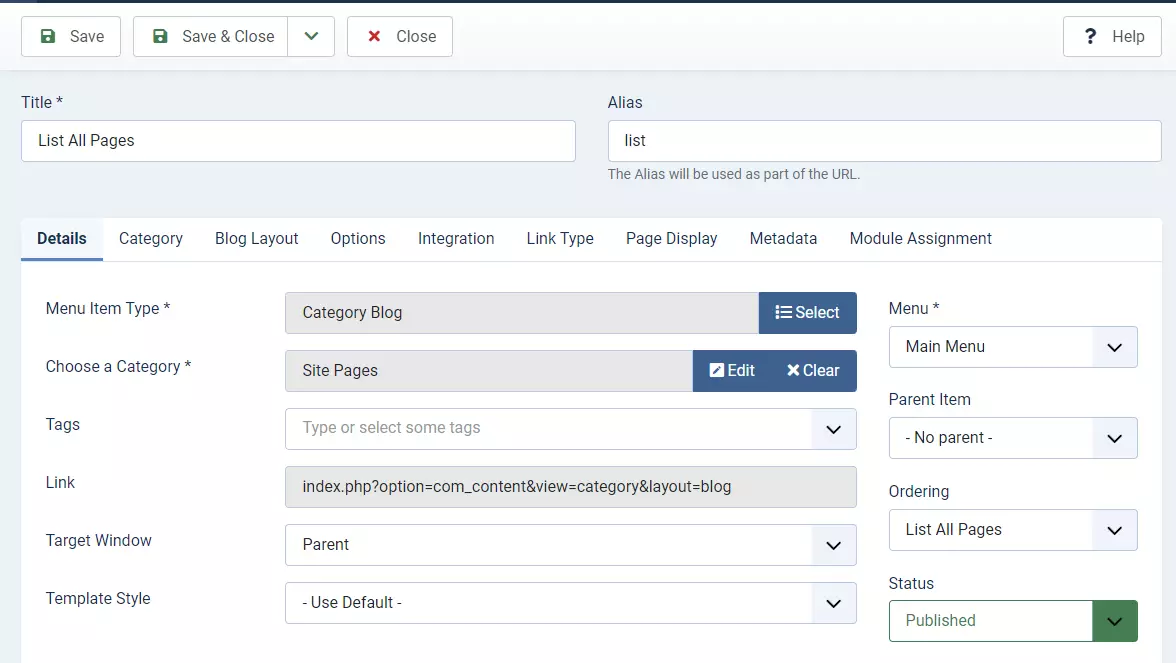
Since it’s now a category blog, when I click the category from the article on the home page, or from the menu, it takes us to the category blog. There is no longer a category list (list of all articles in the category) on the website. Only the category blog. So this takes precedence.
Summary of Alias and Item Precedence
To summarize everything in the above two sections, here is a diagram which outlines what happens in various situations.
Menu Display Options
Menus are displayed by assigning them to a module using the module manager. Recall that modules are small building blocks that make up the layout of your website. For example, this website, Kevin’s Guides, has a module at the top of the screen showing its main menu. I have another module setup as a sidebar on the right (or bottom, if on mobile), and a module position dedicated to showing advertisements.
Let’s look at the module manager and see what happens when we make some changes. Visit the module manager by navigating to Content – Site Modules in the admin panel.
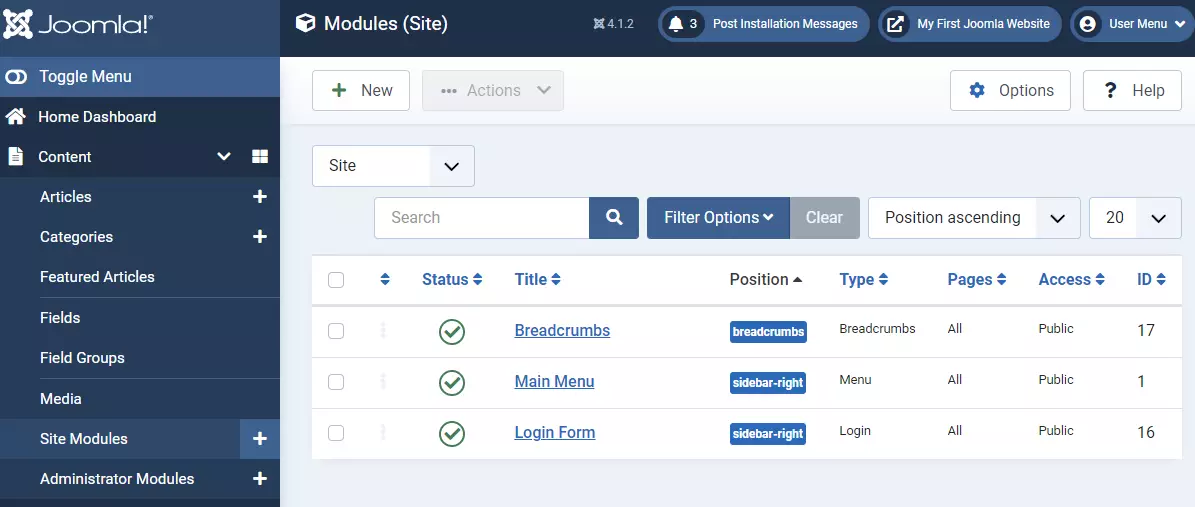
This area of the website shows the modules which are currently published, along with their location and the pages they’re displayed on.
Module Positions
The “Main Menu” is set to show in the sidebar-right position. Module positions depend on the template you are using. The names of module positions may vary depending on which template you are using. Since we’re using the default Cassiopeia template, the position for the right sidebar is “sidebar-right.” Therefore the main menu shows up on the right side of our webpages by default.
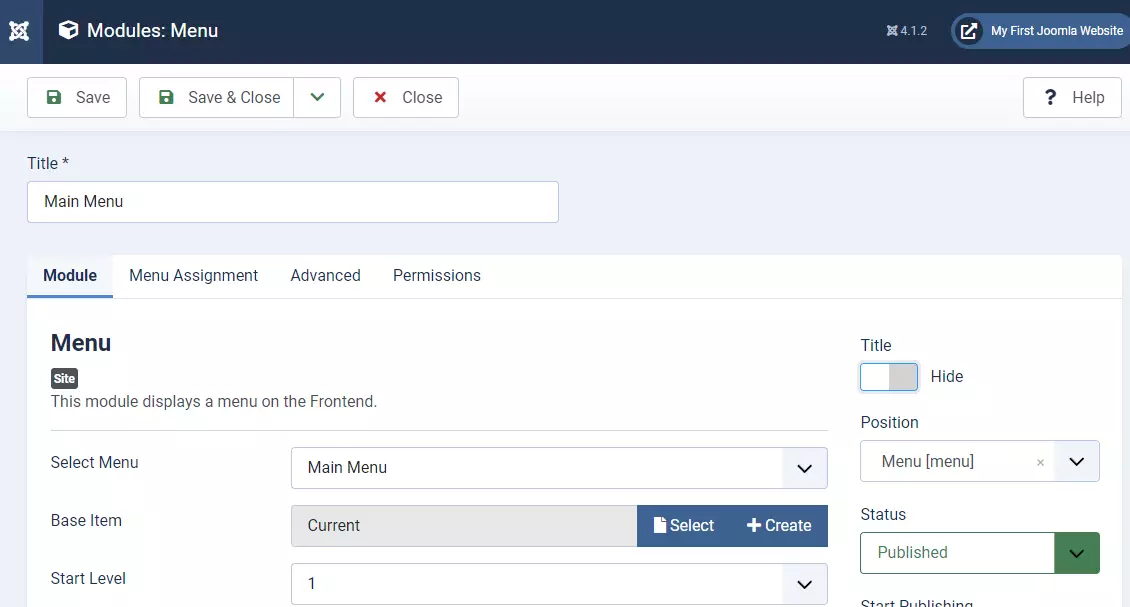
Let’s see what happens when we open the Main Menu module and change it to the “menu” position instead of sidebar-right.
Note that I have changed the position to “menu” and I’ve also set the Title Show property to “Hide.” We don’t need to show the title “Main Menu” above the menu – users will already know it’s the main menu by context.
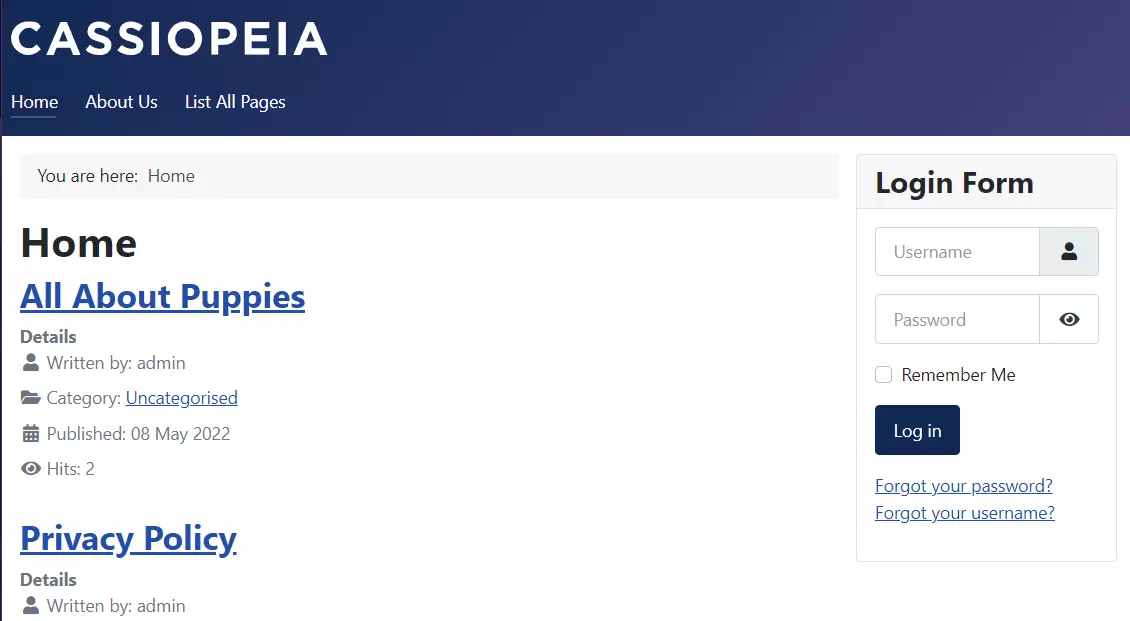
After saving the module in its new location, the website looks like this:
The menu’s now at the top of the screen and looks a little fancier than it did when it was in the sidebar.
Menu Item Ordering
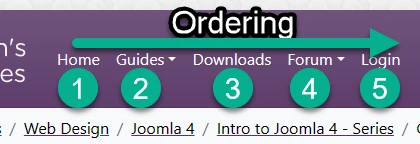
By default, the order menu items are displayed is the same as the order in which they are created. For example, if you start with the main menu which has a “Home” link, then you add a “Blog” item, the Blog item would follow the Menu item in its ordering.
If you want to change this ordering, you can do so with the menu manager. There are two ways to change ordering.
Change Ordering From Menu Item List
The easiest way to change the menu item order is directly from the menu items listing under any menu. Navigate to the menu you want to change the ordering of items for.
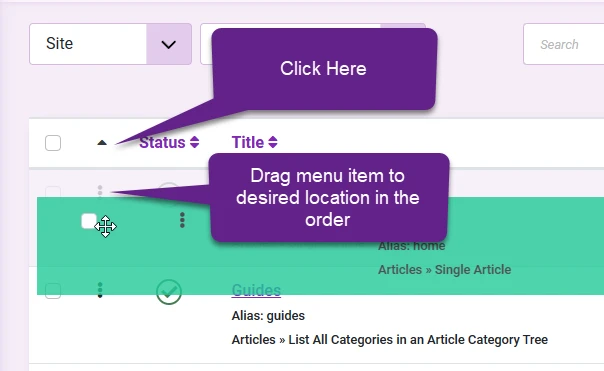
Then, ensure the menu is ordered by by “ordering” column – this is the icon that looks like a little carat symbol.
Now, you can drag each menu item up or down within the list by dragging the 3 dots next to any menu item. The ordering will automatically be saved.
From Menu Item Itself
The next way to change the order of a menu item is to open the menu item you’d like to change the ordering of. On the right, there is an “ordering” field which lists all the menu items in the menu. Set this to the menu item you’d like the current item to come after. For example, if you wanted the “Blog” menu item to come after the “Home” menu item, you would open the “Blog” menu item and set its ordering to “Home”.
Page Display Options
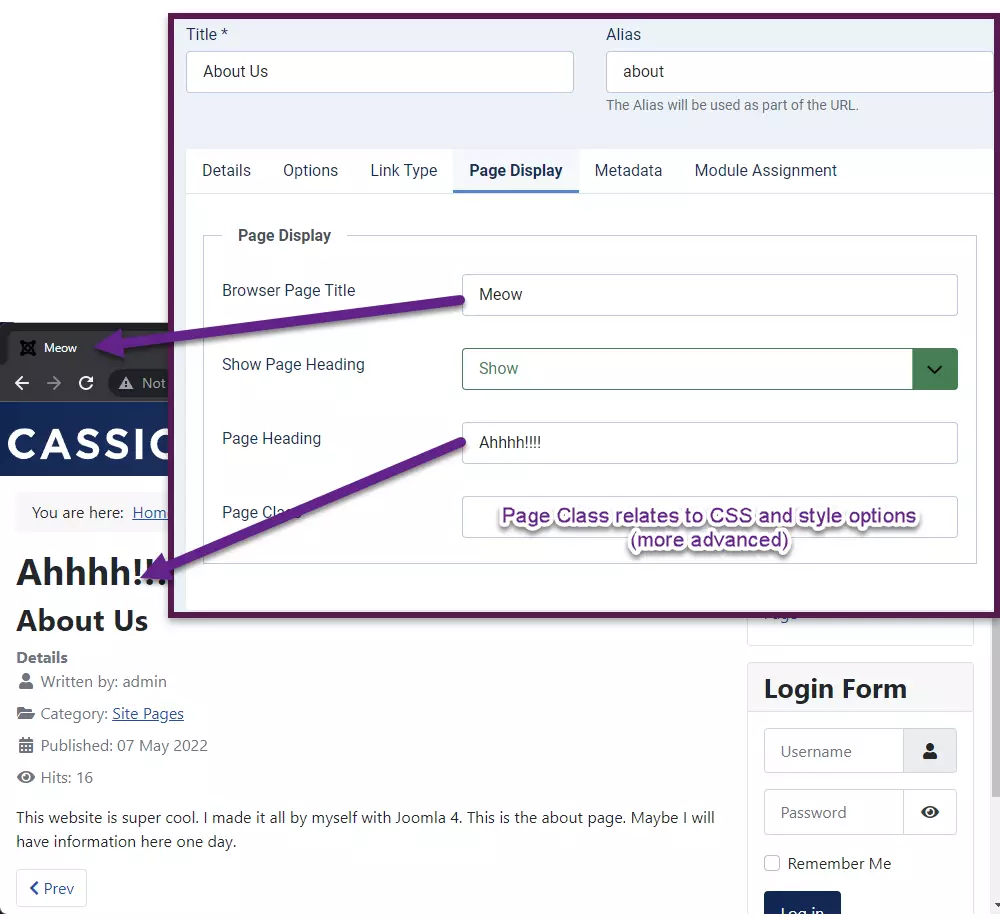
All menu items have a Page Display Options tab where you may configure additional settings about how that page is displayed in the browser.
The first setting “Browser Page Title” sets the text that appears in the browser title. That is, the text that appears at the top of the window or the current tab the user is on.
The “Page Heading” option is a custom heading for the page. This is a H1 heading – the highest heading level. Pages are only supposed to have their most important heading in the H1 tag. I usually create an H1 level heading in the article itself, so I leave this turned off. You may enable it if you’d rather do it at the menu item level. Show heading either shows or hides it, and it appears at the top of the page when visited.
The “Page Class” setting has to do with CSS/stylesheets. This is a more advanced developer/designer setting. You likely won’t need to do anything with this setting unless instructed to do so by your web developer or template style guide.
Other Tips
Here are some more tips you may find useful for managing your site navigation and menus.
Rules on Alias Names
By default, Joomla will automatically create an alias for each article and menu item you add based off the title. For example, if an article is titled “How To Eat Pizza” Joomla will assign it the alias “how-to-eat-pizza”
Aliases cannot have spaces in them, as URLs cannot have spaces. So it automatically converts spaces to dash marks in the alias. You also cannot use special characters like question marks or explanation points in an alias. Additionally, aliases are always lower case.
It’s usually a better practice to make your own item alias. For example, the title of this article is “Chapter 6: Navigation, Links, and Menus.” This would be way too long for an alias. I have assigned it the alias “ch6-nav” for short. That way, if someone wanted to manually type the link in, they don’t have to type out the full article title. Select a short alias that makes sense for the content you’re presenting.
It’s important to remember that no two items can have the same alias. So if you have an article titled “My Article” and another titled “my article” they can’t both have the alias “my-article”. Menu items also cannot share the same alias. The URLs for each item must be unique. Joomla will warn you if you attempt to do this.
You can use the same alias for sub-items if they have different parent elements. For example, if I have two categories, Dogs and Cats, and create an “Overview” article for each category, I could create separate category list menu items for dogs and cats. Then if I created a sub menu item of dogs with the alias “overview” and another for the cats category, I could have two sub-items with alias “overview.” It would be /dogs/overview and /cats/overview – they’re tied to different menu items so this is OK. We’re not permitted to have two subitems of the same parent with the same alias.
Hidden Menus
If you want to give your site a specific URL navigation structure, but don’t want to have everything displayed on a user-facing menu, you can create a hidden menu. Just make a menu and don’t assign any module to it.
For example, on this website, I have a privacy policy at kevinsguides.com/privacy
I didn’t want to put this in my main menu, as I only wanted main content in my main menu. So I created a new, hidden menu called “Hidden” and published a top level item linking directly to the privacy page. Now I have a link at kevinsguides.com/privacy that takes me to the privacy page – even though it’s not actually being displayed in a front facing menu module.
Menu Item Options Override Options Set Elsewhere
You may notice that there are a lot of customization options in each menu item. Many of these options often mirror the same settings found in the article options page and the category options. It’s important to remember that the menu item options will override the options set at the article or category level.
For example, if I set the “Author” option in an article to “Show” it will show the author’s name by default in the article. But if I create a menu item linking directly to that article, and set the menu item’s “Show Author” option to “Hide,” it will override the article option and hide the author’s name.
Same Link in Multiple Menus
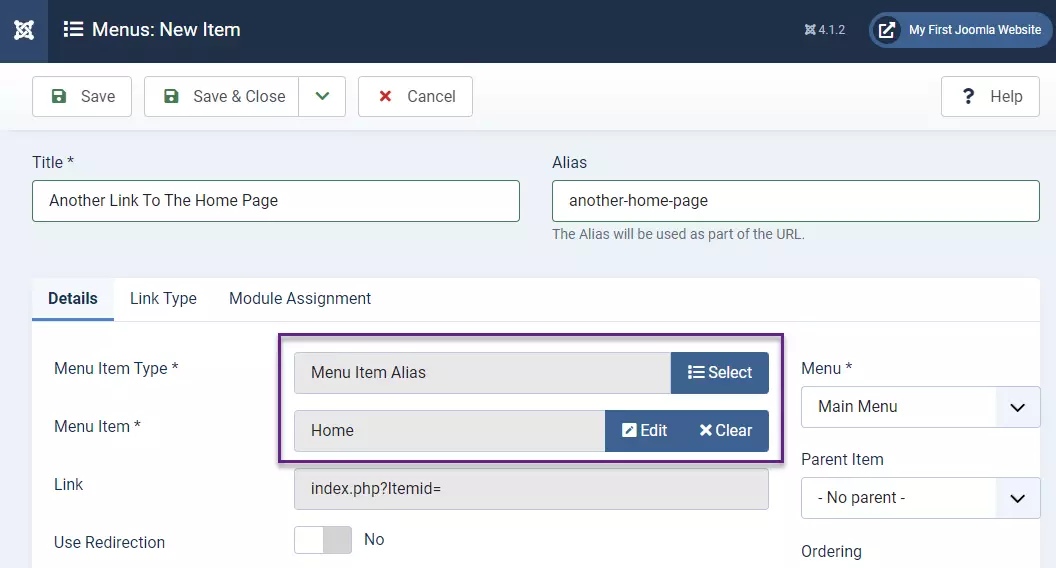
There may be situations where you want to have the same page show up in multiple menus. If you’d like to do that, first create the primary menu item in which ever menu you think makes the most sense (usually, the more important menu). Then, add a new menu item of type “Menu Item Alias” (under System Links) linking to that original menu item.
Conclusion
Key Takeaways
Remember that an alias is a short way to describe a page which becomes a part of the URL. In Joomla, menus are structures used for both navigation and formatting URLs. It’s important that you structure your menus and aliases in a meaningful but simple manner to make it easy on users.
- Enabling URL rewriting and SEF URLs is important to make your URLs more readable to search engines and users.
- When you create a direct link to an article in a menu, the menu item alias and options override any alias or options set at the article level.
- When you create a link to a category (either blog or list) in a menu, the menu item alias and options will override any alias or options set at the category level.
- If you create a menu item linking to a category, but not to the items in that category, the alias set at the article level will be used in the URL, after the alias set at the menu level.
- For example, mywebsite.com/menu-alias/article-alias
- If you do not create a link to the article or the category in the menu, the article will get a url that’s not user friendly.
- The options and settings set at the Menu-Item Level take precedence over the options and settings set at the individual article or category level.
Assignment
Instructions: Add menu items to your main menu in a logical, hierarchical manner. Consider adding links to your main content categories, either as category blogs or category lists. Create direct links to important articles, like your About Us page or Terms of Service agreement.
