
In this chapter, we’ll look into how content is managed in Joomla 4 with articles. Specifically, you’ll learn how content is organized, how content can be added and edited, and how we can publish it.
Content Organization
Content in Joomla is primarily stored in articles. There are extensions that permit other content types (videos, photo galleries, etc.), but articles are the default method of storing and publishing content on your Joomla website. Articles are pieces of content made up of article text stored as HTML code. Joomla manages articles with the use of several properties which are attached to each article. There are dozens of attributes and settings assigned to each article. Some of the more important ones include:
- Title: The title of the article
- Article ID: A number assigned to each article so Joomla can keep track of them in the database
- Author: The author of the article
- Category: The category the article is in
- Article Text: The actual text of the article
- Tags: Similar to categories, but structured more like a pool of articles than linear or hierarchical categories.
The most common way to organize articles is by category, though you can also sort articles by tags. A category is a collection of articles. You can think of them like folders of articles. Joomla supports unlimited levels of subcategories, so it’s possible to have categories within categories. The highest ranking categories are called “top level” categories. The hierarchy of categories goes from “parent” to “child.” So if one category is part of another category, the subcategory is a “child” and the category it’s a part of is called the “parent.” There is also a default category called “Uncategorized” for articles with no category yet assigned to them.

Articles can also be sorted by tags. Tags are a secondary way to organize Joomla articles into pools of similar content. You can think of each tag as a “tag cloud” or nonlinear grouping of articles. They can be used in lieu of categories or in addition to them. To further complicate things, and add additional functionality, tags can be sorted into tag categories themselves. Articles can have multiple tags, one tag, or no tags.
How you sort your articles is ultimately up to you. You may use any combination of tags, categories, both, or neither. Joomla provides a lot of flexibility in this regard. If you’re just making a site with a few pages, you might not need to use tags or categories. If you have a lot of articles like this website, you may want to use both tags and categories. Personally, I like the linear structure of categories.
Article Editing
Adding Articles
Articles can be created using the article editor. You can create a new article from the back end by opening the “Content” section of the admin menu and clicking the plus icon next to “Articles.” You can also go to the article manager by clicking “Articles” and then select “New” in the toolbar.
The article manager, pictured here, has options to manage articles. Once we have articles added, more information will be displayed. This is a useful area to manage and sort through your articles. This is also where you will go to edit your articles after they have been created.
Using one of these methods, add a new article to open the article editor.

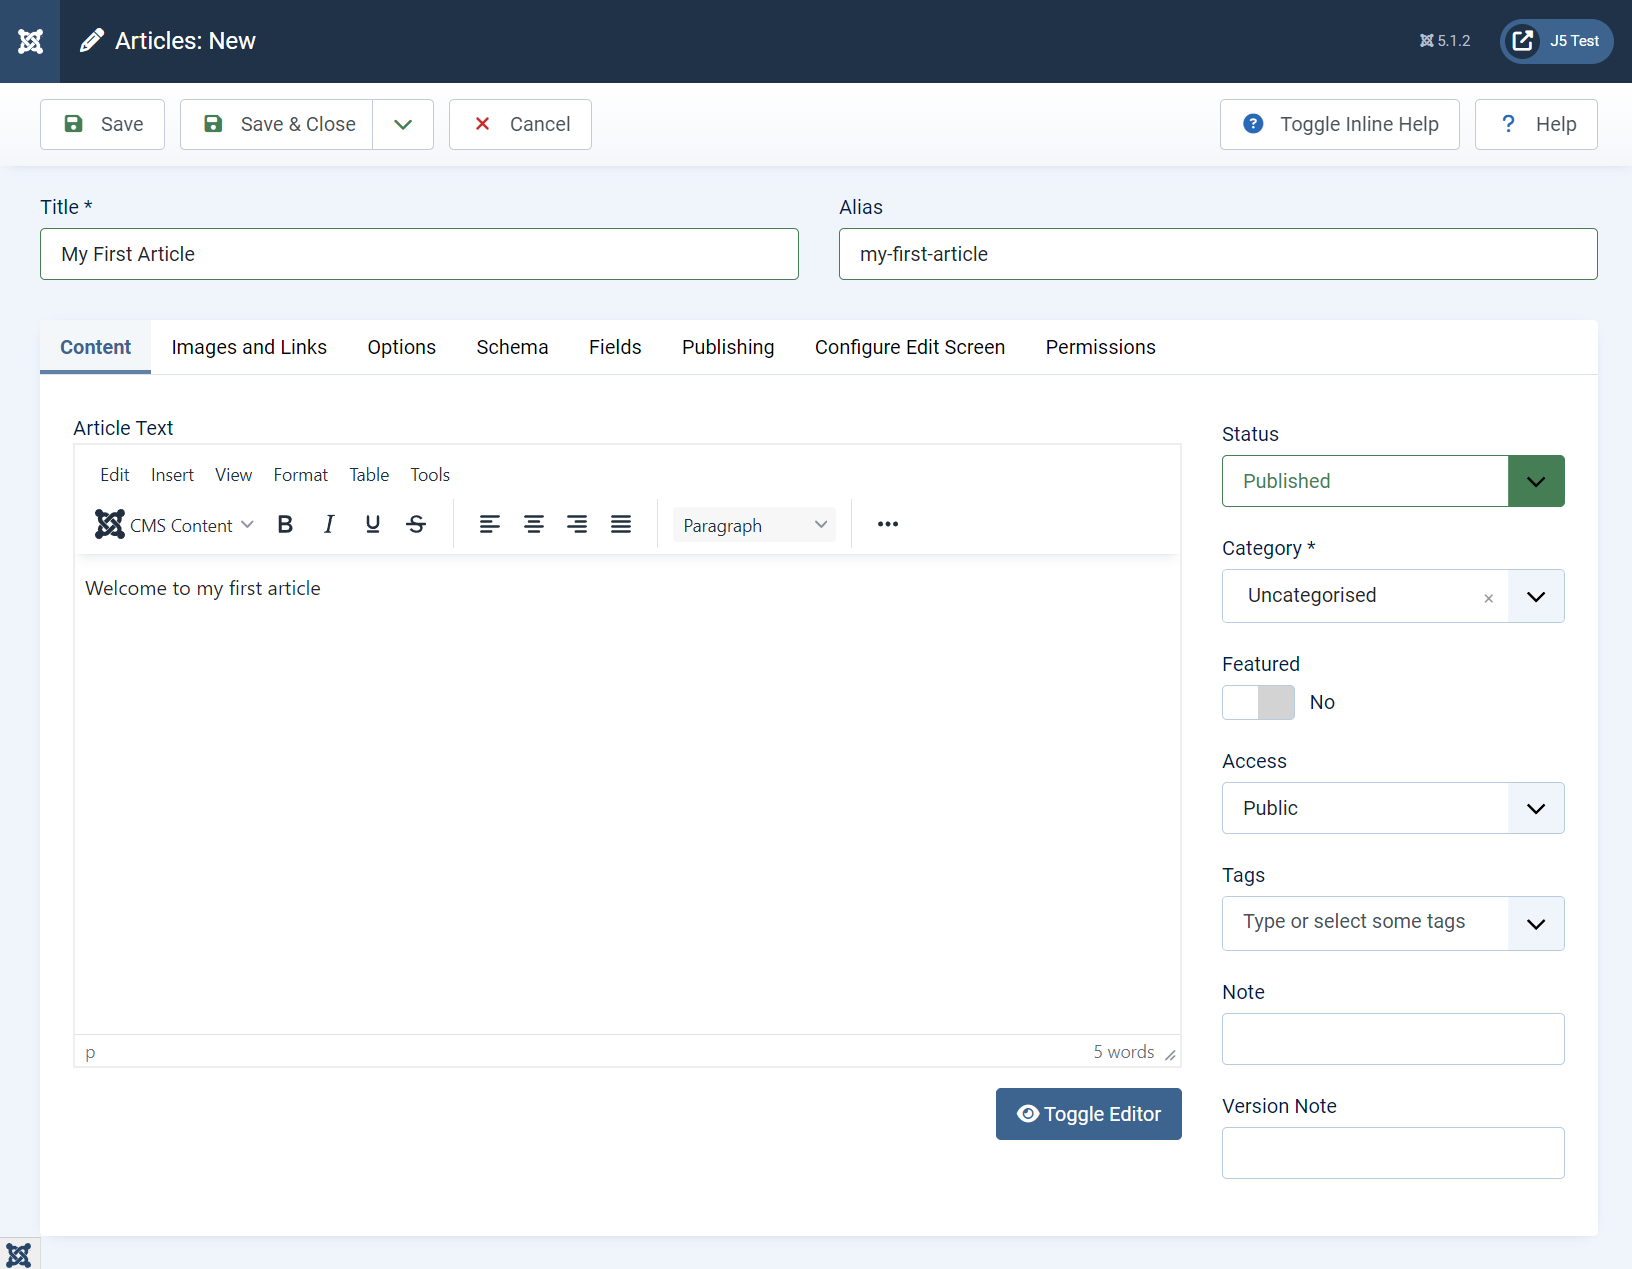
The Article Edit Screen is a powerful area used to create, modify, and manage the content and properties of an article.
On this page, you can see a lot of different tools and options. Center stage is the editor for the article itself. The default editor shown here is called TinyMCE. TinyMCE is a WYSIWYG (What you see is what you get) editor for HTML. It allows us to edit HTML without actually needing to know HTML. You can simply click the buttons to add images, make text bold, add headings, and more.
Here is an overview of the entire article edit screen. Don’t be overwhelmed by all the options, we’ll go through them as we progress. You can click the little pink/purple circles for more information about each area.
Everything on this page is important, but the most important things are the article title, the editor itself, and the save button. The first thing I do is give my new articles a title and save them. I tend to save frequently.
Help
AHHHHH
Toolbar
Allows us to save and close the article.
Title
This field is a human-readable title, displayed in the front end and the back end. Also usually part of the page title and heading, important for SEO.
WYSIWYG Editor
The editor is a visual tool for generating our article’s HTML. It’s like a light version of Google Docs or MS Word for our Joomla articles.
Alias
The alias is a link-friendly name for an article. It replaces spaces with dashes – and does not permit special characters. It should be short and represent the article.
Option Tabs
These allow us to navigate to different parts of the article editor, where we can control more advanced aspects.
Status
Articles may be published (visible to users), unpublished, trashed, or archived. Leave them unpublished when they’re not ready and remember to publish when they’re done!
Category
Articles are sorted into categories
Featured
The featured status is given to articles displayed in special areas of the site, or within certain modules.
Access Level
The access level of an article dictates the groups allowed to view the article. Useful for sensitive content or paywalls. Public means anyone can view.
Tags
Tags are an alternative way you can sort articles
Create a new article and add some text to the main editor area in the center. Make it short, as we’re going to edit it further soon. It can be about whatever you want, but keep in mind we’re eventually going to publish this to the front page. Give the article a title and click save. So pick a topic that goes with your website. Do not worry about changing any other settings or assigning the article to a category.
Additional Features After Saving
After you save the article, you will notice a few more options appear in the top toolbar. They should look like this:

You can click them to see what they do.
Versions
The Versions button brings up a history of each time you saved the article. This is useful if you (or one of your authors/editors) make a major mistake and need to revert to a later version of the article. You can compare versions, view previous versions, and restore old versions from this window.
In this sample screenshot, you can see I saved the article a second time and added a version note.
If you select two versions, you can compare the differences by clicking the Compare button. You can select a single article and hit the preview button to see what that version looks like. If you select an article and click the “Keep On/Off” button, it will set that article version to be kept forever. If you’re the only person editing your website, you likely won’t need to do too much version control. If you have many users’ editing content, version control is a must, as inevitably someone’s going to break something at some point.
After making major changes to an article, you may want to turn on the keep forever option for that version. That way, if another user makes multiple edits and things go wrong, nothing is lost.

Preview and Accessibility
If you click the preview button, Joomla will show you what the article looks like on the front end of the website. If you click the Accessibility button, it also shows you a preview, but with accessibility notes toggled. The Accessibility option can be used to help see if your article is compliant with accessible web standards.
TinyMCE Editor
TinyMCE is the name of the default WYSIWYG editor used in Joomla. It provides several word-processor like features, allowing us to add text, headings, images, tables, lists, and more to our articles.
We’re now going to be discussing how to use some of the essential editor features. Most of it’s pretty straight forward. I would encourage you to follow along by either adding a new article or updating the one you’ve been working on. I have decided to write an “About Me” article for this post.

Menu
The menu options at the top of the editor allow you to insert and modify certain types of HTML content.
CMS Content
The CMS content button allows you to add content that relates to the Joomla CMS. Such as article links, media, and more.
Format
These buttons allow you to make selected text bold, italicized, underlined, or strike through.
Text Align
Alignment options allow you to justify your text to the left, right, and center areas of the page.
HTML Format
The format tools allow us to select what type of HTML element we are working with. This is where you can create headings and such.
Resize
Click and drag this corner to resize the editor area.
The top menu bar has a number of options which allow us to add, edit, and change content in the editor window. If you click the edit button, you’ll find standard features like undo, redo, and copy/paste options. The insert menu has options to add tables, images, media, and more. The view menu gives you options to preview the article, open the editor in full-screen mode, and see the source code (raw HTML). The format menu allows you to make changes to the selected text style and color options. The table menu allows you to add a table, and the tools menu shows you your word count and offers another way to view source code.
Some of these features are redundant, as they also appear in the smaller buttons below. This is just to provide flexibility and options. You can pick which way you’d like to access the editor features yourself. The editor is completely customizable, so if there’s something you don’t like or want to get rid of, that’s always an option. We will discuss modifying the editor layout in a later chapter.
The best way to learn how to use the editor is just by using it. It’s relatively simple as far as the basic text editing goes. We’ll discuss in more detail things like adding images and other CMS-specific features soon.
Create or change your article. Perhaps write a bit about yourself. Experiment with basic article styling, such as headings, bold fonts, and text colors. All the text options can be found from the Format menu.
Article Manager
Once you save articles, you should be able to see a list of them all in the article manager. Here you have access to some essential information about each article, such as its title, category, publishing status, and whether it’s featured. You can also make some changes to the properties of articles directly from the article manager, without having to individually open each article. The article manager is useful if you need to apply certain properties to multiple articles at once, such as un-publishing multiple articles or moving multiple articles to different categories.

Table Headers
Info for each article is spread across columns. You can change the ordering by column by clicking the little arrows in each column title.
Search
Quickly search your articles by title, alias, notes, content, and more.
Filter Options
Click this for more article filtering options. This allows you to select which articles are visible based on category, publish status, author, and more.
Ordering
Select how you want the articles ordered in the list
Component Options
This opens some global article options and allows us to change default settings related to articles. There are many to pick from. We will cover them all soon.
Limit
How many articles to show per page
Save your articles often. Unlike many modern applications you may be used to, Joomla does not automatically save things when you make changes. You must ALWAYS hit save to save your changes if you want them to be… saved. I habitually save after every paragraph of text I enter, or any major option I change.
Featured Article View
There are different ways to display article content. Each option is a different view of the Articles component.
Featured Articles
The default view of your Joomla website’s home page is a featured article view. It shows a blog of featured articles on your website.
Therefore, the easiest way to display an article here is to feature the article. There are two ways to do this. The first way is through the article edit page, by setting the featured option to Yes. The second way is to go to the article manager page and click the circle under the featured column next to the article. This will add a gold star next to the article in the article manager.

Give this a shot, then see what happens when you view your home page.

When you visit your home page, the featured article will be displayed in full on the page.
By default, Joomla displays the article’s title, author information, publish date, category, and hit count under an article details section above the article. All the details are customizable. You can select what details are visible on the front end in the article’s settings, the Articles component options, or in the menu item settings for a particular article page.
If you click the article title, you will be linked directly to the page holding only the article itself.

Add two or three more brief articles containing whatever text you want. They can be gibberish if you’d like. Just be sure they all have a title and a few lines of content. Don’t worry about giving them categories or any other settings. Then set all of them to published status and featured. See what your site’s front end looks like when you’re done.

Essential Article Properties
Now that you know how to create articles and set them as featured, let’s look at some other essential article options and features.
Read More Break
Joomla allows us to add a “read more” section to split an article between the intro text and the full article. For example, if you have a long article that’s hundreds or thousands of words, you might not want to display the entire thing on your front page. You might only want to show the first paragraph or two, and then have users click “read more” to read the rest of the article. Insert a blank line (hit enter) between the two sections you want to separate into intro text and full article text. Then select the “CMS Content” button, followed by the “Read More” option.
This should insert a red line through the middle of your article, showing where the system breaks the article in two.

This can be achieved by adding a read more ruler to the article.
Open an article with multiple paragraphs of text in the article editor. Select a spot after the first or second article to add a read more rule.
After you have inserted the read more rule, save the article and reload your site’s home page. You should now see only the area above the red line on the front page, with a button that says “Read More…” to access the full article.

Images and Links
Next, look at the Images and Links tab under any article. Here you can select a few images to add interest to your article and add a few links. The images are the important thing here. There are better ways to add links to articles than the options on this page.
Article Images
Articles with images perform better with user engagement metrics, so it’s important to have some sort of image associated with all of your articles if you intend to have a popular website.
The Intro Image is the image that gets displayed on the front page and on other pages linking to a particular article. The Full Article Image is the image that is displayed when the user actually visits that article.
The way your website displays the intro and full article images highly depends on what template you’re using. Different designers may use different styling and recommend different image dimensions.
Both images have certain properties associated with them, such as a description, a class, and a caption.

The image description is the text that is displayed when the image cannot be loaded (either the user has disabled images, they’re on a bad internet connection, or the image has gone missing). For accessibility reasons, it’s good practice to always include a description (alt text) for each image. For example, if a visually impaired person is accessing your page content with a screen reader, the alt text can tell them what that image is supposed to be of.
The caption is a short line of text displayed (usually below) the image. This differs from the description, which is usually hidden if the image is loaded.
The image class is the class attribute used to assign CSS styles to the image. If you’re unfamiliar with web development, CSS styles often apply their rules to distinct elements based on class names. Usually you’ll probably leave this blank. Some classes you may find useful are the float-end class, which “floats” the image to the right side of the page or the float-center class, which places it in the middle.
In most cases, you’ll want to use an image that’s large enough to fill the entire width of the article container. So try not to use very small images. For the Cassiopeia template, this is 986 pixels wide.
You may select images by clicking the “Select” button under each image. This brings up the media manager. The media manager is a tool in Joomla that allows us to manage, upload, and insert images into articles and fields.
Select an image to use as your intro image and as your full article image. I have selected options from the “sample content – Cassiopeia” folder. These are sample space pictures included with Joomla. You can upload your own files or select something from the sample data. You may select the same image, or different images, for the intro image and the full article image.
You can see what the images I selected look like in the screenshot. Be sure to add alt text and captions to see how they look on the front end.
Once you’ve added the images to your article, save it and see what it looks like on your home page. You should see the intro image displayed on the home page with the article, and the full article image when you open the article.


You might notice the little bullet icon that says “Google.com” above the full article image in my screenshot above. This is what a link looks like when you add a link from the “Images and Links” page. While it’s a good practice to link to other articles and pages, this is not usually the best way to do it. You’re better off creating links elsewhere, or directly in the article text itself with TinyMCE.
Adding Tags
Tags can be added from the content tab of the article edit screen simply by typing a tag name. When you type a tag in this box that doesn’t already exist, a new tag will be generated for you. If you add this same tag to another article, they will both be placed in the same cloud of tags.

When you add tags to articles and save them, they are displayed near the article info on the site’s front end.

When you click on the tag, you are taken to a page that lists all the other articles with that same tag.

If you’d like to learn more about using tags, there is a separate guide on the Tags component.
Add some tags to your articles. Make sure some articles share a tag. See what the tags look like on your site’s front end.
Publishing & Metadata

The publishing tab in the article edit screen provides several useful options. You can select dates and times to publish articles. This may be useful if you run a blog and have several pre-written blog posts, but want them to be displayed on certain days. You can specify when an article is set to featured, set to unfeatured, set to unpublished, and more. The “Author Alias” can be used if you want to display a different author name under an article you publish, such as could be the case if you’re publishing an article written by someone else, or you just want to make up a fake name to make it seem like your website has more authors. You do you.
The metadata allows you to provide a short, search engine friendly description of the article. Google and other search engines will use this as a description under your search result when they find your page. You can also add keywords. Search engines look at these, but they’re not as key of a factor in search results as they once were. Search engines look more at the actual content of your website these days, rather than just basing it off the keywords. Some other Joomla extensions also use keywords to find similar articles, so it’s still useful to write some keywords related to your content here.
You can add an author to your metadata, so crawlers know who wrote the article. You can also post information about the redistribution rights of the content and select if this article should be crawled by search engines or not. If you want search engines to find your article, leave it on index, follow, which is the global default. “Use Global” means use the global setting, which is set by default in the global configuration to “Index, Follow.” If you don’t want search engines to check this article out, select the “Noindex, Nofollow” option under the robots drop down.
The fields that are greyed out are for informational purposes only. You cannot edit them directly in Joomla and shouldn’t really have reason to. If you really wanted to, you could modify them directly in the MySQL database. These fields are fairly self explanatory. The hits counts the amount of times that article page was accessed, the revisions counts the amount of times you’ve clicked the save button for this article, the ID is Joomla’s internal number assigned to the article, and the revision information displays who modified the article last and when.
Add some metadata to an article with a short description and keywords.
Article Display Options
There are several display options that can be assigned to each article. Joomla allows us to decide if we want to show certain article information, such as the publishing date, title, category, etc. These options can be set in several places. The options are available at the article level, the category level, the menu item level, and in the Articles component options. Even though the settings are nearly identical, changing a setting in one place will affect things differently than changing the same setting in another place. This may seem sort of confusing at first.
Let’s start at the macro level by examining the article options in the article edit screen.
Open an article and click the options tab. Here you will see several options. They’re fairly self explanatory. You can choose whether you want to show the article title, author name, hit count, tags, dates, navigation options, and more. I’d encourage you to experiment with some of these settings and see what it does to the article in the front end.
To set the article settings globally, return to the article manager screen and click “Options” in the toolbar at the top right. Here, under Article Options, you will see most of the same settings you saw at the article level. Changes made here will be the default applied to all articles set to the “Use Global” option in their individual options tab. You can override the global options at the article level, if you want some articles to show different information than others.

Notable Article Options
Here are some of the more important article options. You can click the “Help” button in the admin toolbar if you need an explanation of each option.
- Intro Text: If set to yes, this shows the intro text (part before the “read more” break) in the article itself. If you want to separate them so the intro text is shown on the home page, but not in the article itself, set this to no.
- Link Title and Link Category – If set to yes, when the user clicks the article name or the title name, it links them to a page for that particular article or category.
- Navigation – By default, Joomla has a “Next” and “Previous” button on the bottom of each article that links to the next article in that category, by order. On this website, I manually create links to the next article in the series, so I set it to no.
- Hits – Joomla keeps track of each time someone opens a page as a hit. This is not the best way to measure site or article performance. There are third-party tools, such as Google Analytics, that can be used instead and provide better information about your site’s users. It may be nice to know internally as a rough gauge of how popular an article is, but I would not use it as a primary performance metric. I don’t see a reason to display this to end users. Hit counters were a thing back in the early 2000s. They’re not commonly seen on front ends these days. I would turn this feature off.
- Browser Page Title – The title shown at the top of the browser window or in the tab for that page. By default, it’s the article title. If you want it to differ from the full article title, you can change it here.
Adding A Page To The Menu
Joomla does not have a separate way to just create static pages (if you’re familiar with WordPress, they use different sections for Pages and Posts). In Joomla, we have the option to display an article as its own page in the menu. All we have to do is go to the menu manager and add it to the main menu.
I’d encourage you to create a new article that will function as a stand alone page. An example might be a “Contact Info” page or “About Us” page. Alternatively, have an existing article in mind that you’d like to set as a new stand-alone page on the website.
Go to the Main Menu under the menus section of the admin sidebar. You should see the items currently in your main menu – which at this time is just the Home link.
Click the “New” button to access the menu item edit page.

Give your menu item a title. In this case, I’ve selected “About Us” as the title. For the alias, I have chosen the word “about”.
Under Menu Item Type select “Articles – Single Article.” Then under “Select Article” click and choose the article you want this page to link to.

Notice that the menu item has an “Options” tab just like the article editor. This has the same exact options if you want to set them at a menu item level instead of at the article level. Options set at the menu item level take priority over the options set at the article level. Settings changed at either the menu item level or the article level will take priority over the global article settings. Note that this applies to the alias too. If you link directly to an article with a menu item, the alias given to that menu item will show in the address bar instead of whatever alias you provided in the article editor.
Save and close the menu item editor when you are done.
Now, navigate to your site’s front end and refresh it if you need to. You should see the menu item you just created appear in the main menu. When you click it, it should take you to the specified article.
Notice in the address bar that the alias I selected became a part of the page URL.

Review: Three Locations of Article Display Options
Let’s review the three locations where article display options may be set. The article display options control what extra information gets shown with articles. The display of the author’s name, article hits, title, navigation, and more is configured here.
The three locations are:
- Global Article Component Options: When you click the “Options” button from the Article Manager page (the same page where you can get to the Global Configuration).
- The Individual Article Options: When you open an article and go to the Options tab.
- The Menu Item Options: When you access the Options tab of a single-article menu item type.
The default article options you want to use across most, or all of your articles should be set at the Global level from the Global Article Component Options page.

Options for an individual article can override the options set at the global level. You may modify these settings in the Options tab of any open article being edited.

Finally, the article options set at the menu item level for a single article menu item type will override the settings set at the global level and at the individual article level.
The only notable option that’s NOT in the “Single Article” menu item type options is the Article Layout option, which can be found at the article level or articles component level options. This is the option that allows you to select what layout override is being used for the articles component, if your website’s template supports multiple article layout options. The default template only has one layout.

Example Scenarios
- Scenario 1: You want to hide the author name in all of your articles by default. Where should you make this change?
- A: You should change this in the global options of the Articles component, under the “Articles” tab.
- Scenario 2: You want to hide the titles of all articles except for one specific menu item that links directly to an article.
- A: You should change the global article component option under the Articles tab for “Title” to hide, then set “Title” to “Show” under the menu item options.
- Scenario 3: You want to hide the intro text in 3 featured articles after a user clicks the read more link. The articles do not have individual menu item links. You still want to show the article intro text in all your other articles.
- A: You should set the global Articles component option for “Intro Text” to “Show.” You should change this to “hide” under the options tab of the three individual articles.
Conclusion
This concludes Chapter 4. We have covered all the essentials of creating, publishing, and featuring articles on the home page. In the next chapter, we will go into further detail on how to sort our articles into categories and tags, change some display options, and learn a bit more about menus.
Further Reading
- Media Management in Joomla – How to use the media manager to add videos, images, and more to your articles.
- Tag Management – How to use and manage tags.
Assignment
Instructions: Follow along with the topics discussed in this chapter. Create a few new articles relevant to your website’s topic and familiarize yourself with the editor. Make your articles as simple or as detailed as you’d like. Try adding an image to your article. Decide if you like the idea of having tags on your website. We’ll be discussing categories in more detail in the next chapter, so if you think that might work better than tags, you can omit the tags from your articles.
Here are some ideas for articles if you need help
- A contact article containing details about how to best contact you
- An “About Us” article discussing the goal or mission of your website
- An “About Me” article discussing interesting information about yourself
- An informational blog post article on any topic of interest to you
- A news piece
- A review of your favorite products