SASS is an industry standard CSS preprocessor. It was first released way back in 2006 and has evolved significantly alongside CSS.
As a preprocessor, it’s not a style language meant to be interpreted by the browser itself. Rather, it’s CSS with some extra abilities. You use SASS to transpile (source-source compile) your SASS source into CSS.
Many of the features initially introduced with SASS exist in the latest versions of CSS as well. However, they don’t all work exactly the same and in many cases, SASS is still the better option.
If you plan on becoming a web developer, SASS is an essential skill to know. It’s easy if you already know CSS. In fact, virtually anything you’d write in CSS you can do in a SCSS (Sass source) file. So you can write CSS like you normally would, while you learn to use the more advanced features SASS offers.
Key advantages of SASS include:
- SASS Variables
- This isn’t as important now that we have native CSS variables. But prior to more recent versions of CSS, SASS was the only way to use variables in CSS. They are still useful in certain scenarios.
- Mixins
- Mixins are special functions that can use variables, math, loops, and more to generate CSS. This is a powerful feature for more advanced users.
- Minification
- SASS can minify its CSS output by stripping comments and white space. This reduces the overall size of the CSS file sent to the end user and makes your site load faster.
- Used by major CSS frameworks
- Frameworks like Bootstrap are built using SASS. So if you want to easily change how Bootstrap looks, you need to setup SASS.
- Nesting
- You can nest different selectors within each other, creating a parent-child like relationship. The latest versions of CSS support this too, but it’s not yet in every browser. So SASS into backwards compatible CSS is still the better option.
Getting Started
Note that I may refer to the terms “command line”, “terminal”, and “console” interchangeably.
The best way to start using SASS is to install it using NodeJS/NPM and turn it on from the command line. There are many other tools available to help with this, including special features built into IDEs like WebStorm/PhpStorm. However, I’d suggest you just learn to do it using the commands. This will allow you to better understand how the program works and it’s really not that difficult, even if you’re not familiar with command line applications.
Install NodeJS
If you don’t know what NodeJS is, we need to start there (otherwise skip this section). Begin by installing NodeJS from NodeJS.org using the default installer for your operating system.
NodeJS is a JavaScript runtime environment. It allows us to run JavaScript applications, like SASS and other important development tools, outside the browser.
There are other, older versions of SASS that work with other environments like Ruby. However, the current version of SASS recommends using the NodeJS version.
NPM stands for node package manager. It allows us to install NodeJS packages. It’s the utility we’ll use to install SASS on our machine. Different applications have different dependencies, and NPM helps manage it all.
Install SASS
Open your favorite terminal after installing NodeJS. This could be the Linux terminal, Mac terminal, Windows Command Prompt, Windows PowerShell, etc.
Type the following command:
npm i -g sass
Then hit enter.
You should see a message that says something like “added # packages… found 0 vulnerabilities”
On my Windows PC it looked like this.

If your screen looks similar to the above, it was a success. SASS should now be available. The command “npm i -g sass” is just telling your computer to…
- npm – use the npm program
- i – install something
- -g – install it globally (available anywhere so we can use it in multiple projects without reinstalling every time)
- sass – the name of the package being installed
Troubleshooting
The most likely type of error you could encounter is probably something saying the NPM program wasn’t found. If this is you, it’s because NodeJS either wasn’t installed properly or, more likely, for some reason isn’t added to your system PATH environment variables.
For the “npm” command to work, your operating system needs to understand where the npm program actually is located. Here’s a guide I found to resolve the issue on Windows. If you’re using a different operating system, try reinstalling NodeJS or Googling the issue.
Using SASS
For demonstration, I’ll be creating a simple HTML page styled with a SASS stylesheet.
So currently, my project has two files:
- index.html
- style.scss
I’m going to create a basic container, with a simple Bootstrap-like card and a few lines of placeholder text.
SASS will turn the scss file into a regular css file (after I’ve given it the command). So I’m linking to “style.css” the head of my html file.
<!DOCTYPE html>
<html lang="en">
<head>
    <meta charset="UTF-8">
    <meta name="viewport" content="width=device-width, initial-scale=1.0">
    <title>Test Doc</title>
    <link rel="stylesheet" href="/style.css">
</head>
<body>
    <div class="container">
        <div class="card">
            <h1 class="card-header">Hello, World.</h1>
            <div class="card-body">
                <p>"Lorem ipsum dolor sit amet............."</p>
                <p>"Sed ut perspiciatis unde omnis iste natus........"</p>
            </div>
        </div>
    </div>
</body>
</html>Code language: SCSS (scss)
Next, I’ll add some style to the style.scss file. Take a look and then I’ll explain:
//some SASS vars
$primary-color: #1d2671;
$secondary-color: #c33764;

//a simple bg gradient
body{
    background: linear-gradient(to right, $primary-color, $secondary-color);

}

//create a centered container
.container{
    max-width: 1000px;
    margin: 0 auto;
}

//create card
.card{
    background-color: #fff;
    border-radius: 5px;
    margin-bottom: 20px;
    box-shadow: 0 2px 2px rgba(0,0,0,0.1);

    .card-header{
        padding: 20px;
        border-bottom: 1px solid rgba(0,0,0,0.1);
        background: $primary-color;
        color: white;
    }

    .card-body{
        padding: 20px;
    }

}
Code language: SCSS (scss)
The first few lines (1-3) are declaring variables. Variables are declared using the dollar sign followed by a name. So $primary is my selected primary color (a purple/blueish color), and $secondary is secondary color (pinkish). Values are assigned to a variable using the colon.
You can set variables equal to other things besides colors too, but colors are the most common thing you’ll see. If you ever need something to be constant, yet easily changeable, color variables are very helpful.
You can see the variables in use throughout the stylesheet. On line 7 I use both of them to create a simple gradient background.
The container class is nothing special – just a centered container to hold everything with a max width of 1000.
I used nested styles within the card class to create separate areas for the card header and card body. The card itself has rounded edges and a light shadow.
SCSS to CSS
The last step is to transpile the scss file into a CSS file. As it stands, the browser won’t load any styles, since I haven’t created the CSS file yet.
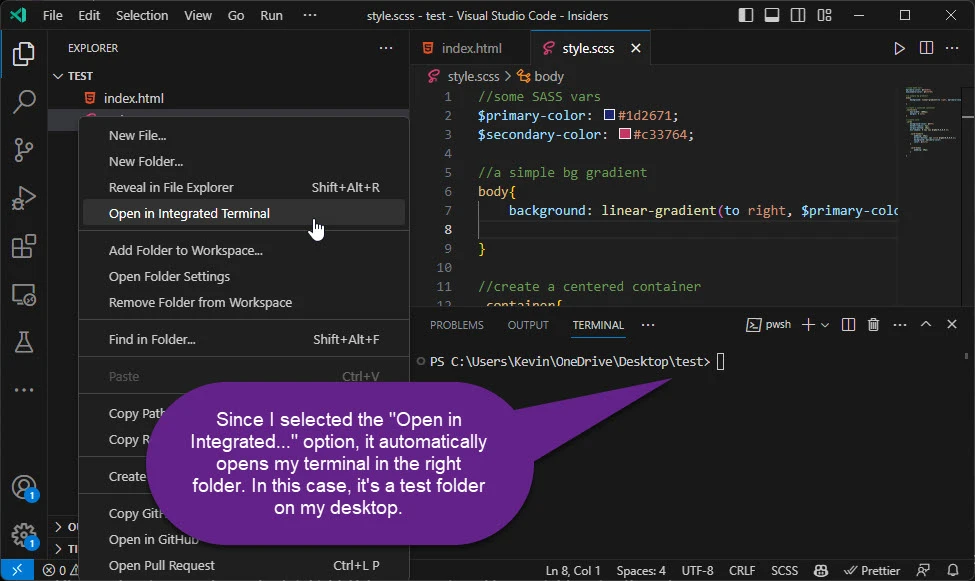
You need to open a terminal window and navigate to the directory containing the files. If you’re using visual studio code, this is very easy. Just right click anything in your project folder in the explorer and select the “open in integrated terminal” option. This will launch a terminal window in VS code and automatically navigate to the selected folder.
If you want to do this outside VS code, you can see if your IDE has a similar option. Or you can just open the default OS terminal window and navigate to the project folder yourself (usually done using the “cd” command – you’ll have to look it up).

Once you have your terminal open in the right place, all you need to do is run a SASS command and provide it the name of the scss file we’re starting with, and the name of the css file we want to create.
The command to do this one time is:
sass thesourcefile.scss:thenewfile.css
So in this case, I run the command as:
sass style.scss:style.css
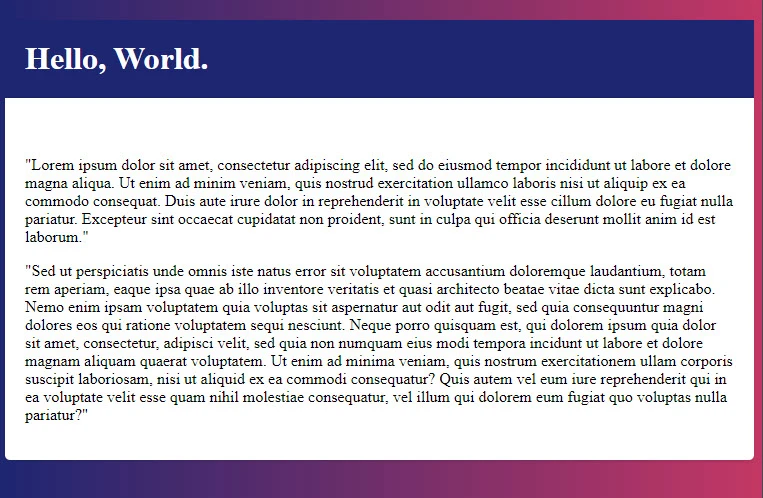
If you don’t see any warnings or errors after typing that command and hitting enter, you’ll see that the desired CSS file has been produced in this same directory. When I open my HTML file in a browser, I can see all the styles have been applied.

Yay! It works. However, there’s still a few very important commands you should familiarize yourself with.
Sass –watch
Every time you change your .scss file, you probably don’t want to retype the sass command every single time to see your changes.
Thankfully, sass has a –watch option, which works basically the same as the regular option, however, it watches the source file for changes (whenever you save it) and automatically runs whenever a change is detected.
Just type –watch at the start of the arguments after using sass.
In my scenario, the command is:
sass --watch style.scss:style.css
Once I type that, I get a message saying that sass is watching for changes. Now, whenever I save my style.scss file, the .css file is updated too!
–style compressed
We can use the style option to minify or compress the CSS file produced. This will remove white space and comments from the produced css file. It can be used by itself or in addition to the –watch option.
sass style.scss:style.min.css --style compressed
sass --watch style.scss:style.min.css --style compressed
Note that when I minified my css file, I named it “style.min.css” rather than “style.css”. You don’t technically have to do this, but it’s conventionally a good practice to get into.
You should be in the habit of always using minified css files for production websites or applications. Make sure you update the link in the head of the HTML document to use the style.min.css file instead of the style.css file used earlier.
Examine Output CSS
If you’ve been following along, your project will now have quite a few more files than we started with. You will notice the following files now exist:
- index.html – from before
- style.css – the original style.css output without the compress option
- style.css.map – a file used by web browsers to make debugging scss easier in inspector view
- style.min.css – the compressed stylesheet we produced
- style.min.css.map – same as the other map, but with the compressed file
- style.scss – our source scss file
If you open the style.css file, you’ll see it looks similar to the source scss file. However, the nesting has been removed and replaced with traditional selectors. Any of the SASS color variables I used have been replaced with their actual value.
body {
  background: linear-gradient(to right, #1d2671, #c33764);
}

.container {
  max-width: 1000px;
  margin: 0 auto;
}

.card {
  background-color: #fff;
  border-radius: 5px;
  margin-bottom: 20px;
  box-shadow: 0 2px 2px rgba(0, 0, 0, 0.1);
}
.card .card-header {
  padding: 20px;
  border-bottom: 1px solid rgba(0, 0, 0, 0.1);
  background: #1d2671;
  color: white;
}
.card .card-body {
  padding: 20px;
}

/*# sourceMappingURL=style.css.map */Code language: CSS (css)
Finally, if you open the minified stylesheet, you’ll see the entire stylesheet compressed onto one line.
body{background:linear-gradient(to right, #1d2671, #c33764)}.container{max-width:1000px;margin:0 auto}.card{background-color:#fff;border-radius:5px;margin-bottom:20px;box-shadow:0 2px 2px rgba(0,0,0,.1)}.card .card-header{padding:20px;border-bottom:1px solid rgba(0,0,0,.1);background:#1d2671;color:#fff}.card .card-body{padding:20px}/*# sourceMappingURL=style.min.css.map */Code language: CSS (css)Conclusion
Congrats! You’ve made it to the end of this little guide. Go explore more of what SASS offers at https://sass-lang.com/ or get to practicing on your next project.