
This chapter will introduce you to the IntelliJ IDE. We will explore the basics of building a program called Hello World, which simply prints the message “Hello, World.” out to the console. This is a classic first lesson for new programmers – a time-tested tradition dating back to at least 1972[1]. Although it may be unoriginal to use this exercise, we’re going to stick with tradition and plow forward. All the early programs in this series will be console based, so knowing how to print to the console is a must!
2.1: IntelliJ IDEA – Creating a New Project
First, download and install IntelliJ IDEA Community if you have not done so already. If you have selected to use a different IDE you may skip the part on IntelliJ. Just follow the instructions for creating a new project in your respective IDE.
I recommend Visual Studio Code if you don’t want to use IDEA. Skip past the first two sections, 2.1 and 2.2, if you’re using a different editor or IDE.
Remember, the Community edition is free. The “Ultimate” version is paid and has a trial. Download the community version (or sign up for GitHub Student Developer Pack to get the ultimate version for free if you’re in college/university with a .edu email address.
Project Creation Steps (IDEA)
The first screen you will see is the IntelliJ welcome screen, which prompts you to create a new project or open an existing one. On the left, there is an option to customize certain aspects of the program.

The customization screen allows you to select different themes. I believe the default is a Dark theme. If you prefer a light theme, you may change this option now. If you like it the way it is, return to the first screen.

Once you’ve selected a theme you like, return to the Projects tab and select the “New Project” option.
Now you’re on the project creation page. Name your project “HelloWorld” and leave the defaults as is.
Look at the option to select a JDK version. Unless you already have OpenJDK 21 installed, you’ll probably need to download it. IDEA can do this for us. Select the option to download a JDK.

Select and download the latest version of OpenJDK (21 or later should work fine – we are demonstrating using 21 LTS). Once downloaded and ready, click “Create” to create the project.

After creating the project, you will be taken to your project in IDEA.
If you’re on Windows, you may see a message asking if you want IDEA to manage Windows Security/Defender settings. Allow this!!! Otherwise the JDK might not load properly.

2.2: IntelliJ IDEA – Layout Overview
Look at this screenshot which shows some of the key features of the IntelliJ Editor.
As you can see, a Main.java file has already been created for us. This is a Java source file. As you might expect, the “Main” source file will be the one we start off with – the entry point to our program.

Let’s inspect the Project Explorer on the left side of our IDE so we can see how our project is structured. We can see IJ has created a base “HelloWorld” folder. In this folder, there’s another folder called “src” which is short for source code. This is where we will keep all our source code files for this project.
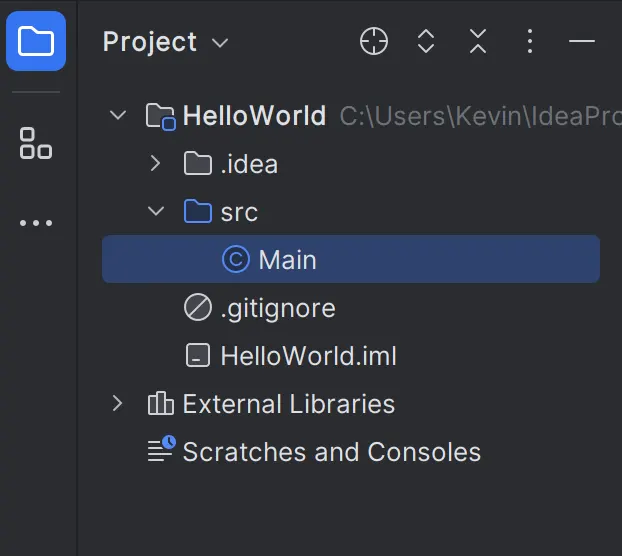
IntelliJ then further breaks down the source folder based on package name – so a com folder, kevinsguides folder, and helloworld folder in this case. The blue C icon next to the open file in the package explorer means this is a Java class file. Classes are the building blocks of objects in Java. You could think of the Main class as being the Main object for this program.
Additionally, there is a .idea folder – this is a folder created by IJ to store project settings and such. You should not need to change anything in the .idea folder.
2.3: Structure of the Generated Main Class
You’ll notice that our Main Java class already contains some basic code. IntelliJ added this when we created a console project from a template, so we can easily jump in. Delete everything within the main method, so the file looks like this:
public class Main {

    public static void main(String[] args) {
        // write your code here
    }
}Code language: JavaScript (javascript)
Classes, Methods, and Statements
The first line, package com.kevinsguides.helloworld; is a package declaration – which is where we declare the name of the package. Because we told IntelliJ to use com.kevinsguides.helloworld as our base package, IntelliJ has automatically added this line in for us. This is also a statement because it ends with a semicolon.
Statements are complete commands that are executed by the CPU. Here, the command is telling the computer what package this file is part of.
All statements in Java must end with a semicolon!

The third line public class Main { is the start of our Main class. We are telling Java to create a public class called “Main” and then anything between the opening and closing curly brace is part of that class. Note that this line does not end with a semicolon – we are not telling the computer to do anything yet, we are just giving the class some structure. Classes start with opening curly braces (line 3) and end with closing curly braces (line 8). Note that the name of a class should be the same as the name of the file it’s in – so the Main class is in a file called Main.java.

The fifth line, public static void main(String[] args) { is the start of our main method. A method in Java is a set of code statements are grouped together to perform a certain operation. Methods should be named based on the operations they perform, and you may also hear them referred to as functions. The statements in a method are executed linearly from top to bottom. Like classes, methods are contained within a set of {curly braces}. The main method is the entry point to a Java program. Java looks for this method when it executes the program and any code entered here is executed first. We will cover the specific details of how the main method works in a later chapter.
For simple programs like HelloWorld, all the statements we make will be within the body of the main method. The bulk of our code for the first few chapters will take place in the main method, though we may be calling or using other methods accessed from outside classes. Down the road, we will learn to create more advanced applications that use multiple methods and classes.
Comments
Finally, on line 6, we see //write your code here. The two forward slashes mean this is a comment. Comments are sections of code ignored by the Java compiler when writing programs. They are used to take notes and explain what is going on. It is a good practice to use comments in your programs so you can understand what your code is doing when you come back to it later, or to explain what the code is doing to people reviewing your work. This is just a placeholder IntelliJ put in to tell us that this is where your code goes.
Comments can be written in a single line or block comments can be created using forward slashes and asterisks, as shown below.
//this is a comment in a single line
/* this is a
multi line comment
block that Java will also ignore */Code language: JSON / JSON with Comments (json)
Keywords

Study the code again. In the diagram, notice all the words outlined in purple. These are all keywords. Keywords are words reserved by Java that you cannot use to name things. This means, for example, that you cannot call your class file “package” or your method “class.” You can’t give your package the name public. We cannot use them as names because Java is using them for something else.
Case Sensitivity
When coding, always remember that Java is case-sensitive. Case-sensitive means it makes a difference when you’re typing if you use capitalized or lower case letters. A method named “Main” is not the same as a method named “main”. If you accidentally change the capitalization of any words, your program may run into errors.
We must also follow certain naming conventions when writing Java programs. We name classes with Pascal Case, which is a naming system that starts each word with a capital letter and has no spaces between words. So, for example, if we were to create a class file representing a pirate ship, we might call it public class PirateShip.
In other situations, such as method names, we use camel Case. camel Case starts with the first letter of the first word being lower case, and every word thereafter beginning with a capitalized letter. This is why the word “main” in public static void main(String[] args) is written lower case. If it was a longer method name, it might look like this: thisIsAnotherMethod(){
Here’s a final example: ThisIsPascalCase and thisIsCamelCase
2.4: Our First Program & The println() Method
Our first program is called HelloWorld. It will probably be the simplest, most boring program you ever work on. All it does is one thing – print the message “Hello, World.” to the computer’s console.
So we just need to start writing some code where it says // write your code here
The line of code we will add to the main method is as follows:
System.out.println("Hello, World.");Code language: CSS (css)The entire file should now look something like this:
package com.kevinsguides.helloworld;
public class Main {

    public static void main(String[] args) {
        //print a message to the console
        System.out.println("Hello, World.");
    }
}Code language: JavaScript (javascript)
When we press the start/play button in IntelliJ, it should look like this:
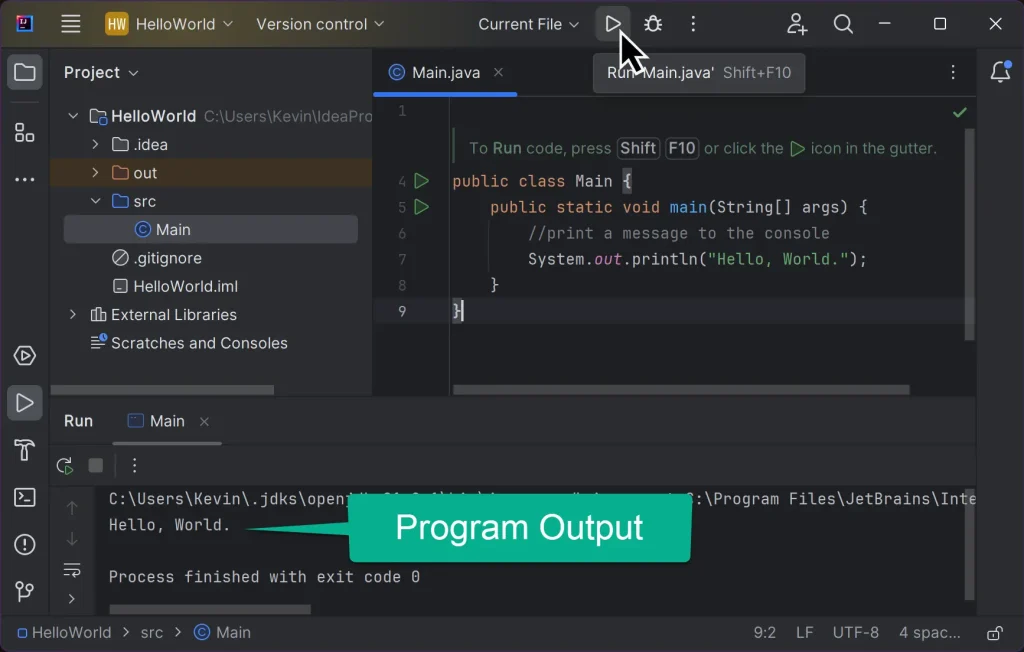
Note that the line of code System.out.println("Hello, World."); ends with a semicolon, like the very first line. This means that this is another statement. We are commanding the computer to print out a message that says “Hello, World.” Also, note how everything is indented – the class is on the outside, the main method is indented one tab space, and the contents of the main method are indented two tab spaces. You don’t technically have to indent like this for the code to work, but it is a highly recommended practice as it makes the hierarchy of code groups easy to determine.
So what’s going on with the code? The first thing to look at is the System.out object. We’re already using objects! As was explained before – objects are essentially just things in Java that can do more things for us. In this case, the System.out object represents the standard output stream – where consoles applications send their text. So we are accessing the output stream and calling its println method. The println method is basically a function of the output stream which allows us to print a line of text to the console. println stands for print line. It takes a string, or sequence of text characters, encapsulated by quotation marks as its argument. An argument is a piece of information we pass on to a method.

So in summation, in this statement we are calling the println method of the standard output stream and passing it an argument with the message “Hello, World.” as a string of text.
Println With No Argument
What happens if you use the println method, but don’t give it a String as an argument? What if we just leave the argument blank?
System.out.println();Code language: Java (java)If we use the println method with no argument it will simply print out a blank line, as is shown below:
System.out.println("Hello,"); //First line
System.out.println(); //Create an empty line
System.out.println("World."); //Third lineCode language: Java (java)
The console output would look like this:
Hello

World
The Debugger & Troubleshooting Issues
If you get any error messages, they will be displayed in the lower area where the terminal is. The Java Development Kit includes a debugger, which is the software used to help trace and report errors. If you have any errors, they will be reported by the debugger with some sort of explanation about what went wrong. IntelliJ automatically displays messages from the debugger when things go wrong.

If you encountered any errors, go back and double-check that everything is typed correctly, that every statement ends with a semicolon, and that you typed every word in the proper case. For example, if you typed system.out.println instead of System.out.println – your program will not work. The screenshot shows this.
IntelliJ even colored the word system in red to indicate that something’s wrong. There are red underlines all over the project explorer indicating what files have issues.
Common Issues
Here are some of the most common errors you might run across:
- Misspelled Words
- If you type a method name wrong, like System.out.prntln() instead of System.out.println() your program will not work.
- Forgetting Semicolon
- All statements must end with semicolons. If you forget one or more your program will not work.
- Forgetting Keywords
- Keywords like class, public, static, etc. are essential to the function of a program. If you forget to type the static keyword in the main method your program will not run.
- Failing to use curly braces properly
- All classes and methods must begin and end with an opening { and a closing } curly brace. Forgetting one or accidentally adding one where it does not belong will make your program fail to run.
- Logic Errors
- These are harder to solve because they might not be caught by the debugger. Things like using the wrong formula to calculate something, or not doing things in the proper order could be considered logic errors. Your program may behave unexpectedly because you did not account for something properly in the logic when you designed it.
- Even experienced programmers have logic errors sometimes. It can take a lot of hunting in large projects to figure out exactly what’s going wrong.
If you have tried all of the above steps and you still cannot get your program to run, try copy pasting the entire program. Make sure your class file is named Main in the project explorer, just like the example image. The package declaration on line 1 is not really necessary in this example, so you may remove that. If nothing works, you may try to download the entire project and import it into IntelliJ. Finally, there may be a more technical problem with your installation of the JDK or JRE. Visit Oracle and try to download and reinstall the JDK. You may sign into Kevin’s Guides and post a comment using the form at the bottom of this page for any additional issues.
The API
So how did I know to use System.out.println() in order to print this message to the console in the first place? Well I memorized it. In time, you will memorize a lot of commonly used methods from the API. However, if you need to look something up everything is explained in the Java API Specification. This documentation provides details about what each pre-built object in the API is used for and what each of their methods do. If you forget a particular method name or don’t know how to do something – Google is your friend. Understanding how to look at the API and read documentation to figure things out is an essential skill for programmers.
2.5: Additional Print Methods
In addition to println, there are several other methods we can use to print text to the output stream. They are the printf() and print() methods. Let’s take a look at the differences between them.
First off, println prints out a line of text. The sample code below contains two println statements.
public static void main(String[] args) {
     System.out.println("Hello, ");
     System.out.println("World.");
 }Code language: JavaScript (javascript)
The output of that code in the terminal is as follows:
Hello,
World.
Note how the words “Hello” and “World” are on separate lines. That’s because the println method always starts printing on a new line.
Now let’s compare this to the print method, which does not add a new line.
public static void main(String[] args) {
     System.out.print("Hello, ");
     System.out.print("World.");
}Code language: PHP (php)
The output of the code using print instead of println is “Hello, World.” all on one line as shown below:
Hello, World.
Finally, we have the printf method – which stands for printing a formatted string of text. We’ll get more into the details of this later, but for now understand that it behaves similarly to the print method.
public static void main(String[] args) {
     System.out.printf("Hello, ");
     System.out.printf("World.");
}Code language: JavaScript (javascript)
Terminal:
Hello, World.
Note that if we use the print or printf methods with no arguments, the program will crash. We can only use the println() method with no arguments to print a line of code, as there’s no point in printing nothing.
2.6: Code Completion & AI Features
IntelliSense, also known as code completion or code hinting, is a feature which automatically helps complete code as you are typing it. While the exact functionality and usefulness may vary somewhat between IDEs, it is generally a very helpful tool to use.
With advancements in machine learning and generative large language models like ChatGPT, features such as GitHub Copilot, IntelliJ AI Assistant, Google Bard, and more, can help analyze your code, explain and resolve errors, and even write part of code or entire functions for you. I will collectively refer to these features as artificial intelligence (AI), as that’s the term everyone’s throwing around.
IntelliSense
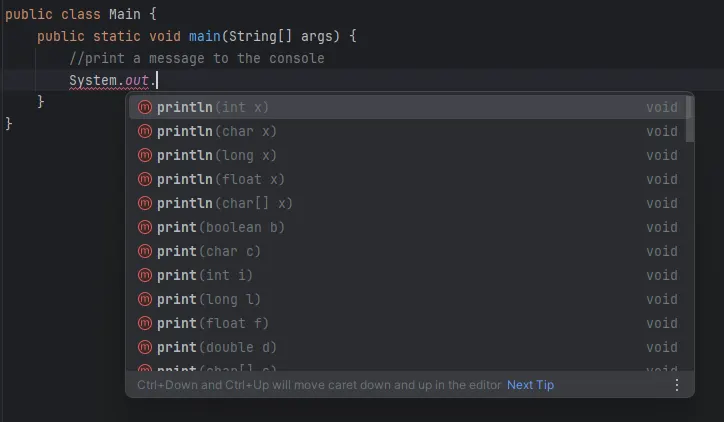
As you are typing, IntelliSense will detect and look up names such as packages, classes, and methods, which correspond to what you’re typing. You may have noticed this behavior already. For example, if I start typing the statement to print out a line of text saying “Hello, world”, a pop-up comes up beneath the code as I type it. This contains a list of all the options related to what I’m typing. As I type System.out.p a window will come up with all the methods or functions provided by the System output stream, starting with the letter p. In IntelliJ IDEA, it looks like the println method is the first to appear.
If you see the code you’re looking for in the window, you can immediately insert it by either:
- Using up/down arrow keys and hitting enter on the selected item
- Double clicking the code you want to insert
- Just hitting the tab key to insert current selected item immediately (very useful if you want to insert the first automatically selected item)
This behavior is usually the same across most IDEs by default.
The exact behavior of IntelliSense can be further customized in settings.
AI Assisted Programming
AI assistance features in programming vary depending on the exact feature and model you’re using. While it can be extremely helpful, and I encourage experimentation with new features, I question the impact of using AI if you are just getting started with programming. Especially if you’re using it to generate entire functions, or complex functions.
My chief concern is if you rely too heavily on AI assistance, you will not learn the fundamental concepts of programming. You need to code yourself, debug errors, and analyze your code thoroughly to become a good software developer. If all you do is use code generators, you will probably not fully understand how the functions you’re using work. This could lead to unexpected but avoidable errors, code efficiency/performance issues, and many other problems. Essentially, at this point at least, generative AI code completion tools should be avoided by beginner programmers. Once you are more advanced, and have more practice, you’ll better understand what AI generated code is doing and how it works. This will lead to better outcomes for the applications you develop and your career in programming.
Additionally, if you end up working in industries dealing with very sensitive information, such as the military or security/defense industry, the AI features you’re allowed to use will probably be heavily restricted, if you’re allowed to use them at all. This could apply to other companies as well. Depending on the policies set by your company, you may not be allowed to use AI. Therefore, having a solid understanding of programming without AI could give you a solid leg up in the industry and make you a more valuable developer.
With that out of the way, let’s examine how these AI features work and which features may be beneficial, even as a novice programmer.
To use many of these features, you either need to pay for subscription access or have a qualifying student account. I am not going over how to set up these features here, you can review that with your respective IDE documentation. I know IntelliJ, VS Code, and Visual Studio all support forms of AI assistance.
Code Generation
First, let’s talk about the feature I think you should avoid when getting started. AI features such as GitHub Copilot’s Code Suggestions.
Copilot’s Code Suggestions feature can auto-generate code for you. You start typing and it will generate the code it thinks should come next. This might be a single line of code, many lines of code, or even entire functions.
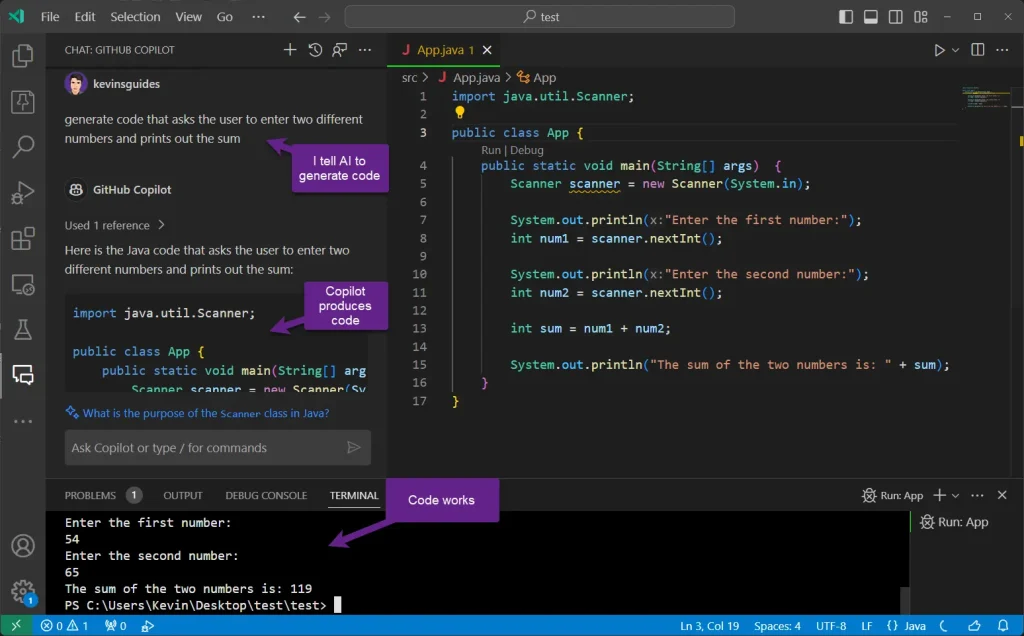
Look at this example where I enable copilot and begin typing a comment about what I want the code below to do. In this case, I want it to ask the user to enter a two numbers into the console and calculate the sum of the numbers.
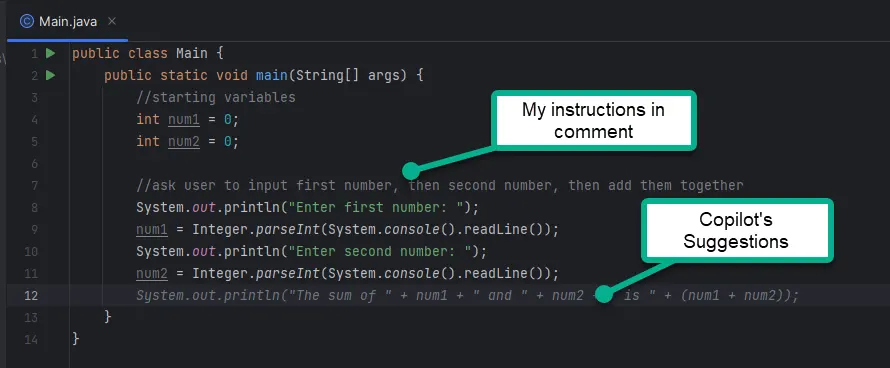
Copilot generated all the code above based on the two comments I made. I just accepted each line as they were generated. I didn’t actually write any code here.
While useful at times, the code generated in this example isn’t even how I want to do it! In the following chapters, you’ll learn how to achieve the above using different fundamental objects and methods. We haven’t gone over what any of those lines of code does other than the parts with System.out.println
In fact, if I run that code as is, I get an error. And without understanding what’s going on, it will be difficult to fix.
Code Discussion/Chat
Another way of using AI to help you code is by interacting with it like a chatbot. Similar to how you might ask a question with Bing’s new AI features, or directly to OpenAI’s ChatGPT.
This can be used both to auto-generate code, and to help fix errors in your existing code.
First, let’s look at its use in code generation. In this example, I’m in VS Code’s Copilot discussion window. I ask it to generate the code that finds the sum of two numbers, and it does that. But additionally, Copilot explains what it did and how the code works. I can also ask follow-up questions if I have any.
Note that this code varies from the code generated by asking a similar prompt in IntelliJ IDEA (also using Copilot). In fact, this code actually works without modification and is basically the same as the code you’ll learn about in the upcoming chapters.
While I’d still avoid using this to begin, it’s undeniably a powerful and valuable feature. Also, since it explains the code a bit, you can still learn a bit about how the code is working. So it has educational value. If you’re dead set on using generative AI from the start, I think this is the better way to do it.
AI Debugging
Finally, generative AI can be very useful to detect problems with your code and find resolutions. Besides just generating code, Copilot’s discussion feature can analyze your existing code and help fix problems.
Check out this example, where I again forget to capitalize the S in “System” and I forget a semicolon at the end of the line printing hello world.
I just ask Copilot what I did wrong. It explains it and finds a resolution.
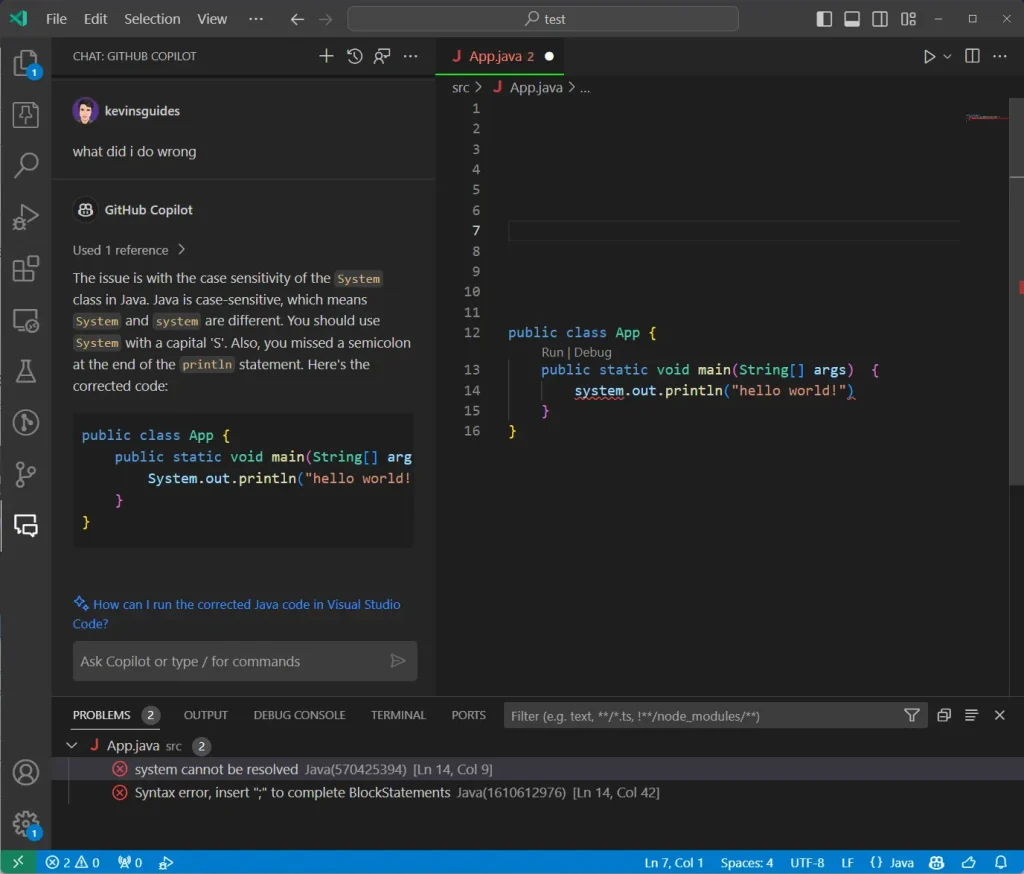
Now that’s pretty cool. Copilot should be able to reasonably fix most beginner errors and mistakes. However, as your programs become more advanced and you develop complex algorithms, it may become less useful. Of the AI technologies discussed, I think this is the only one you should use to start. However, for learning purposes, you should review error codes and try debugging your code yourself for several minutes before trying to use AI to resolve it. Fixing problems yourself has more educational value, will improve your thinking skills, and in my opinion is more satisfying than blindly asking AI to do everything.
Assignment
The assignment for this chapter is to try out all the code in this chapter. Create your project and try changing the HelloWorld code to print out whatever messages you want. Try each different type of print method. Basically, as long as you got your message to print to your terminal without errors, you have completed this chapter.
Conclusion
This concludes Chapter 2. In this chapter, we covered how to create new Java projects in IntelliJ IDEA, how to print to the console using print methods, and basic debugging tips. In the next chapter, you will learn how to use variables to store and manipulate information.